Search My Blog

Sunday, May 31, 2009

Yummy Potato Salad

So, I had some potatoes lying around and I was trying to decide what to do with them. Mash? Sautée? Boil? Fry? All delicious options, but all too heavy for the 45 degree weather in Dubai!

Perhaps that's why I hadn't eaten those potatoes yet! Then it came to me. Potato salad. I absolutely love potato salad. It reminds me of picnics in the park, family gatherings, and summer time. Perfect!

Now the question was, did I have everything else I needed to make potato salad. Well, that's the thing. Salad is so so versatile. You can make a dressing with basic pantry staples and then enhance the salad with whatever is left in the fridge.

Today, I toyed with the idea of skipping the heavier mayo based dressing and going with a light olive oil, lemon and caper dressing. That is, until I saw the mustards in the fridge.... it changed everything. Nothing better than a creamy mustard dressing to complement potatoes!

I also like to add veggies to my potato salads because of the contrasting textures: slightly soft boiled potatoes with the crunchiness and freshness of raw veggies. And then if you want to really dress it up? Add sliced boiled egg or crispy bacon (or both) on top. What a treat!!


Yummy Potato Salad
Serves 2

2 Large Potatoes
1 Shallot, chopped
1 stick celery, sliced very thinly
3 tbsp Mayonnaise
2 tbsp Grainy Mustard
1 tbsp Dijon Mustard
1 tbsp Extra Virgin Olive Oil
Salt and Pepper to taste

Optional: Sliced Boiled Eggs, Crispy Bacon (crumbled)

Boil potatoes for about 25 minutes, until just fork tender. Let cool (best if overnight in the fridge). Cut potatoes in large dice. Place in a bowl with chopped shallots and sliced celery.

In a separate bowl, mix mayonnaise, mustards and olive oil. Add the dressing to the potato mixture. Season with salt and pepper to taste.

Optional: Garnish with slices of boiled egg, or crispy bacon crumbled over top

Wednesday, May 27, 2009

Cumin Scented Lentil Soup with Country Bread Croutons


Today was not a good day. Period. What more can I say?

And when I arrived home, I needed something warm and comforting. Something familiar. So I reached into my freezer, and took out some homemade lentil soup. Already reserved for a day like this.

Everyone has days like this. Or days when it's cold or rainy outside and all you want to do is to stay at home, snuggle under a blanket, and watch movies. Or days when you are having company over, and you need an easy starter or a light lunch. Or days when you have a cold and want something that will make you feel better. Or maybe you just want to stock up the freezer in preparation for days like this (or for days when you don't have time to cook). It could even just be the end of the month and you are runny out of money. But hey, everyone needs to eat!

For all these occasions, this is the perfect recipe. Cumin Scented Lentil Soup.

Sounds kinda exotic? Don't be intimidated. Everything is easily within reach, in any grocery store anywhere in the world.

Sounds time consuming? Not at all! This recipe is so so easy. Just sweat off the veggies, add the lentils and stock, and let it cook away. Blend and serve. Could not be easier.

Think your guests might not like it? Think again! Everytime I make this recipe, my guests adore it! My husband asks me to freeze it, my friends ask for the recipe. In fact, I am making this soup and posting this recipe today to share it with my friends, who have been begging since they tried it.

So, get over any fears that you might have, and try this soup. It’s worth it! I am sure that once you try it, the ingredients will become staples in your pantry, and you will keep some in the freezer for those days when you just don't have the time.


Cumin Scented Lentil Soup with Country Bread CroutonsServes 6-8

1 tbsp Oil
2 cup Onions, Cut into chunks
1 cup Carrots, Cut into chunks
1 cup Celery, Cut into Chunks
1 Bay Leaf
2 tbsp + 1 tsp Ground Cumin
2 cups Green Lentils, Rinsed and checked for stones
2 liters of Veggie or Chicken Broth
1 tsp Salt
Freshly Ground Black Pepper
Bread Croutons
Lemon wedges

In a large pot, heat oil over medium heat. Add onions, carrots, celery, and cumin and cook until just starting to soften, about 2 minutes. Add bay leaf, lentils and broth. Reduce heat to medium-low, cover, and let simmer until lentils are tender, about 45 minutes.
Once lentils are cooked, remove bay leaf. Blend the soup either using a hand blender, or pouring the soup into a blender (be very careful as the soup is hot. If using a blender, work in batches, only filling the blender container halfway each time). Soup should be a thick liquid consistency. If too thick, add a little more broth. Add the remaining 1 tsp of cumin and salt. Season to taste with additional salt and pepper.
Serve herbed bread croutons with lemon wedges for squeezing in before eating.

To freeze, let soup cool, then place in freezer proof containers or bags and freeze. Reheat over stove or in microwave


Herbed Bread Croutons
Slices of Country Bread
Herbs de Provence or any mixed dried herbs (Italian seasoning, or mix of basil, rosemary, thyme, oregano)
Olive Oil
Sea Salt

Slice country bread. Drizzle with olive oil and sprinkle generously with herbs and salt.
Bake in oven until toasted. Enjoy in slices or cut into chunks for soup.

Monday, May 25, 2009

Simple and Light Anytime Spaghetti with Shrimp and Courgettes in a Lemon Butter Sauce


Everyone likes pasta. Especially as a go-to food when we are busy and need an easy meal-- something that is fast and simple that we can whip up any time of day.

This tasty recipe with shrimp and courgettes is one of those recipes. It is so easy that it can be prepared even on your busiest days. It is also a great recipe for entertaining, because the minimal prep can be done in advance, and with only 10 minutes of cooking, you are not slaving in the kitchen isolated from your guests.

Use these tips to make this recipe as easy and stress free as possible: To save time, buy your shrimp already peeled and cleaned. Then, cut the courgettes and shallots (2 minutes of work). This is all the prep you need! Now, in the time that the pasta cooks (8-10 minutes), you can easily prepare the “sauce.” Then all you have to do is toss the pasta and the sauce together and serve. This means the pasta and sauce both stay fresh, and you only have to do just minutes of cooking!

So, try this recipe. I am sure that you will find it light, fresh, and easy as pie (well, actually, it’s easier than pie…).


Simple and Light Anytime Spaghetti
with Shrimp and Courgettes in a Lemon Butter Sauce

Serves 2 hungry people (4 people as starter)

14 pc size 20/3o Fresh Shrimps (about 500 grams), cleaned and peeled
(to use frozen, let thaw in fridge before cooking)
3 cups Courgettes (Zuchinni), sliced longwise into strips about 1/2 cm thick, 10 cm long
1 Shallot or Small Red Onion, diced finely
4 tbsp (60 grams) Butter
2 tbsp Olive oil
Salt and pepper
Zest of 1 lemon
Juice of 2 lemons
200 grams pasta
Salt and Pepper to taste

Cook pasta in salted water until al dente.

While the pasta is cooking… In a pan over medium heat, add 1 tbsp of the olive oil. Add shallots and courgettes and cook for just 2- 3 minutes until courgettes are starting to soften but still crisp to the bite. Add shrimp and toss. Add lemon zest, lemon juice and butter. Cook for about 1-2 minutes, until shrimp are just cooked (they will turn pink). Be careful not to overcook.

Drain the pasta, reserving about 1/8 cup pasta water. Put back into pasta pot with reserved water and add the remaining 1 tbsp of olive oil. Toss. Add the shrimp mixture into the pasta. Season with salt and freshly ground pepper to taste. Enjoy!

Thursday, May 21, 2009

Dark & Moist One- Bowl Chocolate Cake with Chocolate Ganache


Who doesn’t love chocolate cake? And this time, Martha Stewart really has the perfect recipe. It is easy and uses only 1 bowl, so clean up is a breeze! (Two bowls if you use this recipe along with my ganache which follows).

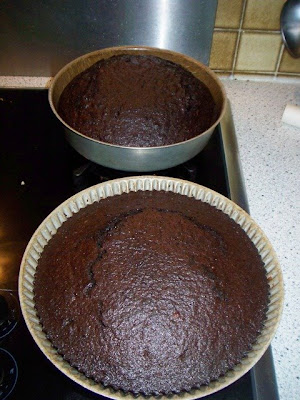
The reason I especially love this recipe is because it is dark, extremely moist, and keeps well. What do I mean by “keeps well”? To be honest, I made this recipe, served one cake for a birthday and kept one in a cool room (about 12 degrees), uncovered, and unfrosted. Then 2 days later, frosted it with ganache and served it. The cake was just as good and moist as the day it was made! Nothing better than 2 cakes for 2 occasions made so simply at one time!

I have already replaced any other recipes I had for chocolate cake with this one. Whenever I need a quick and easy celebratory cake or a treat for my loved ones, this rich and delectable cake is it. Try it!


One Bowl Chocolate Cake (or cupcakes)
From Martha Stewart’s Baking Handbook

Makes two- 8” round cakes or 2 dozen cupcakes

2 1/2 cups all-purpose flour
1 1/4 cups cocoa powder
2 1/2 cups sugar
2 1/2 tsp baking soda
1 1/4 tsp baking powder
1 1/4 tsp salt
2 large whole eggs, plus 1 large YOLK
1 1/4 cups milk
1/2 cup plus 2 tbsp vegetable oil
1 1/4 tsp vanilla extract
1 1/4 cups warm water

Preheat the oven to 350F. Line your cake pans or muffin pans with paper liners or spray your cake pans with cooking spray.


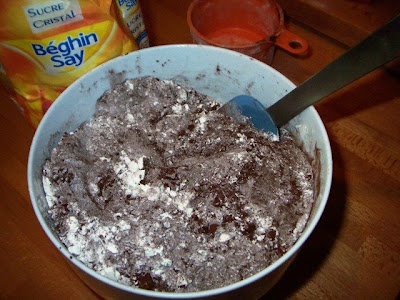
Sift together flour, cocoa, sugar, baking soda, baking powder and salt in a large mixing bowl.

Add the eggs and yolk, milk, oil, vanilla and water, and beat with an electric mixer on low speed until smooth and combined (about 3 minutes). Scrape down the sides of the bowl as needed.

For Cake, divide the batter evenly among the cake pans and bake for 45 minutes until a toothpick inserted in the middle comes out clean. For Cupcakes, fill the muffin cups about 2/3 full and bake for about 25 minutes.

These cakes or cupcakes can be eaten as is or can be frosted. Before frosting, cool the cake or cupcakes completely .


You can frost the cakes individually or you can layer them with ganache in the middle, then decorate however you like!


Yummy Chocolate Ganache
170 grams of Semi Sweet Chocolate, in pieces
¾ cup Heavy Whipping Cream (35% butterfat)

Place the cream in a microwave large proof bowl and microwave on high for about 2 minutes until very hot. Add chopped chocolate and let stand for 3 minutes. Stir until smooth then let the ganache sit at room temperature until cool or slightly firm. Beat until creamy. Use as frosting.

Friday, May 15, 2009

Delicious Lemon Cake with Lemon Glaze


I don't have much of a sweet tooth. However, I do bake a lot for my friends, for special occasions, and of course, for my husband, who loves anything sweet.

My "go to" recipes are my chocolate chip cookies (already shared in a previous posts), chocolate cake with various flavors of icing like mocha and coconut, and crepes, an easy, last minute dessert.

However, a few days ago was the birthday of a work colleague. We were leaving town the following day, so I didn't have many options available in the fridge except for a bag of lemons. I was thinking of making one of my favorite lemon desserts: a lemon tart, or a lemon meringue pie, but honestly, didn't feel like making the effort. As for my lemon polenta cake (mentioned a few posts ago), well, I had just made some and was in the mood for something different.


Thus, I went in search of a lemon cake recipe. One that would have the fresh and zingy acidity from the lemons, but also be a satisfactory celebratory cake. So, I logged into one of my favorite and most reliable baking websites (joyofbaking.com) and found what I was looking for. A recipe for Lemon Frosted Lemon Cake. And it did not disappoint. I made it easily within and hour in the morning, let it cool while I showered and dressed, quickly mixed the glaze and literally dumped it over top.

Besides the simplicity of the recipe, it was a crowd pleaser. It was light and moist and had the perfect balance of tart and sweet. And I was able to make a 9 inch round plus 3 small cupcakes (which I left for my husband to enjoy).

So, I encourage you to try this recipe if you would like an alternative to a more traditional chocolate cake or vanilla sponge cake. You won't be disappointed!


Lemon Cake with Lemon Glaze 
Recipe from http://www.joyofbaking.com/LemonFrostedLemonCake.html

Makes one 9" round cake

1 cup Unsalted Butter at Room Temp
1 cup White Sugar
4 large Eggs
1 tsp Vanilla Extract
Zest of 1 Lemon (preferably unwaxed)
2 cups Flour
2 tsp Baking Powder
1/4 tsp Salt
1/4 cup Fresh Squeezed Lemon Juice

For Glaze 
1 cup Icing Sugar
  2tbsp Fresh Lemon Juice

Preheat oven to 350 degrees F (180 degrees C) and place rack in the center of the oven. Butter, or spray with a nonstick spray, a 9 inch (23 cm) springform pan and then line the bottom of the pan with parchment paper. Set aside.

Cream the butter and sugar until light and fluffy and pale in color (about 3 minutes). Add the eggs, one at a time, mixing well after each addition. Beat in the vanilla extract and lemon zest.
Sift together the flour, baking powder and salt and then add to the batter along with the lemon juice. Mix only until incorporated.

Pour the batter into the prepared pan, smoothing the top with an offset spatula. Bake about 45 minutes, or until a toothpick inserted in the center comes out clean. Place on a wire rack to cool, then gently remove the sides of the pan.

For the glaze, combine the sifted confectioners' sugar with the 2 tablespoons lemon juice. (You want the icing to be thicker than a glaze but still thin enough that it will just run over the sides of the cake. If not the right consistency add more lemon juice or powdered sugar, accordingly.) Frost the top of the cake, allowing the icing to drip down the sides. Let the icing set before covering.

Wednesday, May 13, 2009

The Perfect Scrambled Eggs


Scrambled Eggs. So easy to make, yet so difficult to get right. Overcooked, rubbery, dry... it happens all to often. And honestly, before I met my husband, I rarely made scrambled eggs, and when I did, I didn't make them well.

You will hear so many tricks to making good scrambled eggs: Beat them for 5 minutes until they are pale yellow, add milk, add water... but they never really turn out soft, and fluffy, and moist like they do on TV.
But I really believe that I have perfected the art of scrambled eggs. After many trials and a lot of feedback from my husband, I think this is it.


Now, to be perfectly honest, when I cook, I really don’t measure. That’s why I love it. But for the sake of this blog and wanting you to recreate this breakfast perfection, I am measuring everything for this recipe.

I know this simple recipe is starting to sound a little intimidating. Measuring ingredients, fear of overcooking, etc etc. Well, don't worry. It really is easy. But, this is not the kind of dish that you can leave cooking on the stove. You need to nurture it or risk failure. Having said that, it’s literally less than 1 minute of nurturing.
So, let's take 3 minutes out of the day and make some scrambled eggs. Heck, let's take 5 minutes and make some toast too!


The Perfect Scrambled Eggs
Serves 1

2 large eggs
2 tbsp heavy cream
¼ tsp rock salt
¼ tsp freshly ground black pepper
1 tsp oil

In a bowl, combine eggs, cream, salt and pepper. Beat well.


In a small pan, heat oil on medium heat. When hot, add eggs, and using a spatula, keep pushing around and moving the eggs so that they do not stick to the pan. When halfway cooked (less than 1 minute), take off the heat. Give a few more turns, then turn out to a plate. The eggs should still be runny and soft.
Even if you like your scrambled eggs well cooked, they should not be rubbery. Take them off the heat when half way cooked, and keep turning them until they are just under the consistency that you like, then turn out to a plate and eat immediately.

Monday, May 11, 2009

In Search of the French Sandwich...


So, we are in France. And the entire week leading up to this trip, all I could think about was finding a sandwich upon landing. No joke.

At this point, you probably think I am delusional. I mean, who gets excited about food and can’t stop thinking about it for a whole week leading up to a trip? And not just any food-- a sandwich of all things?!? Yup, that’s me. I even wrote it on the “To Do” List.

Crazy as it sounds, the sandwiches in France are the absolute best. They are simple, but perfect. The crunch of freshly baked bread which cannot be replicated anywhere else, the creaminess of the butter, the saltiness of the ham, and the pungency of the cheese. There is absolutely nothing better than a great French sandwich.
Now, you are probably thinking that this is an easy craving to fix right? Well, it should be. Flying into any French airport would give ample opportunity to satisfy this sandwich craving. But we usually fly into Geneva airport, then drive into France. And the recently renovated, lone snack bar in the “Secteur Francais” of the Geneva Airport serves sandwiches, but overpriced and really not that good. Perhaps it’s because they are sitting in a refrigerated vitrine all day. Or perhaps it’s the price that leaves a sour taste in your mouth.

So, we need to find the fix en route. The problem is that upon leaving Geneva Airport in a rental car (a Citroen if we are lucky, and a Fiat Punto if we aren’t so lucky…this time with a German license plate), there is so much stress to find the right roads to France while avoiding the Swiss highway tax, that we cannot even think about find a boulangerie to satisfy the craving.

Once successfully in France, after either navigating the correct roads or sneaking onto the highway and gunning it to France before someone notices we don’t have the vignette (Swiss highway tax sticker), we find ourselves on a highway, laden with gas stations and rest stops stocked with overpriced, mediocre fare that doesn’t do justice to the real French food, let alone the sandwich. And before we know it, we are either home, sans sandwich, or pulling up to a crappy gas station in a vain attempt to satisfy the craving before lunch time.

But this trip was different. We decided we could no longer play this silly game. We needed the real thing. The real sandwich. The crusty bread. The salty ham. So, we pulled off the highway into a small town in search of a cash machine and a boulangerie. Conveniently, we found both right across from each other. What a treat it was to walk into the boulangerie. The smell was intoxicating. And of course, it was stocked with fresh sandwiches, tarts, flan, meringue. It was all there, just as I remembered it. But, this was not the time for gluttony. Only 1 hour off the plane, and 1 hour away from a home coming lunch, we needed to deal with the task at hand. We made straight for the sandwiches, and not being able to resist, we took two. One Jambon Cru et Raclette (Cured Ham and Sort of Stinky Cheese) and one Jambon Blanc et Fromage (Cooked Ham and Cheese).

Once in the car, we attacked them one at a time. And boy, were they delicious. Everything I had been dreaming of. That crunch. That chewiness. That saltiness. It was all there.

And before we knew it, we were on the road again. Direction: Home. Objective: Lunch with the family (Pate, Pork Chops, Salad and Gratin Dauphinois).

Perhaps one sandwich would have been enough???

Saturday, May 9, 2009

Simple Spaghetti with Tomato & Basil


There are times when we just crave simplicity. Good company and simple, no-fuss food. That's it. No drama. No mess. No questions asked.

So, here it is. Simple. Easy. And in one pot. To satisfy anyone and everyone on the days when you just want to relax and enjoy the simple things in life. Fresh. Flavorful. Filling. Enjoy!

Simple Spaghetti with Tomato & Basil
Serves 2 hungry people

160 grams Spaghetti
¼ cup tomato paste
1/2 cup water, or enough to thin the sauce
1 red onion, thinly sliced
Handful of fresh basil chopped
Extra Virgin Olive oil
Salt and Freshly Ground Black Pepper

In a large pot of salted water, cook spaghetti per manufacturer's instructions until al dente (about 8-10 minutes). Drain and toss in a little olive oil to prevent sticking.

In the same pot that you just cooked the spaghetti, heat about 1 tbsp of olive oil. Add the red onions and sautee for just 1 minute, until starting to soften. Add tomato paste and water and cook for about 1 minute until the sauce is warm. The sauce should just coat the back of a spoon. Add more water if the sauce is too thick. Season with salt and freshly ground black pepper.

Add the cooked spaghetti into the sauce and toss until evenly coated. Add the freshly chopped basil and remove from heat. Divide onto 2 plates and drizzle with some extra virgin olive oil. Enjoy immediately.

Friday, May 8, 2009

Whole Wheat Apple-Raisin Muffins


Muffins…how can you not love them? Not only are they versatile, individually portioned, anytime snacks, but they are also so simple to make.

Muffins are a “quick bread” and the title is far from deceiving. Most muffins take less than 10 minutes to mix and about 20 minutes to bake. What could be easier?

The only problem with muffins is that commercially, they have become a sugary, fatty, sticky mess. They have been tagged in health circles as “unhealthy” because of their high calorie and fat content. Especially those purchased in coffee shops, which are not only laden with sugar, but are about 3 times the size of a regular muffin. However, making your own muffins is easy and can be very healthy, depending on what you put in them.

I love these Whole Wheat Apple-Raisin muffins because they are not overly sweet and chocked full of sugar like store bought muffins. The sweetener in these muffins is not sugar, but molasses. For those of you who have never used molasses, here is a little info. Molasses is the by-product of sugar production. Basically, when the sugar cane is crushed, the juice of the sugar cane is boiled to get crystallized sugar. The sugar crystal is removed, the rest is the first molasses (light molasses).

In this recipe, I used blackstrap molasses, which is the by-product of the third boiling, which is the least sweet, but also has the heaviest taste. It is also said to have the highest nutritional content, containing potassium, iron, and calcium. If you prefer to use another molasses (light- 1st boiling or dark- 2nd boiling), you can substitute without a problem. Just note that the end result will be lighter in color.

So, enough about molasses. Let’ get back to the baking!

Whole Wheat Apple-Raisin Muffins
Makes 12 muffins


Dry ingredients
2 cup whole wheat flour
2 tsp baking powder
1/2 tsp salt
1 tsp cinnamon
1/2 tsp nutmeg

Wet Ingredients
1 cup milk
1/2 tsp vanilla
1/4 cup blackstrap molasses
1/4 cup unsalted margarine, melted & cooled
1 large egg, beaten

2 medium apples, grated
1/2 cup raisins
Vegetable Oil for greasing

Preheat oven to 400F/ 200C

Combine dry ingredients in a large bowl, mixing well.

Combine wet ingredients. Add grated apple and raisins and stir.
Make a well in the middle of the dry ingredients and pour in the wet ingredients, stirring gently until the batter is just mixed.

Spoon batter into a greased muffin tin or a tin lined with muffin liners. The batter should fill each cup about 3/4 full.

Bake for 20 minutes or until toothpick inserted into the centre of a muffin comes out clean.

Transfer muffins immediately to a cooling rack. Serve warm or cool completely and place in air tight container.