Sunday, August 30, 2009

Grilled Lemon-Thyme Pork Chops


Ah... the lovely trinity! And I am not talking about any classical trio. I am talking about my new favorite: Fresh Thyme, Lemon & Garlic.

Yep, this is my new favorite. Why? Well, I could say that it's because there is a bunch of fresh thyme growing in the garden, but really, it's because it is the perfect summery combination. And at this point, we are all wishing that summer would last just a little while longer :)


But why? Why do I keep using this combination? Well, it's not an exact science, but for me, it just tastes good. The earthiness and lemony essences of the thyme are brought out by the fresh lemon zest and juice. And then, of course, there is the garlic. Need I say more?? Yum yum! Put those three aromatics together and you get the perfect flavoring for, well, anything really. I used it in my Fresh Wild BC Salmon recipe a few posts ago. And I will use it now.

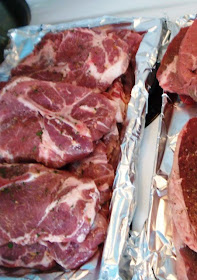
In this case, I used these ingredients to make a marinade/rub for pork shoulder chops which will be cooked on the outdoor grill. You could use chicken pieces, steaks, tuna... all would work well using this method.


A few other quick notes before we start cooking. You will notice that in this recipe, I use a meat thermometer. I rarely use any sort of measurement tools when I am cooking (I cook by taste and measure so that I can share with you). However, this is one exception. Pork must be cooked to 160F to avoid becoming infected with trichinosis, a parasitic disease caused by eating undercooked pork.

Do you really need a thermometer? Hey, it's your kitchen, but I highly recommend it. Especially if you are not used to cooking pork. Why? Because sometimes by plain sight, it's hard to tell if the pork is cooked. Since pork is naturally a little pink when it's cooked, it's normal to get a little nervous and end up overcooking the pork, all in the name of food safety. This result? A texture and dryness similar to shoe leather. To avoid this result, I have asked you to cook your pork to 155F. Then, during the covered resting period after the pork has come of the grill, the meat will continue to cook from its own warmth, and the pork will cook up to 160F before you eat it. This resting time will also ensure that the pork meat is nice and juicy! Just the way we like it!

Okay, that's enough talking for one day. Let's cook (and eat)!


Grilled Lemon-Thyme Pork Chops
Serves 6

6 Pork Chops, room temperature (really, you can use whatever you like...boneless, bone-in)
Handful of Fresh Thyme, destemmed and chopped finely
Zest of 1 Lemon, finely chopped
Juice of 1 Lemon
4 cloves Garlic, minced
1/4 tsp Salt
1/2 tsp Black Pepper
1/4 cup Olive Oil

In a large casserole dish, big enough to hold the 6 pork chops (or a large ziplock bag), combine the chopped thyme, lemon zest, lemon juice, minced garlic, salt and pepper. Mash together with the back of a spoon to get the flavors to combine. Add the olive oil, and mix to combine.

Place the pork chops in the dish (or bag) and massage each one with the marinade. Leave the chops with the marinade in dish and let sit at room temperature for about 30 minutes.

Preheat the the bbq or a grill pan to medium-high heat. Place the pork chops on the grill, then cover and let cook for about 5 minutes. After 5 minutes, there should be distinct grill marks on the bottom side of the chops.

Flip each pork chop over, cover, and let cook for another 5 minutes. Once the 5 minutes has passed, you should find that both sides of your chops are nicely brown and marked by grill on each side.

Reduce the heat to medium and, using a meat thermometer, check that the pork chops are cooked (internal temperature should be 155 degrees fahrenheit in the center). If they are not yet at 155F, place the lid back on the grill and cook for another 3 minutes, then check again. If still not at 155F, flip the pork chops and cook covered for another 3 minutes. Continue to do this until the chops reach 155F. How long this takes will depend on how thick your chops are. (As a guideline, it usually takes about 10-12 minutes on med-high heat for chops about 1/2 inch thick).

Once the chops are 155 degrees, remove them from the grill and place on a plate or in a casserole. Cover with tin foil and let rest for 5-10 minutes. This rest should bring the internal temperature up to 160 degrees and allow the juices of pork to redistribute throughout the meat.

Serve with assorted mustards or your other favorite condiments and enjoy!
Friday, August 21, 2009

Quick Fried Rice

Do you have leftover rice in your fridge? Then this is a great recipe for you!

What if you don’t have any leftover rice? Well, here’s the thing... Fried rice is great for using up leftover rice. The downside? If you don’t have any leftover rice, then you need to plan in advance so that you can make some “leftover rice.”

Why can’t you just make fresh rice? Well, fried rice needs to be made with cold rice. This ensures that the rice doesn’t stick together and become a complete glob of rice when cooking. So, if you don’t have leftover rice, don’t worry. Just plan ahead so that you have time to cook some rice, cool it completely, and then let it sit in the fridge for a couple of hours until it is completely cold.


As for the recipe, it is imperative that you have all your veggies cut and your egg beaten before you start cooking since this recipe takes less than 10 minutes to cook. This makes this a great dish for entertaining, since you can prepare everything in advance and then slip into the kitchen for just a few minutes before dinner. It also makes a speedy after work meal, since the prep is easy and the cook time is minimal.

Also, once you master the technique, you will find that the fried rice possibilities are endless! You could make plain egg fried rice, chicken fried rice, sausage fried rice, mixed veggie fried rice… the list goes on and on. Just dice up whatever you have in your fridge, and voila!

And from now on, I’m sure you will start making extra rice on purpose!

Quick Fried RiceServes 2

1/4 cup of Pancetta, cubed (or thick bacon cut into small pieces)
1 bell pepper (any color), diced
1 clove garlic, minced
1 onion, diced
1 cup green peas, thawed
1 egg, beaten with a 1 tsp oil, 1/4 tsp Salt and 1/4 tsp White Pepper
2 cups left over cold rice, separated
Cooking Oil

Heat 1 tsp oil in a large, non stick pan over medium-high heat. Add pancetta and stir a few times. Add garlic, onion, and bell pepper and sauté until just soft but still crisp to the bite. Remove the veggies from the pan.

Turn the heat up to high. Add another tsp of oil to the pan and wait until it is smoking hot. Add the cold rice, ensuring that it is completely broken up. Stir continuously until rice is hot (about 3 minutes).

Push the rice to one side of the pan and add the egg to the other side. Stir the egg quickly until soft scrambled. Then incorporate the egg with the rice. Add the peas. Then add the veggies back into the pan.

Stir and serve.

Thursday, August 20, 2009

Tips & Tricks: How to Cut Watermelon


I love watermelon. There is nothing like a cool slice of juicy red watermelon on a hot summer day. It is refreshing, sweet and so satisfying.

Watermelon is a great snack or dessert when entertaining. It is easy to find, quick to prepare, and relatively low maintenance. That is, if you cut it correctly.

You might ask what I am talking about. Well, the traditional method of cutting the watermelon into semi circular half slices or triangular quarters doesn’t quite work for me. (see picture below)...


These large slices can be so intimidating! Juice ends up on your face and on your clothes, and before you know it, you are a sticky mess.

So, here is my advice… cut your watermelon into sticks. They fit easily into all mouths without any mess!

Here is how to do it:

1. Cut your watermelon into the traditional semi-circular slices by:
- Slicing your watermelon in half by cutting the longest side on the watermelon into two
- Place one half aside. With the other half, place the freshly cut side down on the cutting board. This keeps your watermelon stable so that it is easier to cut.
- Now cut this half into semi-circular slices about 1 inch thich, disgarding the 2 ends (which will pretty much be just rind)
2. One by one, place each slice flat on your cutting board. Cut into 1 inch sticks.
3. Repeat with the other half.
4. Enjoy!

Watermelon on Foodista

Friday, August 14, 2009

BC Wild Spring Salmon with Lemon, Thyme and Garlic


My apologies for writing so sporadically over the last few months. I have been on an extended vacation, and as you can see from the posts I have made, eating has been the main priority.

Central to this part of my vacation has been family gatherings and family style meals at my parents' house in beautiful British Columbia, Canada. And one of my favorite things from this part of the world is the fresh, wild, BC Salmon.

Salmon is such a versatile fish. It is hearty and meaty and can be cut into steaks, fillets, or cooked whole by steaming, grilling, roasting or BBQing.


For this family dinner, I decided to keep it simple and low maintenance by prepping the salmon, wrapping it in tinfoil, and throwing it onto the barbeque (hmmm...sounds very similar to my campfire cooking methods...).

The reason it's so great for entertaining? Because you can prep the fish anytime during the day and then just throw it on the grill 15 minutes before you are ready to eat. Plus, you can serve it straight onto the table in the tin foil package. All of your guests will be wondering what's inside, and clean up will be a breeze!


BC Wild Spring Salmon with Lemon, Thyme and Garlic
Makes 1 Whole Fish Serving 4-6 people

1 Whole Fresh Salmon (about 1 kg), cleaned (head on or off doesn't matter)
1 Lemon
6 Cloves Garlic, minced
Handful of Fresh Thyme
1/4 cup White Wine
1/2 tsp Salt
1/2 tsp Freshly Ground Black Pepper
Olive Oil for drizzling

First, rinse the salmon, inside and out, under cold water. Pat dry. Place salmon on a large piece of tin foil.

Put aside a few stems of thyme. Then, destem the rest of the thyme and chop finely.

Zest the whole lemon and chop the zest. Mix the zest with the minced garlic, thyme, salt and pepper. Rub this mixture generously on the inside and outside of the fish. Place the whole thyme sprigs inside the fish. Cut the lemon in half and squeeze the juice of the whole lemon on the inside and outside of the fish. Drizzle with olive oil.

Fold up the sides of the tin foil around the fish, and pour the white wine over the fish. Continue to close up the pocket around the fish until all sides are sealed. If necessary, wrap the fish with another layer of tin foil to ensure that it will not leak. Transfer the foil package to a baking tray. (At this point, you could put this into the fridge until you are ready to cook it).

Heat a barbeque on medium high. When hot, place the fish package onto the grill, cover and let cook for 15 minuutes. After 15 minutes, remove the package from the barbeque and place on a serving tray. Do not overcook the fish! You want the meat to be moist and soft.

Place on the table and carefully slice open the top of the package (be very careful as hot steam will escape from the package). Drizzle with a little extra virgin olive oil. Serve and enjoy!

Tuesday, August 4, 2009

Yummy Grilled Pizza

During my travels in Canada visiting my family, I was introduced to many interesting food ideas. Some of these ideas were from restaurants, but majority were from good old home cooking. It's interesting because I really love to read menus and eat in restaurants. I love to hear about different flavor combinations, to taste new ingredients and to forecast restaurant trends. However, it's the home cooking that gets me everytime. Why? Because it's so simple. Simple flavors and simple execution.
Today's recipe is a perfect example of this. Introduced to me by my sister and executed to perfection... the grilled pizza. Sounds interesting, right? Yes it is. And here are all the reasons why:

1. You get a crispy crust every time

2. When it's hot and you don't feel like turning on your oven in your already roasting appartment/house/dwelling, moving outside and turning on the grill sounds like a great idea

3. Less clean up. I am not actually sure if there is less clean up than the conventional pizza method, but it certainly is minimal. Especially if your toppings are only prepared on the grill. 1 dough bowl, 1 pizza pan, 1 cutting board and knife, and the grill (which really shouldn't be that dirty)

4. Great conversation topic. People will ask you about the grilled pizza... about the dough, how to get it on the grill, how to make it crispy, what toppings to use etc etc. Talk about an ice breaker!

5. Great to make a few big sharing pizzas or to make a bunch of pancake sized individual pizzas

6. Healthy. No oil needed to grill to veggie toppings or the crust (except for the small amount already in the crust).

So, are you interested in trying this recipe? Please do. I have been inspired to try it and love the results!


Grilled Pizza Recipe
The Dough
Makes 2 large crusts or lots of little ones
Adapted from the book "Pizza on the Grill" by Elizabeth Karmel, Bob Blumer

1 cup Warm Water
1 tsp Honey
1/4 cup Olive Oil
2 ¼ tsps Active Dried Yeast
1 cup Whole Wheat Flour
2 cups White Flour
¼ tsp salt

In a large bowl, measure out water, honey, and oil. Sprinkle in yeast and let it rest in a warm place until foamy on top.

In another bowl, mix together flours and salt. Add to the liquids slowly, ensuring that it's well incorporated. Add more water or flour as necessary to make a soft and slightly sticky dough. Turn out dough onto a floured surface and knead just until smooth (about 1 minute. Do not overwork!).

Place the dough in a clean, oiled bowl. Drizzle the top with olive oil and ensure all sides are coated. Cover tightly with plastic wrap and let rise in a warm place for about an hour until doubled in size.

After doubling in size, punch the dough down and knead again on a floured work area for a few minutes until smooth. Divide into two balls.

Note: you could also incorporate herbs or olives to the dough during the final kneading

The Toppings
This is where you can be creative and use whatever toppings you love or that inspire you. For summer, think fresh, light colorful ingredients. Grilled veggies, fresh herbs, grilled chicken... whatever you desire.

For our pizzas, we used grilled aubergine, asparagus and zucchinni with caramelized onions, crushed garlic, sundried tomato pesto, and grated mozzarella.

The Assembly and Cooking

1. Preheat the gas grill on medium heat with the cover on.

2. Roll out the dough ( I like mine really thin- about 3-4 mm thick)

3. When the grill in hot, place the pizza dough directly on the grill and close the lid. Leave the lid closed for about 3 minutes so that the dough rises and the bottom is golden brown.

4. Remove the crust from the grill and flip over so the grilled side is up. Top your pizza with your chosen toppings. Reduce heat on grill to med-low and put the pizza back on the grill. Close the lid and let cook for about 7 minutes until bottom is brown and cheese is melted.

5. Enjoy!