Search My Blog

Tuesday, December 7, 2010

Pho Ga- Vietnamese Chicken Noodle Soup


I love pho. To be honest, I don’t remember eating it until I moved to Austin, Texas. Sounds like a strange place to start eating a vietnamese dish, so let me explain. I was just flying back to Texas after a vacation. I had quite a cold, and after hours and hours of flying, I was a congested mess. My boyfriend (now husband) picked me up at the airport late that night and recognized the signs, and prescribed for me a steaming hot bowl of pho. Thankfully, he knew the right place. One of his previously favorite hangouts by his old pad on Burton Drive. Yes, it was kinda a cliché, poorly decorated dive. But it was simple, cheap, delicious, and, despite the time of the night, it was open.


I am not sure if this was my first pho experience or not, but it certainly was the most memorable. As I slurped down the limey, spicy broth (recommended as the way to “sweat out” a cold), I couldn’t help but feel surprisingly better. My sinuses cleared, my throat felt soothed, and as I sat across the table from the love of my life, I felt ready to conquer the world.

Since that experience, every time I feel a little under the weather, I order myself a big steaming bowl of pho. I load it with crunchy bean sprouts, sliced chilis, basil, cilantro, and a squeeze of lime and slurp away.


Fortunetely, since arriving in Damascus more than 1 year ago, I haven’t really fallen ill. That is, until last week. And I found myself thinking about pho. Unfortunetely, I haven’t seen any little vietnamese restaurant around here. So, I had to try to make it myself.

I know the list of ingredients may seem a little intimidating, but it is really just the stuff for the broth, the rice noodles, and everything else. Someone told me once that blanching off the bones for 5 minutes first makes a clearer, tastier broth. To be honest, I’m not sure if that’s true because I started doing it that way and since it tastes good, I stick to it and haven’t tried the alternative.

So, next time you are feeling under the weather or just want a heart warming, steaming bowl of soup, try this one. You’re gonna love it!


Pho Ga (Vietnamese Chicken Noodle Soup )
Makes 2 steamed bowls of Pho

To make the broth:
1.5 kg Chicken carcasses
2 Large Onions
2 pieces Ginger, 2 inches each
2 tbsp Coriander Seeds
6 Star Anise
6 Whole Cloves
1 tbsp Sugar
2 tbsp Fish Sauce
Stems of 1 bunch of Cilantro
2.5 Liters of Water

The rest of the ingredients:
2 Skinless, Boneless Chicken Breasts
400 grams Dried Rice Noodles
1 cup Fresh Bean Sprouts
Cilantro Leaves
1/4 cup Red Onion or Shallot, thinly sliced
1 Whole Lime, cut into wedges
Sliced Chili
Fresh Thai Basil

Char the ginger and onions on a gas element, grill, or under the broiler. Let cool and peel. Cut both the onion and ginger into chunks. Set aside.

Fill a large stockpot with water and bring to a boil. Add the chicken carcasses and boil for about 5 minutes. Drain and rinse the chicken carcasses and the pot. Place the clean carcasses back into the pot and add 2.5 liters of water. Add the onions, ginger, spices, sugar, fish sauce, and cilantro stems. Simmer for about 2 hours, skimming every 20 minutes or so.

Add the chicken breasts to the broth and simmer for about 15 minutes. Remove and set aside to cool.

Taste the broth. Adjust seasoning with more fish sauce and or sugar. Strain the broth and throw away the solids. Then, my mom’s broth trick… cool it off, put it in the fridge overnight. The next day, skim off all the solidified fat and skum and you will end up with a pretty nice broth. If you don’t have time to do this, you don’t have to, but I think it gives a broth with a better finish and less grease.

Boil water and prepare the rice noodles as per the package instructions. Divide the noodles into two soup bowls, shred the cooled chicken breasts, and place on top of the noodles. Pour the hot broth over top. Add desired garnishes and enjoy.

Monday, November 29, 2010

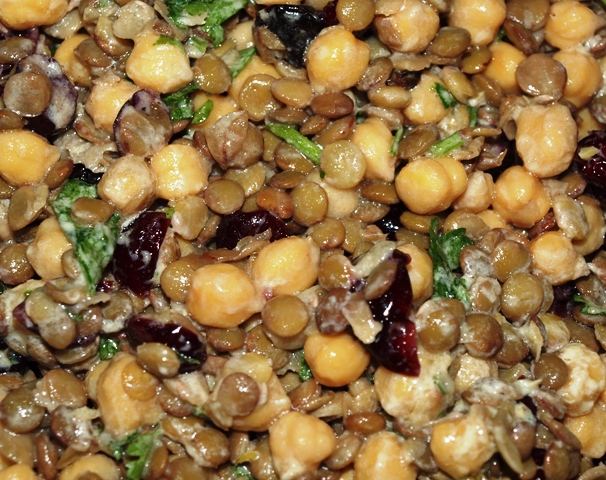
Lentil & Chick Pea Salad with Dried Cherries and Creamy Lemon Yogurt Dressing


I pride myself in a well stocked pantry. I could say it's because I like to be prepared for a natural disaster, but in fact, it's because I like to be prepared for whatever culinary adventure strikes me at any given moment.

Of course, there's the dried stuff.... the pasta, rice noodles, egg noodles, rice, couscous, cornmeal, oatmeal, bulgar, lentils, chickpeas, and other beans and pulses. Oh, and don't forget the flours and sugars. Then there is the canned stuff... the chopped tomatoes, coconut milk, evaporated milk, sweetened condensed milk.  Then, the essential sauces and oils. I mean, I like to make most things myself, so I am not referring to add and toss pasta sauce or meat sauces, I am talking about seasoning sauces like worchesterchire, tobasco, soy sauce, hoisin, oyster sauce, sesame oil, truffle oil, vinegars, etc.

Oh, and don't even get me started on the spices!  That would take hours.

But then there are times when it is necessary to do a "pantry clearout." Those are the times when I feel up for a challenge, or when my husband and I finalize a move to a different country and we realize we have far too much stuff in our pantry. So, for some number of weeks, or months (yes, it can take me THAT long to clear all the stuff in my pantry), we survive on what we have, plus the essential fresh stuff that we allow ourselves to buy.

And let me tell you... dishes can get mighty creative! So, here is one of them. A salad made from beans, dried fruit, and other stuff.

Oh, and as a note, I used dried lentils and chick peas rather than canned. I find that the texture of dried is far nuttier than canned and that each individual pulse stands up to being tossed in dressing and never gets that mushy texture. That is why I prefer to take the time and cook my own.

Lentil & Chick Pea Salad with Dried Cherries and Creamy Lemon Yogurt Dressing
Makes loads

2 cups Chick Peas, cooked
3 cups Lentils, cooked
3/4 cup Dried Cherries
1/2 cup Cilantro, chopped

For the Dressing
Zest and Juice of 2 Lemons
1/2 cup Yogurt
1/2 cup Olive Oil
2 tbsp Dijon Mustard
Salt and Pepper

In a jar or container with tight fitting lid, add add dressing ingredients. Place on lid and shake, shake, shake!!

Then, in a large bowl, toss together chick peas, lentils and dried cherries. (Everything can be done ahead up to this point).

When you are ready to serve, pour the dressing over the chick peas mixture and toss. Then stir in the cilantro. Season to taste with salt and pepper.

Sunday, November 28, 2010

Twice Baked Honey-Soy Chicken Wings


This is an awesome recipe for chicken. I used it to make some kick a** chicken wings, but it can also be used as a marinade for a roasting chicken, chicken legs or even chicken breasts.

Sorry to use such strong words, but these chicken wings were really super amazing. I made them for my 30th (gulp, yes 30th) birthday party and they were a huge success. In fact, I would say that they were the hit of the party!

Sweet and sticky, my guests had to force themselves to STOP eating them! Now that's what I call a winner!


Twice Baked Honey-Soy Chicken Wings
Makes a whole lot of wings

4 kg Chicken Wings, wing tips removed
8 cloves Garlic, minced
3/4 cup Hoisin Sauce
1 cup + 1/2 cup Honey
1/2 cup Dark Soy Sauce
2 tbsp Sesame Oil
1 tbsp Chili Powder
Vegetable Oil for pan

Preheat oven to 400 degrees.

Rinse and pat dry the chicken wings. Separate the wing from the drumette and place the wing parts into a large bowl or ziplock bag.

In a bowl, mix together garlic, hoisin, 1 cup honey, soy, sesame oil, and chili. Pour half of the mixture into the chicken wings. Massage the marinade into the wings. Set the other half of the marinade aside.

Line a baking sheet with tin foil, then rub vegetable oil all over the foil. Place the wings, skin side up onto the baking sheet then pour the marinade that was with the wings over top. Bake for about 8 minutes, then flip over and bake for another 6 minutes.

After 14 minutes, remove the baking sheet from the oven. Place the wings into a bowl. Drain the fat and excess marinade off the baking sheet, change the foil, and rub again with oil.

Add 1/2 cup of honey to the remaining half portion of marinade. Toss the wings in the marinade and place on the baking sheet skin side up, and drizzle with leftover marinade as before.
Bake in the oven for another 12 minutes until the wings are sticky.

Sunday, November 21, 2010

Potato & Calamari Salad


There are so many versions of potato salad. And most are the mayonnaise drenched, rich kind that accompany fried chicken at a picnic or German sausages.

Well, not this one. This potato salad is colorful, healthy, light (well, by light I guess I mean in comparison to other potato salads), fresh, and full of veggies.  There is the crunch of the vegetables, the tender chewiness of the squid, the freshness of the lemon juice.... it is just so delicious.

So, try this salad. Not as an accompaniment to other picnic favorites, but on its own as a lunch or light dinner or a starter before other great dishes!

Potato & Calamari Salad
Serves 2 generously as main dish

3 Large Potatoes
1 Shallot, chopped
2 Small English Cucumbers
1 Large Tomato
2 cloves Garlic, minced
2 sprigs Fresh Rosemary, destemmed and chopped
500 grams Squid, cut into rings
Juice of 1/2 Lemon

2 tbsp + 2 tbsp Extra Virgin Olive Oil


Salt and pepper

Peel the potatoes and boil or steam until fork tender. Cut into large chunks and place in a bowl, along with the chopped shallot, cucumber and tomato. Season with salt and pepper and set aside.

In a large sautee pan over medium heat, add 2 tbsp olive oil. Add the garlic, chopped rosemary and squid and cook for about 1-2 minutes, until squid just turns opaque. Squeeze in the lemon juice. Pour the entire mixture into the bowl with the potatoes and vegetables. Toss. Drizzle with about 2 tbsp of olive oil and season to taste. Enjoy warm or cold.

Saturday, November 20, 2010

"Home Brewed" Vanilla Extract


Real vanilla extract is so darn expensive that it makes me want to scream! Why does it cost so much when it is so easy to make?

This frustration has led me to start making my own. With just 2 ingredients, you can make as much as you want!  Then, you just use it in recipes as you would store bought vanilla extract. Combine that with the satisfaction of making your own, and you have a winner!


"Home Brewed" Vanilla Extract
Makes about 1 cup

1 cup Vodka
3 Whole Vanilla Beans, split or about 12 used whole pods

Place the vanilla beans and vodka into a sterilized jar. Let sit for about 2 weeks in a cool, dark place until the vanilla infuses into the vodka. Use in recipes that ask for vanilla extract.