Search My Blog

Wednesday, November 18, 2009

Apple Tart with Orange Zest & Cinnamon


Apple Pie. It’s a classic. Everyone has their favorite version. Mine is an apple tart flavored with orange zest and cinnamon. Need I say more?


(**In this case, I made a whole wheat pastry crust, but you could use a regular pastry crust. You can make it even easier by using store packaged puff pastry instead of making a crust. Just place it in the tart tin, prick it with a fork, and assemble in exactly the same way)


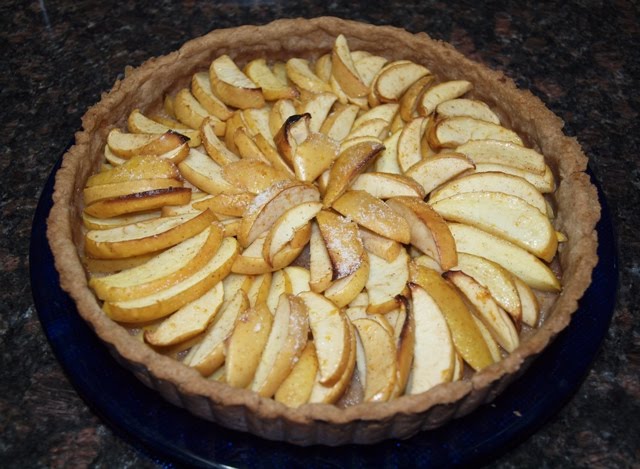
Easy Apple Tart with Whole Wheat Crust
Makes 1 tart

For Whole Wheat Pastry Crust
1 1/4 cups Whole Wheat Flour
1/8 tsp Salt
1/2 cup Butter, cut into cubes
3 tbsp Ice Water

The Filling
Zest of Half an Orange
Juice of Half an Orange
4 Large Apples, Cored and Thinly sliced (Peeled if you wish)
1/2 tsp Cinnamon
1 tbsp to 1/4 cup White Sugar (depending on the sweetness of your apples. For apples like Gala, Golden Delicious, Fiji, use around 1-2 tbsp. For tart apples like Granny Smith, use closer to 1/4 cup of Sugar)

In a food processor, mix together flour and salt. Add butter and pulse until the mixture resembles a course meal. Slowly add the ice water, pulsing just until the dough starts to stick together in a ball. Remove the dough from the processor, form into a ball, wrap in plastic wrap and refridgerate for at least 30 minutes before rolling out.

Preheat oven to
180 degrees Celsius (350 degrees Farenheit)..

In a large bowl, add zest, juice, apples, and cinnamon. Toss to coat apples.

Roll out pastry dough and place into tart pan (try to roll the dough so that it is a little larger than the tart pan, then trim off the excess. Do not stretch the dough into the pan, otherwise, it will shrink when it is baked).

Fill the tart shell with the apples (I like to do it in 2 layers).

Bake for 25 minutes until pastry crust is golden and apples have softened.
Serve with Vanilla Ice Cream or Whipped Cream.

Tuesday, November 17, 2009

Simple Béchamel Sauce & Two Heart Warming Gratins


The therapeutic properties of a simple white sauce are indescribable. There are just no words that will put into perspective how good it feels. And yet, so many of us don’t indulge in this type of therapy. In fact, for years, I wouldn’t dare touch any white, velvety, creamy sauce in excess and when I did, accidentally, fall into its grasp, I would be overcome with guilt, which far outweighed the sauce’s benefits.


However, I have since changed my mind. Why? First of all, because I love it. Very few people can resist a comforting white sauce on anything. And those who resist do so because of the belief that ingestion of this sauce will bring forth other enemies. That brings me to my next reason for a change of heart… béchamel is really not as fatty and cream laden as we believe. It’s made of milk, thickened with a roux of fat and flour, and then flavored.


So for those of us that love our venti lattes and caramel frappucinos, this sauce is really a walk in the park. And just as that daily java or occasional coffee indulgence gives us a few moments of peace and serenity, so can a plate of perfectly cooked pasta in white sauce or a portion of seasonal vegetable baked in white goodness.


I am certainly not advocating excess of anything, whether it be creative coffee drinks or meals with white sauce. But what I am suggesting is that this versatile and comforting sauce can be welcomed into your life in the easiest and most unobtrusive way… by using pantry ingredients.


The great thing about béchamel is that you can use it to make any variety of sauces for pasta, lasagna, veggies. In this case, I made 2 veggie gratins, but you could also combine all the ingredients that I used into 1 dish for the ultimate gratin. However, I made 2 seperate dishes for one simple reason... Onions rarely get to be the star of the show. They are always an aromatic, a flavoring, a complement. I love onions and made this gratin really to showcase how tasty and sweet they are.


Aubergine & Courgette Gratin
Serves 4 as side dish

1 medium Aubergine (about 3 cups), cut into about 1/2 cm slices
3 medium Courgettes (about 3 cups), cut into about 1/2 cm slices
2 cloves Garlic, peeled and cut in half
1 tbsp Olive Oil
2 cups béchamel sauce

In a large pan, heat the olive oil on medium high heat. Add the garlic and cook for about 1 minute, stirring constantly. Add the vegetables and cook until the veggies just begin to soften. Remove from heat and remove the garlic halves.

Line the bottom of an oven proof dish with a layer of vegetables. Top with a layer of béchamel, and continue layering until all vegetables are used up and a layer of béchamel is on top. (At this point, you could add some grated gruyere or breadcrumbs on top, but really, I think the veggies and béchamel alone make a great side dish).

Bake at 190 degrees for 30 minutes until bubbly and brown on top.

Bacon, Onions & Garlic Gratin
Serves 2 as side dish
4slices thick bacon, diced
3 large onions, cut into chunks
1 clove Garlic, minced
1 ½ cups béchamel sauce

Heat a large pan over medium high heat. Add the bacon and let cook for about 2 minutes, until the fat melts and the bacon pieces begin to crisp. Add the onions and the garlic and cook until the onions are just tender.

Place the bacon mixture into an ovenproof dish. Add about two thirds of the béchamel, and toss together. Redistribute the mixture evenly in the dish. Top with the remaining béchamel.

Bake in 190 degree oven for 30 minutes until bubbly and brown on top

Béchamel Sauce
Makes about 3 1/2 cups of Béchamel

2 tbsp Butter
1 tbsp Olive Oil
4 tbsp Flour
3 ½ cups Milk, Room Temperature
1/2 tsp Salt
1/4 tsp Pepper
¼ tsp Nutmeg

In a heavy bottomed sauce pan, melt the butter with the olive oil. Add the flour and whisk together. This will form small clumps of flour/butter on the bottom of the pan. Do not be alarmed! Just keep stirring for about 2 minutes to cook the flour.

Add the milk (make sure it’s room temperature so that you don’t get clumps!), while whisking. Allow the sauce to come up to a bubble. This is when the sauce will reach it’s maximum thickness.

Stir in the salt, pepper, and nutmeg. (Depending on what you are using the béchamel for, this is the point when you could add cheese, herbs or whatever other flavorings you like). For our purpose, we will use it classically… just like this.

Friday, November 13, 2009

Simple Roasted Red Pepper Hummus with Baked Pita Chips


So sorry everyone for not posting for a while. Been busy moving house (finally out of the hotel!!!) and stocking my kitchen with all things delicious!

In times like these, quick and easy to make foods are key. On top of that, healthy and vitamin rich food is important, especially during times of stress (i.e. moving).

Today, I went to the beautiful outdoor fruit and veggie market to pick up some fresh produce. When I got home, despite all of the delicious goodies in my bag, I was too tired to make much of an effort. So, I made this fast and tasty dip and served it with healthy homebaked pita chips and carrot sticks (but you could serve it with whatever cut up veggies you like).


It was just what the doctor ordered. Full of flavor, but also packed with nutrients. And the veggies and chips gave that nice, satisfying crunch! This would also be a great stress free party snack, or a healthy alternative to chips when relaxing on the couch. It can be made ahead, as the flavors only get better with time.

Simple Roasted Red Pepper Hummus
Makes about 3 cups

2 Red Peppers, Whole
2 Cloves Garlic
1 Handful Fresh Flat Leaf Parsley
1 can Chick Peas (with liquid)
Juice of 1 Lemon
Salt and Pepper to taste
Drizzle of Olive Oil

First, roast the peppers. If you want to skip this step, you can used drained jarred peppers, but I think roasting them yourself is so easy. Just rub both of the peppers with olive oil and place over an open gas flame until blackened on all sides. If you don't have a gas burner, you can also place them in the oven on broil, turning until blackened on all sides. Once they are roasted, place them in a bowl and cover with plastic wrap. This will make them easier to peel by steaming the skins off! After a couple of minutes, remove the skin, core and seeds of the peppers and tear into large chunks.

Then, you will just puree all the ingredients together, either by using a blender or a stick blender. It's that easy! Put the garlic, parsley, roasted peppers, lemon juice and chick peas into a blender jar and puree until smooth. Add salt and pepper to taste, and serve with a drizzle of olive oil.


Baked Pita Chips
Make as many as you like!

These are so simple and healthy and a great alternative to fried packaged chips. Just cut your pita (or arabic bread which is what I use being in the middle east) into triangles by first cutting them into semi circles and then into triangles (like cutting a pizza).

You will see that this creates 2 triangles on top of each other. Gently pull these apart to create 2 chips.

Spray a baking sheet with some olive oil and lay the chips in 1 layer. Spray the chips with olive oil and bake in a 200 degree oven for 5-8 minutes until the chips are crisp and golden. Enjoy!

Monday, November 2, 2009

Easy Sweet or Savory Crepes


Crepes are basically an unleavened French pancake. We usually pay a fortune for all different sorts of crepes in restaurants, cafes, and creperies, but what many of us don’t realize is that they are super easy and inexpensive to make. Also, all of the ingredients are pantry staples so this recipe doesn’t require a lot of forethought. As far as equipment goes, you really don’t need one of those fancy crepe pans that you see in the restaurants (unless of course, you want one!). All you need is a regular non-stick pan (of any size) and some kind of flipper or spatula.


Once you master the basic technique, you can use your imagination and fill them with just about anything. Think about all the different types of crepes you have eaten or seen on menus… sweet crepes like crepes suzette and savory crepes filled with spinach and ricotta.


Now think about all of your favorite things….Think Nutella, chocolate and marshmallows, smoked salmon with cream cheese and capers, lobster or even ice cream! Crepes are a clean canvas that you can dress up any way you like.

They are so versatile, you can use them at your dinner parties, or as a substitute for bread when you haven’t had time to run to the store.


This is really as easy as it gets. Crepes seem high maintenance, but really, they are very easy. You can make the batter up to 24 hours in advance (or maybe more, I never tried) and just put it in the fridge.

For my crepes, I made three different kinds: Nutella and Banana, Banana and Condensed Milk, and Scrambled Egg with Cheddar. You can use whatever fillings or toppings you like. Just to get you started, here are a few ideas...


Ideas for Savory Crepe Fillings:
- Ricotta Cheese and Spinach
- Scrambled Eggs with Cheese (and bacon)
- Ham and Cheese
- Smoked Salmon, Cream Cheese, Red Onions, Capers
- Tomato, Mozzarella, and Basil
- Grilled Veggies

Ideas for Sweet Crepe Fillings:
- Nutella & Banana
- Nutella & Marshmellows
- Fruit Jam
- Fresh Fruit with Whipped Cream
- Sauteed Apples, Peaches, or Pears
- Ice Cream or Sorbet


Easy Sweet or Savory Crepes
Serves 2
(makes 8 crepes using a 8 inch pan)

1/2 cup Flour (you could use whole wheat if you like)
1 Egg
1/2 cup Milk
1/4 cup Water
1/8 tsp Salt
1 tbsp Butter, melted
Optional: 1 tbsp Sugar (for sweet crepes)

Just a note: for sweet crepes, you can add 1 tbsp of Sugar in with your batter to sweeten it up a little. My husband loves his batter with this little bit of sugar. For me, I like to skip it and keep my crepe batter versatile. Then I can use the same crepes for sweet and savory!

In a large mixing bowl, combine all ingredients (including optional sugar) except melted butter and beat well until smooth and combined. (If you are making ahead, cover and place the bowl in the fridge for up to 24 hours)

Add melted butter and beat well.

Very lightly grease a non-stick frying pan over medium heat (I like to use butter because of the flavor). Slowly pour the batter into the pan, tilting the pan so that the batter coats surface evenly. Be sure not to pour too much batter. You just want enough to coat the pan.

Cook for about 2 minutes on each side, until just brown. Remove from pan and fill with your preferred fillings. Serve flat with toppings, folded over, or rolled.

Monday, October 26, 2009

Zucchini Fritters with Tzatziki


Nothing says autumn like a basket full of zucchini!


Today we are using this abundance of zucchini to make fritters. I love these fritters because the zucchini really takes center stage. They are great as a starter, side dish, or snack and the leftovers can be stored in the fridge for the next day!

I didn't have a grater (since I am still cooking in a hotel kitchen), so I used a peeler instead to peel these zucchinis into ribbons. It actually makes them look quite nice, but of course, it takes more time than grating. Anyway, regardless of whether you peel or grate, these warm fritters are delicious with the cool, fresh tzatziki.


Zucchini Fritters
Makes 12-15 Fritters

½ kilo Zucchinis, grated or shaved
2 Eggs
1/3 cup Flour
1/2 tsp Baking Powder
1/2 tsp Salt
1/2 tsp Freshly Ground Pepper
1 Small Onion (red if you can), quartered then sliced thinly
1 tbsp Lemon Zest
1/4 cup Fresh Parsley, finely chopped
1 Clove Garlic, minced
1/4 cup Feta, crumbled
1/2 can Sweet Corn Kernels
(A great addition to this mix would be some crispy bacon mixed in at the end before cooking!)

Toss the grated zucchini with a teaspoon of salt. Put the zucchini in a strainer over a bowl and let drain for about 15 minutes, until a lot of the moisture has come out of the zuchinni. Place in paper towel and squeeze any excess moisture from the zucchini.

In a large bowl, beat the eggs. Add the flour, baking powder, salt and pepper and mix well. Stir in the onion, lemon, parsley, garlic, and feta. Finally, add the corn and the zuchinni. At this point, I find it easier to mix together with my hands to ensure it is all mixed together well.

Heat a drizzle of olive oil in a skillet over medium heat. Once hot, drop heaping tablespoons of batter into the pan and using a spatula, flatten slightly. Cook for about 4-5 minutes on each side, until both sides are golden brown. Place on paper towel to remove the excess oil. Serve with tzatziki.


Tzatziki
Makes 2 cups

1 cup Cucumber, grated
2 Cloves Garlic, paste or minced
2 cups Plain Yogurt
Juice of 1/2 Lemon
Drizzle of Extra Virgin Olive Oil
1/4 tsp Fresh Black Pepper

Toss grated cucumber with 1 tsp salt. Place in a strainer over a bowl, and let drain for about 15 minutes. Place in paper towel and squeeze any excess moisture from the cucumber.

In a medium bowl, stir together cucumber, garlic paste, yogurt, lemon juice and pepper. Cover and refrigerate for 30 minutes, until flavors meld together. Drizzle with olive oil before serving.