Search My Blog

Showing posts with label fried. Show all posts

Thursday, October 1, 2015

Light and Crispy Fish & Chips


Frying. It's not something that I do a lot at home. To be honest, because it's messy. And it smells. But it tastes so darn good!

Today I picked up some beautiful fresh fish (snapper) and couldn't resist turning it into fish and chips. And it was amazing! Our daughter of course, who has eaten very little deep fried food, if any, in her lifetime of less than 2 years absolutely adored it, even though fish has been an on and off food for her.

The batter was light and crispy, and the tartar sauce was the perfect tangy accompaniment. Definitely worth the mess and smell in my kitchen!

Friday, May 3, 2013

Baked Zucchini Fries


It's Stanley Cup season and that means game food! Unfortunately, game food although tasty is usually hard on the waistline. That is, until I discovered these baked zucchini fries. They are crisp on the outside and soft in the middle, making for an addictive game day snack. Enjoy them with regular ketchup, or elevate them by serving them with a warm marinara sauce.

They are very easy to make and will disappear so quickly, you will question whether they were actually zucchini! In fact, kids love them too!

Saturday, April 20, 2013

Beer Battered Fish and Chips with Tartar Sauce


Okay, I will admit that I slightly misnamed this post.

It isn't actually beer battered fish and chips. It's beer battered fish with Roasted Baby Potatoes (which are just as yummy and provide a great alternative to chips). Or you could serve it with Baked Sweet Potato Fries

Why not regular french fries you ask? Well first of all, with the fish already fried, a healthier side dish might be preferable. But the real reason? It's just plain difficult to perfectly fry fish and potatoes at the same time. And let's face it, if you fry one first, then the other, the first item is surely going to be cold. And who wants to eat cold fried fish or chips?

Saturday, April 13, 2013

Baked Sweet Potato Fries


They say that most people have a preference for either salty or sweet. Me, I love salty. So, when I am in the mood for something comforting, I turn to savory favorites. And as a snack, I often think about eating things like crackers, nuts, chips, and fries.

Most of the time, I can let the day go by without succumbing to my desire to eat these kinds of snacks, because I know that some of them aren't the healthiest of choices (i.e. chips and fries). But sometimes, I just can't get them out of my head.

Today was one of those days. I wanted fries. Badly.

So, I decided to turn on the oven and make some baked fries in hopes that they would satisfy this urge. And to make them even healthier (and in my opinion, more delicious), I made them with sweet potatoes. 

Saturday, June 9, 2012

Quick and Crunchy Fried Fish


Hi everyone. So sorry I have been absent for a while, but we've been moving into our new house! Actually, we haven't exactly done the moving part. It's been more like sanding, priming, painting, ripping out carpets, cleaning and everything we can possibly do to prepare for the move.

So, for anyone that's ever been through this, you know that cooking takes the back burner. Your kitchen is half packed, you start to live off restaurants and pantry items, and a hot, home cooked meal seems a distant memory. 

As the stress starts to build, the cravings begin. For me, it was fried chicken. The problem is, fried chicken is not close by for us, and it's not as quick to make as I would like.  However, fried fish is super easy and fast. So, that's what I made. Fried fish.

Sunday, June 26, 2011

Wonton (Chinese Dumplings)


I am always looking for recipes that I can make in quantity and store for days when I don't have much time. This is definitely one of them. In fact, this isn't just a large recipe, it's a HUGE recipe!

Yes, this recipes really does make about 150 wontons! But I did that on purpose. I won't lie.... making wonton is a lot of work. So, I buckle down and spend the better part of a day making a ton of them. Then, I freeze them for many many meals to come.

So, you must wonder... don't they get boring? I mean, especially for two people? At about 6 wontons per person per meal, that is 25 meals, or about 13 meals per person of the same thing.

But it doesn't have to be boring. Wonton can be cooked and served so many ways that they become a freezer staple.


Wonton
Made about 150

For the Filling:
750 grams Ground Pork
500 grams Ground Chicken or Turkey
2 Egg Whites
1/3 cup Water
1/3 cup Soy Sauce
2 tbsp Chinese Black Vinegar
1 tbsp Sesame Oil
2 1/2 tbsp Ginger, minced
1/3 cup Cornstarch
1 tbsp Brown Sugar
1 1/2 tsp Salt
1 tsp White Pepper
2 cups Napa Cabbage, chopped (white and green parts)
1 cup Green Onion, chopped (white and green)

150 Wonton wrappers

In a large bowl, thoroughly mix together all filling ingredients. Cover and place in the fridge for about 45 minutes. Once the filling has sat for about 45 minutes, I usually taste it, either by cooking a bit in a non-stick pan, or making 1 wonton just to check the seasoning. This is entirely optional, but if you are about to spend the time to make dozens of them, I just think it's better to double check that you are happy with the taste!

To fill the wontons, place 1 rounded teaspoon of filling in the centre of the wrapper. (You might feel that this doesn't look like a lot of filling, but do not add more! When you try to close the wonton, the filling will push out creating a mess!)


Brush all of the edges of the wrapper with water (I use my fingers by dipping them in a bowl of water, but you could also use a brush). The fold as desired. Here are the 2 folds that I prefer:
1. The basic triangle fold- bring 2 opposite corners together and press the wonton wrapper together around the filling, making sure to push out all the air.
2. The purse fold- bring all 4 corners to the centre and stick together, push all the air out, and press each set of edges together.


Place on a wax paper lined baking sheet.

At this point, there are many directions you could take with these. You could cook them (either boiled, fried, or in soup), or you could freeze them for later.

To Boil or Steam
Bring a pot of water to a boil. Drop the wonton into the water, being sure not to overcrowd the pan. Bring back up to a boil, then reduce to a simmer and cook for about 4-6 minutes until the filling is cooked through. Remove the wonton from the water with a slotted spoon, trying to remove as much excess water as possible. Serve with Wonton Dipping Sauce.
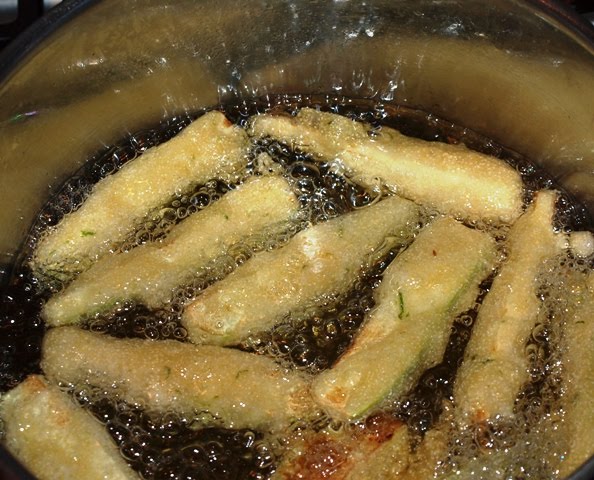

To Fry
Heat a pot of oil or fryer to 350 degrees. Place the wonton in the oil in batches, being sure not to overcrowd. Fry for about 4-6 minutes until the wonton are golden. Great served with sweet and sour sauce, chili sauce, or wonton dipping sauce.

In Soup
Blanch the wonton for a couple of minutes in boiling water. Drain. Place the wonton in your soup broth and finish cooking. Spoon broth and wontons over shredded napa cabbage and cooked egg noddles. Drizzle with sesame oil and garnish with green onions.

To Freeze
To freeze, place the wax paper lined baking sheet with the wontons directly in the freezer. By freezing them first on the sheet, it will ensure that they freeze individually instead of sticking together. When they are completely frozen, place in a container or ziplock bag.

To cook from frozen, boil, fry, or place in soup just as above. Just note that they will take a couple extra minutes to cook.

Wonton Dipping Sauce

1/4 cup Soy Sauce
1/4 cup Chinese Black Vinegar
1/2 tbsp Ginger, minced
1 Small Red Chili, seeded and chopped
1 tsp Sesame Oil

Just mix all the ingredients together! That's it!

Saturday, March 5, 2011

Ode to the Middle East: Part 2- Fattoush Salad


Fattoush. This is the salad that my brother fell in love with when he came to visit us in Syria (although he did mistakenly call it Phantoof....).

The reason why I love this salad (and probably why my brother loves it also) is because it has great texture and flavor. It is so fresh tasting and the tartness of fresh lemon juice, tanginess and saltiness of the olives, bite of the onions,  and the crunch of the fried or toasted pita bread all complement each other. It is a great starter salad, as it is traditionally eaten, or could be great as a meal, topped with some roasted chicken.

And the best part is that it can easily be made anywhere in the world!

Traditional fatoush uses a slightly bitter green called Purslane. If you cannot find purslane, you can use watercress, or baby arugula. It also uses a spice called sumac, which is ground from red berries and imparts a sour, lemony taste.

Here is my fatoush recipe:

Fatoush Salad
Serves 2

2 Tomatoes, cut into large dice
1 English Cucumber, cut into large dice (cut into 4 lengthwise, then chop)
1 bunch Purslane (Watercress, Baby Arugula, or Lettuce)
1/4 cup Black Olives (pitted, sliced, or whole.... your choice)
1 Shallot, thinly sliced

For the dressing:
1/4 cup Extra Virgin Olive Oil
1 tbsp White Wine Vinegar
2 tbsp Fresh Lemon Juice
1 tsp Sumac
1 tsp Dried Mint
1 tsp Dried Thyme
1 clove Garlic, crushed
1/2 tsp Salt

1 Round of Pita Bread

In a large bowl, mix together all the salad ingredients. For the purslane or watercress, use the leaves and small stems only. For the lettuce, chop into bite sized pieces.

In a smaller bowl, whisk together all dressing ingredients.

Place the pita bread in the oven (350 degrees) until crisp- about 5 minutes. Break into bite sized pieces. (You could also fry this bread as done traditionally. Cut into 1 inch pieces and fry in oil until crisp).

To put it all together, toss the dressing into the salad and top with the crisp pita bread.

Saturday, September 4, 2010

Zucchini Sticks with Tzatziki Sauce


In general, I try to eat healthy. And this means staying away from fried foods. The alternative is usually to bake, which turns out a similar crunch in a far more healthful manner.

But sometimes, occasionally, once in a while... my cravings overtake me and I want, actually, I NEED something fried.  In these very rare (ahem) cases, I fry at home. Yes, it is fried, but at least I control the type of oil, the amount of salt, and I make sure it tastes good. After all, if you are going to give into a craving, you better be eating something that tastes darn good!!!


This frying batter is unique because it uses soda water, which I believe gives the batter a lighter texture. Combined with some cornmeal, you get a crisp, light outer coating with a distinctive crunch.

I used this batter for zucchini sticks, but you could also use it for calamari, fish, and other vegetables like eggplant, onions, asparagus, or peppers.


Zucchini Sticks
Makes a whole bunch!

2 cups Flour
1 cup Cornmeal
Zest of 1 Lemon
2 1/2 cups Soda Water
1 kg Zucchini, cut into sticks
Vegetable Oil for frying
Salt

Heat oil in a large pot. The oil should be about 6 inches deep.

In a large bowl, combine the flour, cornmeal, and lemon zest. Add the soda water and stir to make a lumpy batter. Place a handful of zucchini sticks into the batter. When the oil is ready (test by dropping a little batter into the oil. If it immediately fries and floats, the oil is hot enough), drop a few zucchini sticks, one at a time, into the oil. It is very important not to put too many in at once, otherwise the temperature of the oil will drop and the sticks won't fry nicely.

Fry until golden, about 4-5 minutes. Remove from the oil with a strainer, and place on paper towel. Salt immediately and serve hot with tzatziki.


For the Tzatiki Sauce

3/4 cup Cucumber, grated
1 Clove Garlic, minced
1 1/2 cups Plain Yogurt
Juice of 1/2 Lemon
Salt and Pepper

Place the grated cucumber onto some paper towel, salt generously, and leave for about 10 minutes. After 10 minutes, pat dry to remove as much moisture as possible.

In a medium bowl, mix together all ingredients. Season to taste.

Friday, April 9, 2010

Crunchy Baked Ravioli


A few posts ago, I made Fresh Ravioli with White Bean, Bacon & Leek Filling. I boiled some to eat that day, and I froze the rest to eat later.

Today, I wanted something crunchy and admittedly unhealthy. Usually, when I get this "munchy" feeling, it means I want something fried, although I try to stay away from frying because it's not that healthy.  To overcome this feeling, I generally reach into the freezer for my Baked Spring Rolls, which provide all the crunch without the fat. Unfortunetely for me, I had already polished those off during a previous freezer siege.  I did, however, have the ravioli, so I decided to try my luck with them.


So, I put them on a baking sheet, drizzled them with a little olive oil, and baked them at 180 degrees for about 20 minutes. They browned up beautifully and were crunchy and delicious! Just the cure for the munchies!

Now, you could jazz this up for entertaining by serving it along side some warm marinara sauce. Yum!

Crunchy Baked Ravioli

Olive Oil for Drizzling
Marinara Sauce for dipping

Preheat the oven to 180 degrees Celsius (350 degrees Farenheit).

Place the ravioli on a lined baking sheet. Drizzle with olive oil. Bake for about 20 minutes until golden and crispy. Serve with warm marinara sauce.

Wednesday, March 3, 2010

Baked Spring Rolls with Sweet Chili Sauce


Today is all about making those guilty pleasures a little healthier! And one of those happens to be Spring Rolls. You know, those crunchy, deep fried treats that tempt you on every Chinese menu. Oh, and then there are the ones that you can buy in the freezer section and bake or fry at home. Don’t even get me started with those ones! Don’t you hate it when you spend all that money on packaged spring rolls, only to bite into a hollow roll?


Well no more sparse spring rolls for you! These ones are so much healthier and tastier than the ones you buy in the store and they are baked instead of fried! (although to be perfectly honest, you can fry them if you want to…).


Another reason that this is a great recipe is because it is quite easy to make, and it can be doubled or tripled to stock up the freezer for those days when you don’t feel like cooking, or you are faced with unexpected company. I love recipes like this that can be made ahead.

So, roll up your sleeves and make a bunch! You will thank me for it later!


Baked Spring Rolls
Makes about 25-30 large spring rolls

1 tsp Ground Ginger
250 grams Pork Belly, cut into small chunks
750 grams Chicken Breast, cut into small strips
1 tbsp cooking oil
2 tbsp Sesame Oil
8 cups Cabbage, shredded
2 cups Carrots, shredded
1 Onion, shredded
1/2 cup Cilantro, chopped
3 tbsp Dark Soy Sauce
Salt and Pepper

In a large pan, cook the pork and chicken with the ginger. When almost cooked, add both of the oils, cabbage, carrots, onion, and soy sauce, and cook until just tender. Season with salt and pepper to taste. Remove the pan from the heat and let cool. Stir in the cilantro.

Once cool, start rolling the spring rolls. Place some filling in the diagonally across the center of the wrapper. Roll into a tube by first folding the bottom corner over the filling, then folding in the side corners, then rolling. Continue with the remaining wrappers and filling. At this point, you could freeze the spring rolls for up to 2 months.

To bake, place the spring rolls (fresh or directly from the freezer) on a lined, lightly oiled baking sheet. Brush each spring roll with oil. Bake at 180 degrees Celsius (350 degrees Farenheit) for about 25 minutes, until they are golden brown. Serve with sweet chili sauce.


Sweet Chili Sauce
Adapted from recipe at http://thaifood.about.com/od/thaicurrypasterecipes/r/sweetchilisauce.htm

Makes 2 cups sauce
2 cups water
2 tbsp cornstarch
3 cloves garlic, minced
2 tsp. dried crushed chili (more or less to taste)
1 regular chili powder
2 Tbsp. fresh-squeezed lime juice
5 Tbsp. brown sugar (or more to taste)
2 Tbsp. honey
1 1/2 tbsp light soy sauce

Place 1/4 cup of cool water in a small bowl or cup. Add the cornstarch and stir to dissolve. Set aside.

Place remaining water in a sauce pan or pot over medium-high heat. As the water comes to a boil, add the remaining ingredients. Stir well and bring to a boil.

Reduce heat to medium-low and add the cornstarch dissolved in water. Stir continuously as the sauce thickens (about 1 minute).

Remove sauce from heat and taste-test. If not sweet enough, add more sugar or honey. If too sweet for your taste, add another squeeze of lime juice. If too spicy, add a little more water (you may have to add more cornstarch-water too).

Cool and/or refrigerate until ready to serve.

Note: This sauce will keep for up to 1 month in a covered jar in the refrigerator.