Search My Blog

Showing posts with label cornmeal. Show all posts

Thursday, January 3, 2013

Cheesy Corn Muffins (Blue and Cheddar)


Happy New Year everyone and thanks for trying and sharing my recipes this past year!

A new year means new beginnings, new challenges and new friends--- it also means new recipes! Typically in January, there are lots of low fat, get fit recipes and cleanses being passed around in an attempt to shed those extra holiday pounds.

I have never found the January diet craze to work for me to me honest. I actually prefer to continue to eat the things I love in moderation. What does that mean? Well, it doesn't mean loading up on fast and sweets all the time. It does mean choosing flavorful ingredients, eating 1 instead of 2, and looking for ways to add healthy components.

Thursday, May 3, 2012

Super Moist Cornbread


I make bread almost every week, but never think to make cornbread instead! Perhaps because it's uses aren't the same as regular bread--- sandwiches, spreads, cheese.

However, with so much cornmeal in my pantry, cornbread just came to mind, and I am glad it did. I love this particular recipe because the cornbread is so moist and packed with flavor and texture. I especially like the chunks of onion and pepper throughout.

It pairs perfectly with a bowl of soup, chili or stew, or just on it's own (with a little butter too!).

Super Moist Cornbread
Makes 1- 8 inch by 8 inch pan

1 1/2 cups Cornmeal
1/2 cup Whole Wheat Flour
1 tbsp Baking Powder
1 tsp Salt
1 Large Egg
1 cup Milk
1 can (14 oz) Cream Style Corn
1/4 cup Onion, chopped
1 tbsp Green Chili, chopped
1/3 cup Red Bell Pepper, chopped

Preheat the oven to 400 degrees Fahrenheit. Grease an 8 inch square baking pan and set aside.

In a bowl, mix together all the dry ingredients.
In a separate bowl, mix together the wet ingredients
Add the dry ingredients to the wet and stir until just combined.

Bake for 35-40 minutes until a toothpick inserted in the middle comes out clean. Enjoy with a bowl of chili or soup!

Thursday, March 8, 2012

Lemon Cornmeal Poppyseed Bundt Cake


I cannot say this enough... I am in love with everything and anything lemon!

Especially in baked goods. I think it's something about the citrus cutting that baked good richness. And the bright yellow color of sunshine. Or maybe I just really love lemons.

Monday, April 18, 2011

Green Pea Polenta Cakes: A Side Dish & Brunch all in one!


Today, as I was in the grocery store, my eyes fell on a bag of cornmeal. Strange... I haven't used cornmeal in ages. I really think it's because of moving. You see, I always make sure my pantry is full. You might call me a kitchen hoarder, but I just like to say that I am well stocked. Anyway, every time we move, we spend weeks before hand emptying out our pantry. That basically means using up as much stuff as we can and not buying anything else! As difficult as it can be when you get low in stocks, the more interesting the meals become.

So, once moved to a new location, I always start again to stock up the pantry. But it takes time. And something always gets overlooked. In this case, the cornmeal.

But I am so glad I have found it again! It is so easy to make and has endless possibilities. In this case, I made a great side dish which turned into an easy brunch also! Two dishes in one! Can't go wrong with that!

I cooked the polenta with some peas and aromatics then cooled it in a pan and cut it into little cakes. These cakes were then pan fried until crispy on the outside and soft in the middle. Yum!

These polenta cakes are great as a side dish to any sort of meal.  And the leftovers are amazing for brunch with a sunny side egg on top. Reminds me a little of the cheesy grits with poached egg that my husband loves so much!


Green Pea Polenta Cakes
Makes 12 squares (6 servings of 2 squares each)

1 tbsp Canola Oil
1/2 Red Onion, finely chopped
3 Cloves Garlic, minced
1 1/2 cups Cornmeal
4 cups Water
1 1/2 cups Frozen Peas
Salt and Pepper

Olive Oil or Butter for cooking

Prepare a 9" by 13" cake pan by lining it with plastic wrap.

In a large pot, heat canola oil over medium-high heat. Add the onions and garlic and cook until softened, about 5 minutes. Add polenta and water and bring up to a boil. Reduce to low. Stir continuously until polenta is cooked, about 20 minutes (alternatively, stir for the first few minutes, cover for about 10 minutes, then stir again). Stir in the frozen peas and salt and pepper to taste. The mixture should be creamy and smooth.

Pour the mixture into the prepared cake pan and smooth out with a spatula. Place in the fridge to cool and set.

Once cool, cut into 12 squares. Up until this point, this recipe can be prepared ahead and kept in the fridge until ready to use.

Heat some butter or olive oil in a pan over medium heat. Add the polenta squares and cook until browned on both sides and hot in the middle (about 5 minutes per side).

Serve as is or as a side dish to any meat, fish, or poultry. Or, for a yummy brunch, serve with a sunny side up egg on top (and bacon on the side...)

Wednesday, September 22, 2010

Herb Breaded Chicken Tenders with Honey Mustard Dipping Sauce


These are my husband's favorite. He constantly hints at them... as if I have forgotten to make them for him for a long time!

There are infinite ways of making chicken tenders, and I usually do it differently each time I make them. Sometimes I bread them with cornflakes, cornmeal, crackers, or bread crumbs, and sometimes I dip them in egg, egg and milk, yogurt, or olive oil. I usually end up baking them, but sometimes I pan fry them first. It really just depends.

But no matter how I make them, one thing remains the same, and that is the Honey Mustard Dipping Sauce. No matter how I make the chicken, it really is the sauce that counts.


Herb Breaded Chicken Tenders with Honey Mustard Dipping Sauce
Serves 4 to 6 people

1 1/2 kg Chicken Breast, cut into strips
2 cups Bread Crumbs
1 cup Flour
1 tbsp Salt
2 tsp Ground Black Pepper
2 tbsp Dried Oregano
2 tbsp Dried Parsley
About 1/4 cup Olive Oil

Preheat oven to 180 degrees Celsius (350 degrees Farenheit).

In a large bowl, mix together bread crumbs, flour, salt, pepper, oregano and parsley.

In another large bowl, place the chicken tenders. Drizzle with olive oil until all the chicken tenders are coated.

Dip each olive coated chicken tender into the breadcrumb mixture and place on a sheet pan lined with parchment paper.

Bake in preheated oven for 25 minutes, turning once during cooking. Serve with Honey Mustard Dipping Sauce.

Honey Mustard Dipping Sauce

1/2 cup Dijon Mustard
2 tbsp Honey
1 tbsp Balsamic Vinegar

Stir together the mustard, honey, and balsamic vinegar. Enjoy with chicken tenders.

Thursday, September 9, 2010

Lemon Cranberry Biscotti


Some people like soft and chewy cookies. Others prefer crisp and crunchy cookies. I like them both.

Today, I was craving something crunchy and satisfying. So I decided to make biscotti, the ultimate in crunchy cookies. I especially love these biscotti, because they have cornmeal, which give them a distinctive, satisfying crunch.


After going through a chocolate phase, when everything had to have dark chocolate, I wanted to make something different. So instead of my usual Dark Chocolate and Walnut Biscotti, I decided to go for Lemon and Cranberry. Summery yet comforting.


Lemon Cranberry Biscotti
Makes about 36 biscotti

3 Eggs
2/3 cup Sugar
Zest of 2 Lemons
2 cups Flour
3/4 cup Cornmeal
1 ½ tsp Baking Powder
1 tsp Salt
¾ cup Dried Cranberries

Preheat the oven to 180 degrees Celsius (350 degrees Farenheit).

In a large bowl, beat the eggs. Add the sugar and lemon zest and beat well until pale yellow.

In a separate bowl, mix together the flour, cornmeal, baking powder and salt. Add the dry ingredients to the wet ingredients, mixing until just combined. Stir in the cranberries.

Divide the dough into two and form each half into logs. Place the logs on a lined baking sheet and flatten each log so that they are about 4 inches wide and 1 inch thick. (It is easier if you wet your hands a little so the dough doesn’t stick).

Bake the logs for about 25 minutes until golden. Place on a wire rack to cool for about 15 minutes. Then, slice each log diagonally into ¾ inch slices. Place the slices back onto the baking sheet (cut side down), and bake for another 10-12 minutes until the cookies are dry.

Cool on a wire rack before serving.

Saturday, September 4, 2010

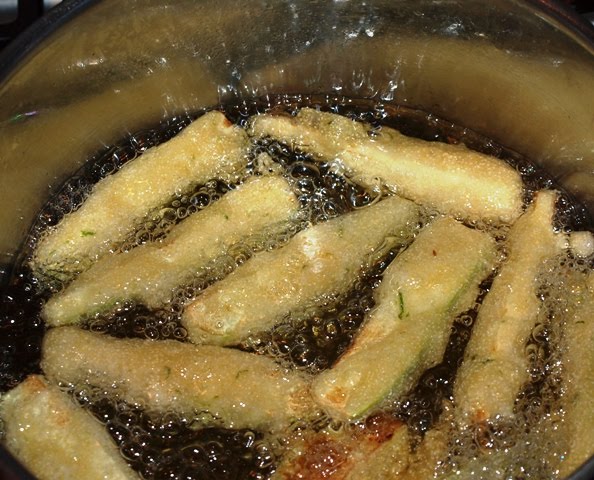
Zucchini Sticks with Tzatziki Sauce


In general, I try to eat healthy. And this means staying away from fried foods. The alternative is usually to bake, which turns out a similar crunch in a far more healthful manner.

But sometimes, occasionally, once in a while... my cravings overtake me and I want, actually, I NEED something fried.  In these very rare (ahem) cases, I fry at home. Yes, it is fried, but at least I control the type of oil, the amount of salt, and I make sure it tastes good. After all, if you are going to give into a craving, you better be eating something that tastes darn good!!!


This frying batter is unique because it uses soda water, which I believe gives the batter a lighter texture. Combined with some cornmeal, you get a crisp, light outer coating with a distinctive crunch.

I used this batter for zucchini sticks, but you could also use it for calamari, fish, and other vegetables like eggplant, onions, asparagus, or peppers.


Zucchini Sticks
Makes a whole bunch!

2 cups Flour
1 cup Cornmeal
Zest of 1 Lemon
2 1/2 cups Soda Water
1 kg Zucchini, cut into sticks
Vegetable Oil for frying
Salt

Heat oil in a large pot. The oil should be about 6 inches deep.

In a large bowl, combine the flour, cornmeal, and lemon zest. Add the soda water and stir to make a lumpy batter. Place a handful of zucchini sticks into the batter. When the oil is ready (test by dropping a little batter into the oil. If it immediately fries and floats, the oil is hot enough), drop a few zucchini sticks, one at a time, into the oil. It is very important not to put too many in at once, otherwise the temperature of the oil will drop and the sticks won't fry nicely.

Fry until golden, about 4-5 minutes. Remove from the oil with a strainer, and place on paper towel. Salt immediately and serve hot with tzatziki.


For the Tzatiki Sauce

3/4 cup Cucumber, grated
1 Clove Garlic, minced
1 1/2 cups Plain Yogurt
Juice of 1/2 Lemon
Salt and Pepper

Place the grated cucumber onto some paper towel, salt generously, and leave for about 10 minutes. After 10 minutes, pat dry to remove as much moisture as possible.

In a medium bowl, mix together all ingredients. Season to taste.

Tuesday, October 13, 2009

Baked Crunchy Cornmeal Chicken


I love fried chicken.

It reminds me of my grandfather. He was a chef on the Canadian Pacific Railway. He ran his own restaurant. And he sure loved his fried chicken.

I love thinking about those Sunday afternoons when our family would sit and muse over a big red and white bucket of chicken. Or the times we would enjoy the now extinct all-you-can-eat-buffet which I have come to believe that my grandfather chose because they had great fried chicken.


Everyone has their own memories of their grandfather. Mine just happen to involve crunchy, juicy fried chicken.

But, in this health conscious day and age, we are all looking for ways to slim down our favorites. For me, it's because I want to be able to eat more of it while keeping my conscience guilt-free.

So, try this recipe for baked chicken that is as crunchy as the fried stuff minus all the grease. The polenta gives it a nice texture, the herbs give it a great flavor, and the chili gives it a bit of a punch. Plus, it is great hot, room temperature, or cold (think picnics, leftovers, lunch boxes). Okay, you may still crave the greasy stuff once in a while, but this is one crunchy piece of chicken that you don't need to hide.


Baked Crunchy Cornmeal Chicken
4 servings

2 kg Chicken Parts (I used 2 whole legs separated into leg and thigh and 2 large chicken breasts cut into 1.5 inch strips)

In a large ziplock bag, combine:
3/4 cup Plain Yogurt
1 teaspoon Lemon Zest
Juice of 1 Lemon (or about 1/4 cup of the bottled stuff)
1/4 cup Onion, finely chopped
1 tbsp Dried Thyme
2 teaspoons Salt
1 teaspoon Cayenne Pepper or Chili Powder

Add the chicken to the bag. Remove the air from the bag and seal. Then massage the mixture into the chicken pieces. Refrigerate for about 2 hours.

Preheat the oven to 190 degrees Celsius. Coat a baking sheet with a little oil.

In a large bowl, combine:
3/4 cup Quick Oats
3/4 cup Flour
1 cup Cornmeal
1/4 cup Fresh Parsley, finely chopped
1 tsp Salt
1/2 tsp Black Pepper

In another large bowl, whisk together:
2 Eggs
1/4 tsp Salt
1/4 tsp Black Pepper

Remove chicken from the ziplock bag. Dip each piece of chicken first in the eggs, then in the cornmeal. Then dip the same piece in the egg again, and in the cornmeal again. This will ensure it has a thick and crunchy crust.

Place the chicken skin side up on the baking sheet. Drizzle with olive oil and bake for about 30-40 minutes until golden brown. Serve hot or cold.

Thursday, October 8, 2009

Lamb and Vegetable Casserole with Herb Polenta Crust


Shepherd’s Pie.

Like myself, most of you have probably heard of it, eaten it, or made it. But do any of us know how it began or what it was traditionally made of?

I certainly don’t. I grew up believing that Shepherd’s Pie was ground meat (usually beef) mixed with peas, carrots, and corn that was put in a casserole dish, topped with mashed potatoes, and baked in the oven.


While there does seem to be some agreement that Shepherd’s Pie is a meat casserole with mashed potatoes, that is really where the agreement ends. What kind of meat and the addition (or omission) of vegetables seems to be under debate. And of course, the million dollar question… it’s a pie so where is the pie crust?

Well, I can’t answer all of these questions, but I have learned that Shepherd’s Pie originated as a sort of “poor man’s pie.” It was made using leftover meat between two layers of mashed potato “crust,” since potatoes were the affordable starch of those times. And it’s still a very affordable, easy to make dish that has become a staple in many households.


But today, we are going to do something a little different. We are going to turn this “poor man’s pie” into a gourmet feast by tweaking just a few ingredients in this dish. Will it add extra work or extra expense? Not at all. The steps are the same and if anything, I might have made this dish tastier and healthier that the way it’s usually made. I have loaded this recipe with vegetables and topped it with herb polenta instead of the classic mashed potatoes. Give it a try!


Lamb and Vegetable Casserole with Herb Polenta Crust
(a.k.a "Gourmet Shepherd’s Pie" )

Serves 4 people (either as 1 casserole or 4 individual servings)

For the Meat Layer
1/2 cup Carrot, diced
1/2 cup Onion, diced
1/2 cup Zucchini, diced
4 Cloves Garlic, minced
250 grams Lamb Mince
2 tbsp Flour
1/2 can Corn Kernels
1 Large Tomato, diced
1/2 cup Water
1/2 cup Frozen Peas
2 tbsp Tomato Paste
Salt and Pepper to taste
Oil for cooking

In a pan over medium-high heat, heat about 2 tbsp oil. Sweat the carrots, onions, zucchini and garlic for about 5 minutes until just starting to soften. Remove the vegetables from the pan and set aside.

In the same pan, crumble in the lamb mince and sprinkle with the flour. Stir constantly for about 3 minutes until the lamb starts to brown. Add the vegetable mixture back into the pot with the lamb. Add the corn, tomato, tomato paste, peas, water and a good pinch of both salt and pepper. Stir well so that all the ingredients are mixed. Cover and simmer for about 10 minutes. While it is simmering, you can make the polenta.

For the Herb Polenta Layer
2 cup Milk
2 cup Water
1 tsp Salt
1 cup Corn Meal
1/2 cup Fresh Parsley, finely chopped
2 tbsp Butter

In a heavy bottomed pot, heat milk, water and salt until it just starts to bubble. Reduce the heat to low. Add the cornmeal, stirring constantly, for about 5-8 minutes (depending on the type of cornmeal—check the package for timing). Be very careful that the heat is low as the polenta will sputter. When the polenta is cooked, remove from heat and stir in the butter and parsley.

Making the “pie”
Whether you choose to make one family style casserole or four individual ones, the method is the same. Place a layer of the meat mixture at the bottom of the baking dish. Top with a layer of the herb polenta. Bake in a preheated oven at 190 degrees Celsius for 25 minutes, until it’s bubbling around the edges and the polenta is golden on top.

Saturday, October 3, 2009

Chunky Veggie Soup with Cornbread Style Dumplings


There is nothing like a little soup to warm you up on a chilly autumn day!

I love this soup because it's a great way to use up whatever vegetables you have kicking around in the fridge or in the garden. And if you don't have any veggies, not to worry. Just pick up whatever is in season to make this soup!

The cornbread style dumplings are hearty and have a great texture. They are a wonderful alternative to regular flour based dumplings. Of course, if you don't have cornmeal, you can make the recipe using 2 cups of white flour instead.

Chunky Veggie Soup with Cornbread Style Dumplings
Serves 6-8

The Soup
3 tbsp Olive Oil
1 ½ cups Onions, medium dice (about 0.5cm)
4 cloves Garlic, finely chopped
5 cups Mixed Veggies, medium dice (I used carrot, zucchini, aubergine, red peppers)
2 tbsp Dried Herbs (eg. Oregano, Thyme, Parsley, Chervil, or a mix)
1/4 tsp Salt
1/4 tsp Freshly Ground Black Pepper
4 tbsp Tomato Paste
2 Liters Vegetable Stock (or chicken or beef stock if you like)

In a pot, heat olive oil over medium-high heat. Sweat onions, garlic, all the veggies, and the dried herbs for 4-5 minutes. Add the salt, pepper and tomato paste and stir. Then add the stock. Bring up to a boil, then cover, lower the heat to medium-low and let simmer for about 15 minutes.

While the soup is simmering, go ahead and make the dumplings (if you want to omit the dumplings, just let the soup simmer covered for about 45 minutes total and enjoy!).


The Cornbread Style Dumplings
Makes about 20-1 inch dumplings

2 tbsp Freshly Chopped Parsley
1 1/2 tbsp Dijon Mustard
2 tsp Baking Powder
1/2 tsp Salt
1/4 tsp Black Pepper
1 cup Cornmeal
1 cup White Flour
3/4 cup Water

In a large bowl, combine parsley, mustard, baking powder, salt and pepper. Add cornmeal and flour and stir until all ingredients are well mixed.

Make a well in the middle of the dry ingredients. Slowly pour the water into the well, using a fork to incorporate the flour mixture into the water. Mix just until the dough comes together. Do not overmix or the dumplings will be tough. Using your hands, roll into 1 inch balls.

Once the soup has simmered for 15 minutes, drop the dumplings into the soup, cover and let simmer for another 30 minutes. You will know when the dumplings are ready because they will float to the top of the soup.

Sunday, September 13, 2009

Dark Chocolate Dipped Citrus Biscotti

As the summer comes to an end and the temperatures start to drop, it's time to say goodbye to all things frappucino, mochacino, iced- this and iced that, and say hello again to big mugs of warmth. Gone are the afternoons of sipping refreshing summer beverages...

Yes, it's sad in some ways. But in some ways, it is a joyous occasion when we can welcome back chilly days and warmer drinks. After all, there's nothing better than enjoying a warm, comforting caffeinated beverage of your choice with some of your closest friends and a yummy biscotti!

Okay, I understand that this may sound like a bribe. Give up summer and you can snuggle up to a warm cup of jo and something sweet. Well, it's not really a bribe. It's just a small reminder of the great things to come. And nothing pairs more perfectly with a steaming mug of coffee than a biscotti. Why?

Well, let's start first by talking about biscotti. What is it? A biscotti is an Italian cookie that is baked twice. It is characterized by having a drier and harder texture and usually does not have any oil or butter in it. They can be made in a variety of flavors, from chocolate to cranberry to hazelnut to coffee flavored.


So, why is the biscotti the perfect accompaniment?

1. Because it is the perfect texture for a dipping cookie. If you are a "cookie dipper," then you know how important it is for your cookie to have enough structure so that when you dip it, it doesn't fall apart into soggy, crumbly bits

2. You need crunch! Whether you are a dipper, or someone who alternates between bites and sips, you know that you need an accompaniment that retains some crunch.

3. Not too sweet. Some accompaniments are far too sweet that the sugariness just coats your mouth and you almost lose the coffee taste that you crave

Well, thankfully, the biscotti meets all of our coffee accompaniment's expectations. It has the ability to be dipped without falling apart, it has great crunch (especially because of the cornmeal component in the ones we will be making) and it has the perfect balance of sweetness.

Now that we've made the case for biscotti as the perfect accompaniment, we need to discuss flavors. As I mentioned before, you can make biscotti in all flavors, just like any other cookie or cake. But in my opinion, there is one particular variety that really outshines the rest, and that is the one we will be making today. Citrus Biscotti.

I love these Citrus Biscotti because, first of all, anything citrus just wins my heart. But besides my love for all things citrus, they are just so simple and clean tasting. You are really able to enjoy the cookie as it is, with a hint of citrus just to make it interesting.

In this recipe, there is also the option to dip these biscotti in dark chocolate. This is not mandatory, but it sure is delicious! I mean, hey, dark chocolate, coffee, citrus.... these are 3 flavors that just excel together!

The best part about biscotti is that they are a naturally dry cookie, and can last up to 3 weeks in an airtight container. So be prepared to make a lot and have them available to entertain your friends!


Dark Chocolate Dipped Citrus Biscotti
Recipe from Giada de Laurentiis

Makes about 36 biscotti

2 cups all-purpose flour
3 large eggs
3/4 cup fine yellow cornmeal
1 cup sugar
1 1/2 teaspoons baking powder
1 tablespoon orange zest
1 teaspoon salt
1 tablespoon lemon zest
1 3/4 cup Dark Chocolate, chopped into pieces (optional)

Preheat oven to 325 degrees F. Mix the flour, cornmeal, baking powder, and salt together and then add orange and lemon zests. Beat the eggs and sugar in another bowl until pale yellow and fluffy, about 3 minutes. Add flour mixture to the egg mixture and beat just until blended (the dough will be soft and sticky). Let stand for 5 minutes.

Transfer the dough to parchment lined baking sheet. Moisten your hands with water and shape the dough into two 11 by 4-inch logs. Bake until lightly brown, about 35 minutes. Cool the logs for 5 minutes. Using a serrated knife, cut the logs into 1/2-inch-thick diagonal slices. Bake, cut side down, on parchment until the biscotti are pale and golden, about 25 minutes. Cool the biscotti on the baking sheet for 5 minutes, transfer to a rack and cool completely.

Melt 1 3/4 cups of dark chocolate in the microwave or in a double boiler. Dip biscotti into the melted chocolate, shake off the excess, and place on the baking sheet. Refrigerate until the chocolate is firm, about 35 minutes.

Store in an airtight container up to 4 days, or freeze in resealable plastic bags up to 3 weeks.

Saturday, May 2, 2009

Easy, Speedy Breakfast: Cheesy Grits with Poached Egg


My husband’s favorite breakfast of the moment. After living in Texas for over 2 years, something had to stick, and it was the grits. He loves them. And I don’t blame him. They are heart warming, stick to your stomach goodness that will keep you full until your next meal.

What are grits? Grits are coarsely ground, hulled corn, which are then boiled with water. They are eaten for breakfast in the southern US.
But wait a minute, what is the difference between polenta (discussed in a previous post) and grits? Are they the same, since they are both coarsely ground cornmeal? Well, yes, they are both ground corn, although polenta is usually ground a little finer than grits. Also, the true grits are hominy grits, which have been ground from lime soaked corn which has been hulled and had the bran and germ removed (okay, it’s a little more complicated than that, but you get the idea), giving it a different taste and texture than polenta.

Anyway, back to the cooking and thus, the eating… my suggestion for a fast, easy, and filling breakfast is… (drum roll please)…Cheesy Grits with a Poached Egg!!

Not only is this recipe for a single serving, making it a really easy breakfast, but once you get this recipe into your routine, it shouldn’t take more than 5 minutes to make. If you don’t want the egg, you could skip it and just go for the grits, but I am telling you, try it once with the egg, and you will never go back!

For all you skeptics out there, don’t forget that breakfast is the most important meal of the day. And we all know, if you don’t eat breakfast or you skimp and eat just a measly piece of toast, banana or (heaven forbid) cookie, you will lack both the energy to make it through the morning, and the concentration, since the disturbance of your loud, growling stomach will prevent you from being even the slightest bit productive.

So, I am going to go make myself a bowl of grits. Are you joining me?

Cheesy Grits with Poached EggMakes 1 serving

1/4 cup Grits
1/4 cup Milk
1/2 cup Water + 1/4 cup water
Add 1/4 cup Grated Cheese (Sharp Cheddar, Emmental, Gruyere)
1 Egg
1 tbsp White Vinegar
Salt and Pepper

Fill a pan or pot about 4 inches high with water. Add 1 tbsp white vinegar and bring to a boil (this is for the poached egg)

In the meantime, place the grits, milk, and 1/2 cup of water in large, microwave proof bowl (must be large so that grits do not boil over in the microwave). Microwave on high for 2 1/2 minutes, keeping a close eye on them. Stir in 1/4 more cup of cold water and microwave again for 1 minute. Remove the bowl from the microwave and stir in the cheese.

By this time, the water should be boiling. Turn the heat down to low. Crack 1 egg into a small bowl, then slide it into the pan. Leave it for about 2-3 minutes, until you can see that the egg white is cooked, then gently lift it out of the water with a slotted spoon. You should feel that the yolk is still soft, but the white is cooked. Drain well and slide this egg on top of the cheese grits.

Add salt and pepper to taste. Enjoy!

Thursday, April 30, 2009

Warm Lemon Polenta Cakes: Au Naturel, with Berries, or a la Nutella!!!


I love polenta. For those of you who do not know what polenta is, you've been missing out. In fact, I missed out also. I was never introduced to polenta until my 20's, when I encountered it in restaurants and then started to use it at home.

So, what is it? Basically, polenta is coarsely ground cornmeal. It is a staple food of Northern Italy, but has made it's way onto restaurant menus and into households around the world. It can be used in a variety of ways. Basic polenta is cornmeal made into a thick porridge by boiling it in water. It can be eaten plain and fresh, with the addition of cheese, butter, milk, vegetables, or as an accompaniment to fish or meat. You can also allow it to cool and set, then cut it into shapes and fry or grill it.

Polenta is a great alternative to rice or potatoes. It is an especially good substitute for mashed potatoes, since you can add butter and cream and achieve the same consistency, creaminess, and therefore comfort factor from a bowl of steaming hot polenta as you can from mashed potatoes.


Until recently, I mainly thought of polenta as a savory food. Yes, I have encountered polenta in baked goods, but mainly in bread to add texture and crunch. But today, I made some delicious, sweet polenta cakes. They were flavored with some fresh lemon and I tell you, they were divine! To sweeten things up a little more, I “stuffed” two of them with a nutella center. I also considered mixing some berries into the batter, but that will have to be for another day…


Warm Lemon Polenta CakesMakes 4 individual sized cakes (the size of muffins)
75 grams Unsalted Butter, Room Temperature
60 grams White Sugar
75 grams Almond Powder
½ tsp Vanilla Extract
1 Egg
Zest of 1 Lemon
Juice of ¼ Lemon
¼ tsp Baking Powder
¼ tsp Salt
40 grams Polenta (yellow cornmeal)
Optional: Nutella or ¼ cup fresh berries


Preheat oven to 160 degrees Celsius.


In a large bowl, cream together butter and sugar. Beat in almond powder, then egg, then vanilla extract, then lemon zest and lemon juice, being sure to beat well after each addition.

In a separate bowl, mix together polenta, salt and baking powder. Add these dry ingredients to the butter and sugar mixture.

Grease 4 muffin cups or 4 ramekins, then dust with flour.

To make Polenta Cakes au Naturel:
Fill the ramekins ¾ of the way full with the batter.
To make Polenta Cakes a la Nutella:
Fill the ramekins ¾ of the way full with the batter. Then make a small hole in the centre and add about 1 tbsp of nutella into each one.


To make Polenta Cakes with Berries:
Stir about ¼ cup of fresh berries into the batter (raspberries, blueberries, blackberries, or strawberry pieces). Then fill the ramekins ¾ of the way full with the batter

Bake in preheated oven for 40 minutes or until toothpick comes out clean. Let cool for about 10-15 minutes before flipping onto a plate.

Enjoy warm as is or with a scoop of vanilla bean ice cream.