Search My Blog

Showing posts with label cake. Show all posts

Monday, October 13, 2014

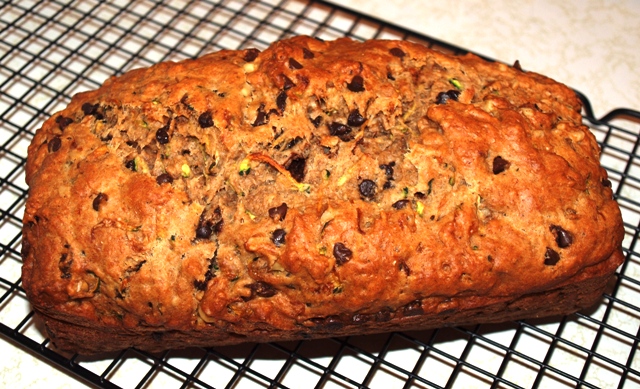
Banana Zucchini Bread


A few things happened today. I wanted to make something yummy and freshly baked to enjoy in the afternoon. I noticed I had an abundance of ripe bananas in the freezer. And I wanted to give my daughter some kind of treat.

So I made banana bread. With zucchini. And way less sugar than usual. But then I messed up and shorted the recipe an entire cup of flour. Yup, a whole cup. And I didn't realize until just now as I was looking at my recipe. I didn't notice because the banana bread was fantastic. Moist and yummy. So good in fact that we (my husband, me and my 1 year old daughter) ate almost the entire loaf!

Oh well. It was pouring rain today, the house smelled like baking and the banana bread was fairly healthy as far as baked goods go. And I got a new and better recipe as a result. A very productive day!

Monday, September 29, 2014

Whole Wheat Chocolate Zucchini Cupcakes with Chocolate Cream Cheese Icing


My daughter just turned one. I can't even believe it. It seems like just yesterday that I was busy cooking up a storm to stock our freezer for her arrival.

This past weekend I found myself trying to make a somewhat healthy but still decadent and crowd pleasing first birthday cupcake.  

In the past year, I haven't given our daughter a whole lot of sugar, salt or processed food. I try my best to make her meals healthy and packed with nutrients while of course making sure that the food is tasty.

Tuesday, June 10, 2014

5 minute Nutella Cake for 2 (or one!)


Today is my husband's birthday. He's been working all day and has no idea what time he will be home. So, instead of preparing an amazing dinner only to have him microwave it later, I thought I would make him a cake.

Only I didn't want to make a huge cake that we would eat a quarter of and toss. I wanted something small that he could enjoy when he gets home from work. Oh, and the other thing is that I don't have time to make him a huge cake. Between diapers and dishes, I wanted to find something simple that I could whip up in a flash.

Sunday, May 20, 2012

Chocolate Orange Buttermilk Cakes


Again with the buttermilk! Like I said, it pays to freeze the stuff in half cup portions because you never know when you are going to need it.

In this case, I wanted to make some cupcakes with a subtle hint of chocolate and orange. I wanted cupcakes that would stand without icing...kind of like a cross between a cupcake and a muffin I guess? Okay, I take that back. I was trying to make it sound healthy by calling it a muffin (even though muffins are not always healthy). 

Let's just say that it's a flavorful cupcake that will not be frosted. I guess you could frost it with orange cream cheese frosting or a chocolate butter cream, but let's keep it simple (and guilt-free) for the moment.

Thursday, March 8, 2012

Lemon Cornmeal Poppyseed Bundt Cake


I cannot say this enough... I am in love with everything and anything lemon!

Especially in baked goods. I think it's something about the citrus cutting that baked good richness. And the bright yellow color of sunshine. Or maybe I just really love lemons.

Saturday, November 19, 2011

Individual Ricotta Cheesecakes with Wild Blueberry Compote

My sister was coming over for dinner with some fresh Fanny Bay Oysters. She asked me to make a salad. I did, but I felt that it just wasn't enough of a contribution to this dinner. After all, she was bring fresh oysters. From Fanny Bay. On the island. And was sharing them with me. That is sisterly love.

So, I needed to bring something equally fun and loving to the dinner table. 

As I have said time and time again, I am more of a savory girl. My sister, however, loves her sweets. So, I thought I would make her some ricotta cheesecake. But, it couldn't just be any ricotta cheesecake. Because, as I mentioned before, she had the oysters. Fresh, beautiful, huge Fanny Bay oysters. And my dessert had to be worthy of those.

So I made the cheesecake with wild blueberry compote. In individual mason jars. To show my love and appreciation for my sister. Oh, and did I mention the oysters?


Individual Ricotta Cheesecakes with Wild Blueberry Compote
Makes 4 individual cheesecakes

250 grams Ricotta
2 Large Eggs, seperated
1/4 cup + 1 tbsp Sugar
1 1/2 tbsp Flour
Zest of 1 Lemon
Pinch of Salt
4 Small Wide Mouth Mason Jars (250ml) or ramekins or individual springforms
Butter and Sugar for Mason Jars

For the Wild Blueberry Compote
Makes about 2 cups of Compote

3 cups Wild Blueberries, frozen
1/3 cup Sugar
Zest and Juice of 1 Lemon
1 tbsp Cornstarch

To make the cheesecakes:
Preheat the oven to 375 degrees.
Butter 4 small wide mouth mason jars (250ml size). Sprinkle sugar inside the jars. Set aside.

In a large bowl, beat the ricotta until smooth. beat in the egg yolks and sugar. Stir in the flour, lemon zest and salt.

In a seperate bowl, beat egg whites with 1 tbsp sugar until they form stiff peaks. Fold the egg whites gently into the ricotta mixture.

Pour the mixture into the prepared mason jars, place on a baking sheet, and bake for 30-35 minutes until firm and golden brown on top. Let cool completely.

To make the compote:
Combine all ingredients into a saucepan and simmer on medium-high heat for about 10 minutes until thickened. Let cool completely. Spoon onto the cooled cheesecakes before serving.

Sunday, November 6, 2011

Sundried Tomato and Olive Quinoa Cakes


I have definitely been on a quinoa kick lately. I absolutely love the stuff. It's easy to make, has a great nutty texture, and is really good for you.

However, this quinoa kick has put me in a little bit of a rut. I find myself making the same things with quinoa. I cook it, then mix it with veggies and turn it into a salad of sorts like my Summer Quinoa Salad with Chicken & Apple.

I mean, don't get me wrong. These one meal wonders with quinoa are delicious. But I felt the need to break out of this quinoa rut and try something different.

For starters, I figured I should make something warm. Like a warm quinoa side dish. But of course, I got caught up in adding stuff to the quinoa, and before I knew it, it was another room tempurature salad of sorts. Again.


So, this time, to break out of the mold, I decided to use the quinoa as a basis for pan fried cakes. I added sundried tomatoes, olives, onions and zucchini for flavor; I added eggs to bind everything, and pan fried them. Then, for a final burst of flavour, I mixed up a little garlic mayo.

I served these cakes with some pan seared wild coho salmon and a little salad and it was a fantastic dinner! The perfect dish to make quinoa interesting again!


Sundried Tomato and Olive Quinoa Cakes
Makes 8 cakes

2 Large Eggs
1/3 cup Onions, finely chopped
1/3 cup Sundried Tomatoes, finely chopped
1/3 cup Olives, finely chopped (whatever kind you like)
1/2 cup Zucchini, finely diced
2 cups Cooked Quinoa, room temperature
2 tbsp Whole Wheat Flour
Salt and Pepper
Olive Oil canola oil for pan

Garlic Mayo
1 clove Garlic, minced
1/2 cup Mayonnaise
2 tbsp Grainy Mustard
Salt and Pepper

In a large bowl, beat the eggs. Stir in the onions, sundried tomatoes, olives and zucchini. Then add the quinoa and flour. Mix until incorporated. Let rest at room temperature for 10-15 minutes.

In the meantime, combine all ingredients for the garlic mayo in a bowl. Mix and set aside.

Heat some oil in a large pan over medium heat. Form the quinoa mixture into balls and place in the preheated pan, pressing down to form patties. Cook until browned on both sides (about 5 minutes per side).

Serve warm with the garlic mayo.

Wednesday, September 14, 2011

Chocolate Zucchini Walnut Bread


I am a savory person. Some people love sweets, but I love salt. So when it comes time for dessert, I usually prefer to have things that aren't too sugary sweet. I err on the side of fresh fruits and dark chocolate.

However, to appease those around me who thrive on more sweetness, I usually make some kind of "bread".... banana bread, carrot cake, or zucchini loaf. Somehow, these choices seem to satisfy both ends of the salty- sweet spectrum.  Plus as a bonus, they are full of fruit and veg.

And just in case there is any left over, no one will feel guilty snacking on the leftovers!


Chocolate Zucchini Walnut Bread
Makes 1 loaf

1/4 cup Butter
1/3 cup Sugar
2 Eggs
1/4 cup Unsweetened Apple Sauce
1/2 cup Buttermilk
1 cup Zucchini, shredded

1 1/4 cups Flour
1 cup Whole Wheat Flour
2 1/2 tsp Baking Powder
1 tsp Ground Cinnamon
1/4 tsp Ground Nutmeg
1/2 tsp Baking Soda
1/2 tsp Salt
Zest of 1/2 Lemon

1/3 cup Chopped Walnuts
1/3 cup Chocolate Chips

Preheat the oven to 350 degrees. Grease a loaf tin and set aside.

Cream together butter and sugar until light and fluffy. Then beat in the eggs.
Stir in the apple sauce, buttermilk and the zucchini.

Sift together the dry ingredients. Stir into wet ingredients until just combined. Stir in the walnuts and the chocolate chips.

Bake for about 45 minutes, or until done. Cool on a wire rack.

Monday, August 29, 2011

Fresh Fig Cake


Once again, it's that time of year when the fig tree in my parent's backyard bears its fruits!

I remember my mom planting that tiny tree like it was yesterday and me questioning her at the age of 10 what figs were and if I would even like them.


Before I moved away from home at around 20 years old, I don't remember eating fruit off that tree. I do remember my mom getting really excited one year when she was able to get 3 figs off the tree. But she must have eaten them....


On my journeys away from home, I became more and more familiar with figs. Especially in the dried form. In Dubai and Damascus, I remember strings of them hanging in the store fronts along with dried dates and apricots. I fell in love with them.

Fast forward to this summer.... my first summer after returning to Canada, just a short ferry ride from home. And boy was I surprised this week when my mom came over with 2 huge buckets of ripe figs from the tree.


I ripped some apart immediately with my hands and ate them, with the intention of turning a lot of the remainders into jam. 


My sister, not knowing what to do with all these figs, resorted to the internet, and came up with this fantastic recipe for a fresh fig cake.

The only modification that she made was to use 1 1/2 cups of figs in the cake batter instead of the original 1 cup. And the cake was TO DIE FOR! It was so good, that I had to share it with all of you!

Fresh Fig Cake
http://allrecipes.com/recipe/fresh-fig-cake/detail.aspx

For the Cake:
1/4 cup butter, softened
1 cup white sugar
1 egg
2 cups all-purpose flour
1/2 teaspoon salt
2 teaspoons baking powder
1 cup evaporated milk
1 teaspoon vanilla extract
1/4 teaspoon almond extract
1 1/2 cups chopped fresh figs

For the Filling:
1/4 cup packed brown sugar
1/4 cup water
2 cups chopped fresh figs
1 tablespoon lemon juice

Preheat oven to 350 degrees F (175 degrees C). Spray two 8-inch round cake pans with vegetable oil spray.

In a medium bowl, sift together flour, salt and baking powder. Set aside.

In a large mixing bowl, cream butter with the sugar until fluffy. Add egg and beat well. Add flour mixture alternately with the evaporated milk. Fold in vanilla and almond extracts and chopped figs.

Divide into two prepared 8 inch round cake pans. Bake at 350 degrees F (175 degrees C) for 30 minutes, or until a toothpick inserted into the center comes out dry.

To make the filling: In a saucepan, combine 2 cups figs, brown sugar, water and lemon juice. Bring to a boil. Reduce heat to a simmer and cook until thickened, about 20 minutes. Spread thinly between layers of cake and on top.

Monday, August 1, 2011

Decadent Chocolate Cupcakes with Orange Cream Cheese Frosting


It was my cousin's birthday today. So I made cupcakes. Delicious, decadent chocolate ones. In fact, it is my go to, one bowl chocolate cake recipe care of Ms. Martha Stewart. It still never fails me. I use it for cakes and cupcakes for ever occasion, and adjust the frosting based on the person, the occasion, or my mood.

In this case, these cupcakes were for a summer birthday so I wanted the frosting to be rich but fresh (is that possible??).

I decided to use cream cheese frosting, because my cousin loves it! In fact, last time I made Mini Carrot Cake Cupcakes with Cream Cheese Frosting, she devoured them!

But to add that freshness, what better than some orange? I mean, chocolate and orange?? A match made in heaven! And on a summer day, it was the perfect combo!

Decadent Chocolate Cupcakes with Orange Cream Cheese Frosting

For the Cupcakes
(I used the One Bowl Chocolate Cake Recipe for these!)

2 1/2 cups all-purpose flour
1 1/4 cups cocoa powder
2 1/2 cups sugar
2 1/2 tsp baking soda
1 1/4 tsp baking powder
1 1/4 tsp salt
2 large whole eggs, plus 1 large YOLK
1 1/4 cups milk
1/2 cup plus 2 tbsp vegetable oil
1 1/4 tsp vanilla extract
1 1/4 cups warm water

Preheat the oven to 350F. Line your muffin pans with paper liners or spray your cake pans with cooking spray.

Sift together flour, cocoa, sugar, baking soda, baking powder and salt in a large mixing bowl.

Add the eggs and yolk, milk, oil, vanilla and water, and beat with an electric mixer on low speed until smooth and combined (about 3 minutes). Scrape down the sides of the bowl as needed.

Fill the prepared muffin tins with the chocolate cupcake batter until the cups are about 3/4 full. Bake for about 20-25 minutes until a toothpick inserted into the middle comes out clean. Let cool on a wire rack.

For the Icing
1 cup Cream Cheese, room temperature
1/4 cup Butter, room temperature
1/2 tsp Vanilla
2 3/4 cup Icing Sugar
Zest of 2 large Oranges
Dark Chocolate Shavings for Garnish

Beat the butter, cream cheese and vanilla in a bowl until completely smooth. Add the icing sugar, half a cup at a time until the icing is smooth. Stir in the fresh orange zest. At this point, you can spread onto the cooled cupcakes or you can place in the fridge and cool for 1-2 hours and pipe the icing onto the cupcakes. Garnish with a sprinkle of dark chocolate shavings.

Sunday, July 3, 2011

Banana Walnut Bread


I never realized how I take banana bread for granted. I mean, it is so easy and quick to make, that I almost forget how much I love it.

Then one day, I was with a friend in a coffee shop. She reached for a slice of banana bread, pre-cut and wrapped in cellophane. And she said... "I want a piece of banana bread... I love banana bread and I haven't had it in so long!" She then proceeded to buy it for $3.00! Can you believe it? $3.00 for a slice! 

So I asked her why she didn't just make banana bread at home. After all, she is a pretty good baker. 

And her response? "I have never made banana bread." WHAT?!?!?! Never made banana bread? How could this be possible?

What about Zuchinni Bread? or Carrot Cake. No, no, no. She hadn't made any of them before.

Why? I asked.

The answer? She didn't think it would be so easy. Well, here is a recipe that proves her wrong....

Banana Walnut Bread
Makes 1 loaf

1/4 cup Butter
1 tsp Vanilla
1/2 cup Sugar
2 Eggs
1/4 cup Unsweetened Apple Sauce
1 cup Mashed Ripe Bananas, about 2 large ripe bananas 
1 1/4 cups Flour
1 cup Whole Wheat Flour
2 1/2 tsp Baking Powder
1/2 tsp Baking Soda
1/2 tsp Salt
1/4 cup Buttermilk
1/2 cup Chopped Walnuts

Preheat the oven to 350 degrees. Grease a loaf tin and set aside.

Cream together butter and vanilla. Beat in sugar until light and fluffy. Then beat in the eggs.
Stir in the apple sauce and the banana

Sift together the dry ingredients. Stir into wet ingredients until just combined. Stir in the buttermilk and the walnuts.

Bake for about 45 minutes, or until done. Cool on a wire rack.

Sunday, June 12, 2011

German Marble Cake and a BBQ Celebration!


Today was my husband's birthday celebration. Nothing dramatic... just a low key barbeque with family. But of course, food wise, nothing can be "low key." We needed to make a spread fit for celebration!

On the menu? Barbeqie pork ribs, thyme marinated chicken thighs, smokies, grilled vegetables, greek pasta salad, and some sangria to wash it all down.


Oh, and the cake. Decisions, decisions. Every year, my husband gets some kind of awesome cake. The most memorable had to be the "Turtle" cake, followed by the patriotic vanilla cake . This year, when I asked him what kind of cake he wanted, he said "A Marble Cake." At first, I was surprised, but then I remembered...


On my birthday last year, I was blessed by a German friend, Julia, who surprised me with a German marble cake for my birthday. My husband loved it so much, he ate about 3/4 of it. He ate it as it was, and then for breakfast, lunch, and every time in between until it was gone. And it left such a strong impression that when I asked him about his birthday cake, he didn't even hesitate before asking for this one.

I am not sure if I can ever replicate Julia's delicious cake, but here is my recipe, which complemented our barbeque celebration just perfectly!


German Marble Cake
Makes 1 cake

1 cup Butter, room temperature
1 cup Sugar
4 Large eggs, separated yolks and whites
1 cup Skim Milk
1 tsp Almond Extract
3 1/4 cups Flour
1 tbsp Baking Powder
1 pinch Salt
1/4 cup Cocoa Powder
3 tbsp Triple Sec
Icing Sugar for dusting

Preheat oven to 350 degrees. Grease a bundt or fluted pan (like an angel food cake pan)and set aside.

In a large bowl, cream together butter and sugar. Beat in the egg yolks, milk, and almond extract.

Sift together the flour, baking powder and salt. Stir into the butter and egg yolk mixture.

In a separate bowl, beat the egg whites until stiff. Fold them into the batter.

Move half of the batter into a separate bowl. Mix in the cocoa powder and triple sec.

Spoon the batter into the cake pan, alternating white and brown batter. Then swirl with a fork.

Bake for about 60 minutes until a toothpick inserted into the center comes out clean. Cool on a wire rack. Dust with icing sugar before serving.

Sunday, May 22, 2011

Mini Carrot & Ginger Cupcakes with Cream Cheese Icing


I don't really think that I have a sweet tooth. Yes, I do occasionally crave a piece of dark chocolate or a homemade sweet, but in most cases, I would choose savory over sweet anyday.

The exception to this seems to be carrot cake. For a cake filled with vegetables, carrot cake is pretty delicious and sweet. In fact, I love it so much that I wanted my wedding cake to be carrot cake (over-ruled by Chocolate-Raspberry....).

Carrot cake is deliciously moist, and of course, topping it with sweet, velvety cream cheese icing doesn't hurt!

Mini Carrot & Ginger Cupcakes with Cream Cheese Icing
Makes 60 Mini Cupcakes

For the Cupcakes
2 cups Flour
2 tsp Baking Powder
2 tsp Cinnamon
1 tsp Baking Soda
3/4 tsp Salt
1/2 tsp Ground Nutmeg
3/4 cup Brown Sugar
3/4 cup White Sugar
3 Large Eggs
3/4 cup Vegetable Oil
1 tsp Vanilla
1 tsp Fresh Ginger, grated
2 cups Grated Carrots
1 cup Canned Crushed Pineapple, drained
2/3 cup Chopped Walnuts

For the Icing
1 cup Cream Cheese, room temperature
1/4 cup Butter, room temperature
1/2 tsp Vanilla
2 3/4 cup Icing Sugar

Preheat the oven to 350 degrees. Line mini muffin tins.

In a small bowl, mix together flour, baking powder, cinnamon, baking soda, salt and nutmeg. Set aside.

In a large bowl, beat the white and brown sugar, eggs, oil, vanilla and ginger. Add the flour mixture and stir until just combined. Stir in the carrots, pineapple, and walnuts.

Spoon the mixture into the muffin cups until 2/3 full. Bake for 11-13 minutes until a toothpick inserted into the centre comes out clean. Cool completely on a wire rack.

To make the icing, beat the butter, cream cheese and vanilla in a bowl until completely smooth. Add the icing sugar, half a cup at a time until the icing is smooth. At this point, you can spread onto the cooled cupcakes or you can place in the fridge and cool for 1-2 hours and pipe the icing onto the cupcakes.

Tuesday, May 10, 2011

S'mores Cupcakes


Camping is one of my favorite pastimes. Pitching the tent. Hiking. Building fires. And of course, campfire cooking.

In 2009, when we went camping in Eastern Canada, I shared some of my campfire cooking with you: Campfire Toasted Ham and Cheese Sandwiches, Fire Roasted Chicken Thighs, Cheddar Baked Potatoes, and of course, Warm Baked Apples filled with Nutella.


I think that was the last time we went camping (living in the Middle East, camping is not a very popular pastime) and since moving back to British Columbia, I have been dying to go!

So, while I was drifting off, thinking about ideas for cupcakes for my best friend, it's no surprise that camping came back into my mind. And then I thought of S'mores. The sweet, sticky, oozy marshmallow with the rich chocolate and the crunch of the graham cracker. So I decided to recreate S'mores in a whimsical cupcake.


This cupcake has a graham cracker crust, layer of chocolate, dense chocolately cupcake, graham sprinkles, broiled marshmallows, a chocolate drizzle, and topped with a graham cracker garnish.

Yes, it is a lot of steps and yes, it does take some time, but it is so so worth it! They looked fantastic and the taste was to die for. How could you possibly resist?


S'mores Cupcakes
Makes about 5 dozen medium sized cupcakes

For the Crust
1 1/2 cups Graham Crumbs
1/2 cup Sugar
1/3 cup Butter, Melted
3/4 cup Semi-Sweet Mini Choc Chips or Finely Chopped Chocolate

For the Cupcakes
(I used the One Bowl Chocolate Cake Recipe for these!)

2 1/2 cups all-purpose flour
1 1/4 cups cocoa powder
2 1/2 cups sugar
2 1/2 tsp baking soda
1 1/4 tsp baking powder
1 1/4 tsp salt
2 large whole eggs, plus 1 large YOLK
1 1/4 cups milk
1/2 cup plus 2 tbsp vegetable oil
1 1/4 tsp vanilla extract
1 1/4 cups warm water

For the Toppings
Marshmallows (I used mini but you could also use big ones)
1 1/2 cups Semi Sweet Chocolate Chips
Dark Chocolate Chips
15 Graham Crackers, broken into large pieces

Preheat the oven to 350F. Line your muffin pans with paper liners or spray your cake pans with cooking spray.

Combine the graham crumbs, sugar and melted butter. Press about 1 tsp into each cupcake mould. Sprinkle with chocolate chips.

Sift together flour, cocoa, sugar, baking soda, baking powder and salt in a large mixing bowl.

Add the eggs and yolk, milk, oil, vanilla and water, and beat with an electric mixer on low speed until smooth and combined (about 3 minutes). Scrape down the sides of the bowl as needed.

Add chocolate cupcake batter on top of the graham crusts until the cups are about 2/3 full. Sprinkle with a little of the graham crust. Bake for about 20-25 minutes (for medium sized cupcakes).

Let cool on a wire rack. Turn the oven to broil. Once cool, top with marshmallows and broil for about 30 seconds until the marshmallows are browned. Make sure you watch the marshmallows as they brown quickly and burn easily.

Once browned, remove from oven and using your fingers or a spoon, just press down the marshmallows.

In a microwave proof bowl, heat chocolate chips for 20 seconds at a time, then stir, then heat again, until completely melted. Place the chocolate into a ziplock bag and cut a small corner off the bag. Drizzle the chocolate over the top of the cupcakes. Garnish with a piece of graham cracker.


Monday, April 18, 2011

Green Pea Polenta Cakes: A Side Dish & Brunch all in one!


Today, as I was in the grocery store, my eyes fell on a bag of cornmeal. Strange... I haven't used cornmeal in ages. I really think it's because of moving. You see, I always make sure my pantry is full. You might call me a kitchen hoarder, but I just like to say that I am well stocked. Anyway, every time we move, we spend weeks before hand emptying out our pantry. That basically means using up as much stuff as we can and not buying anything else! As difficult as it can be when you get low in stocks, the more interesting the meals become.

So, once moved to a new location, I always start again to stock up the pantry. But it takes time. And something always gets overlooked. In this case, the cornmeal.

But I am so glad I have found it again! It is so easy to make and has endless possibilities. In this case, I made a great side dish which turned into an easy brunch also! Two dishes in one! Can't go wrong with that!

I cooked the polenta with some peas and aromatics then cooled it in a pan and cut it into little cakes. These cakes were then pan fried until crispy on the outside and soft in the middle. Yum!

These polenta cakes are great as a side dish to any sort of meal.  And the leftovers are amazing for brunch with a sunny side egg on top. Reminds me a little of the cheesy grits with poached egg that my husband loves so much!


Green Pea Polenta Cakes
Makes 12 squares (6 servings of 2 squares each)

1 tbsp Canola Oil
1/2 Red Onion, finely chopped
3 Cloves Garlic, minced
1 1/2 cups Cornmeal
4 cups Water
1 1/2 cups Frozen Peas
Salt and Pepper

Olive Oil or Butter for cooking

Prepare a 9" by 13" cake pan by lining it with plastic wrap.

In a large pot, heat canola oil over medium-high heat. Add the onions and garlic and cook until softened, about 5 minutes. Add polenta and water and bring up to a boil. Reduce to low. Stir continuously until polenta is cooked, about 20 minutes (alternatively, stir for the first few minutes, cover for about 10 minutes, then stir again). Stir in the frozen peas and salt and pepper to taste. The mixture should be creamy and smooth.

Pour the mixture into the prepared cake pan and smooth out with a spatula. Place in the fridge to cool and set.

Once cool, cut into 12 squares. Up until this point, this recipe can be prepared ahead and kept in the fridge until ready to use.

Heat some butter or olive oil in a pan over medium heat. Add the polenta squares and cook until browned on both sides and hot in the middle (about 5 minutes per side).

Serve as is or as a side dish to any meat, fish, or poultry. Or, for a yummy brunch, serve with a sunny side up egg on top (and bacon on the side...)

Friday, April 23, 2010

Light Fresh Grapefruit Cake


Here is an interesting recipe for a cake with fresh grapefruit. This cake is light, moist, full of fresh grapefruit flavor with a hint of sweetness. Perfect for an afternoon tea date.

I have seen many variations of grapefruit cake recipes, and most include a glaze to pour on top of the cake. I, however, don’t think a glaze is necessary. I think the cake tastes perfect as it is, and too much sugar masks the fresh and slightly tart flavor of the grapefruit.

If you do decide that you would like to add a grapefruit glaze to this cake, mix some icing sugar with fresh grapefruit juice to form a pourable consistency (about ¾ cup of sugar to 2 tbsp grapefruit juice) and pour over top of the cooled cake.


Light Fresh Grapefruit Cake
Makes 1 loaf

Dry Ingredients
1 cup Whole Wheat Flour
1/2 cup White Flour
2 tsp Baking Powder
1/2 tsp Salt
1/4 cup Sugar

Wet Ingredients
3 Large Eggs
Zest from 1 Large Grapefruit (approx 1 tbsp)
1 cup Low Fat Plain Yogurt
1/2 tsp Vanilla Extract
1/4 cup Canola Oil

1/4 cup Ruby Red Grapefruit Juice, freshly squeezed

Preheat oven to 175 degrees celsius. Lightly grease a standard loaf tin.

In a large bowl combine dry ingredients.

In a separate bowl beat the egg. Then add the rest of the wet ingredients and stir to combine.

Pour the wet ingredients into the dry ingredients, stirring until just incorporated. Then stir in the fresh grapefruit juice.

Pour the mixture into the greased loaf pan. Bake for 50-55 minutes until a toothpick inserted into the middle comes out clean.

Monday, April 12, 2010

Pantry Fish Cakes


When I was a kid, I remember eating frozen fish cakes, which I baked in the toaster oven for about 20 minutes and dipped in ketchup. Since that time, I have eaten many fish cakes and crab cakes, but never really thought of making them at home. Especially since where I am living, good fish and seafood are very hard to come by.


Then I stumbled across this recipe that uses canned sardines! Now that is certainly something that I could try because all the ingredients were in my pantry! So I did. And they were great.


Pantry Fish Cakes

Makes 8-10 Large Fish Cakes

For the Fish Cakes
3 cups Potatoes, cut into chunks (about 1/2 kg)
2 x 120g cans Sardines in water, drained
1/4 cup Parsley, chopped
Zest and Juice 1 small lemon
3 tbsp Dijon Mustard
2 tbsp Green Onions
Salt and Pepper

For the Sauce
1 tbsp Green Onions
2 tbsp Parsley, chopped
1 tbsp Light Mayonnaise
1/4 cup Light Yogurt
Zest and Juice 1 small lemon
Salt and Pepper

Canola Oil for cooking

Cook the potatoes in boiling salted water until tender, about 15-20 mins. Meanwhile, coarsely mash the sardines in a bowl (there's no need to remove the calcium-rich bones as they are soft enough to eat). Mix in the parsley, lemon juice, zest, green onions, and dijon. Drain the potatoes, then mash until smooth. Gently mix into the sardine mixture and season. Moisten your hands and shape into 8-10 large cakes.

In a seperate bowl, mix the sauce ingredients together.

Drizzle some canola oil into a non-stick frying pan and fry the fish cakes in batches for about 3-4 mins on each side until golden and crisp. Serve with the yogurt sauce.

Monday, March 1, 2010

Olive, Sundried Tomato and Oregano Cake


I love recipes that allow for a little creativity and improvisation, and this is one of those recipes. Once you make the basic cake recipe, you can spruce it up with whatever flavors you like. Today, I used olives, sundried tomatoes, and oregano, but a little cheese, bacon, onion, and fresh herbs sounds pretty good too! Just throw in whatever bits you have in your fridge or pantry and turn this savory, versatile cake into a party of flavors.


Just a note, you really have to try this cake recipe with some nice fresh olives. I really think their saltiness and tartness works very well here.

This cake is especially good dipped in some balsamic and olive oil with fresh cracked pepper. Yum!

Olive, Sundried Tomato and Oregano Cake
Makes 1 cake

1/2 cup Whole Wheat Flour
1/2 cup All Purpose Flour
2 tsp Baking Powder
1/4 tsp Salt
1/4 tsp Pepper
3 eggs
240 ml Evaporated Milk
50 ml Vegetable Oil
2 tsp Dried Oregano
1/4 cup Black Olives, pitted and sliced
1/4 cup Green Olives, pitted and sliced
1/2 cup Sundried Tomatoes, chopped

Preheat the oven to 180 degrees Celsius (350 degrees Farenheit).. Grease and line a loaf pan.

In a large bowl, mix together flours, baking powder, salt and pepper. In another bowl, beat eggs. Then beat in milk and oil. Add the liquid ingredients to the dry ingredients, mixing only until incorporated (do not over mix!). At this point, you can stir in any flavorings that you like. I used olives, sundried tomatoes and oregano.

Pour the mixture into the prepared loaf pan, and bake in the preheated 180 degree Celsius oven for 35- 45 minutes, until a toothpick inserted into the center comes out clean.

Monday, October 5, 2009

Naughty (or Healthy) Chocolate-Banana Cupcakes


Everyone loves cupcakes. Some of us even love them a little too much. But whether you want the occasional indulgence or the guilt free version, this is the recipe for you. These easy and delicious cupcakes can be made as healthy or as naughty as you want.


For the healthy version, make the low fat milk and whole wheat flour substitutions and keep the rest of the recipe as is. Eat as is (without icing)…more like a decadent muffin than a cupcake. (I have also tried substituting the butter for 2 tbsp oil and 2 extra tbsp low fat milk... it worked very well!)


For the naughty version? Use the full fat milk, the white flour and stir in some semi-sweet chocolate chips or poke in a few pieces of dark chocolate into each cupcake before sticking in the oven. And of course, top with some dark chocolate ganache (see chocolate cake blog for ganache recipe). What could be better? Oh, I forgot. Then head to the gym… for balance of course.


Or, for those of us that want decadence but want to skip the gym... make the healthy substitutions, poke with pieces of dark chocolate, and skip the icing. Now that is what I call compromise!

Chocolate-Banana Cupcakes
Makes 12 cupcakes

1/4 cup Butter, room temp
1/2 cup Sugar
2 Eggs
1/4 cup Milk (or substitute 1% or 2% milk)
2 teaspoons Vanilla Extract
3 Bananas, ripe and mashed
1 1/2 teaspoons Baking Powder
1 1/2 cups White Flour (or substitute whole wheat flour)
1/3 cup Cocoa Powder
1/2 teaspoon Salt

Preheat oven to 350 degrees.Grease or line a 12-cup muffin tin.

In a large bowl, cream together the butter and sugar. Add the eggs one at a time, beating until each is incorporated. Add milk, vanilla, bananas and mix well.
In a separate bowl, combine flour, baking powder, cocoa powder and salt.

Add the dry ingredients into the wet ingredients, mixing only until incorporated. Do not overmix, otherwise the cupcakes will be tough.

Spoon the batter into the muffin cups until about 3/4 full. Bake for 13-15 minutes until cupcakes are springy to the touch and a toothpick inserted in the centre comes out clean. Move to a wire rack to cool.

(If you would like to ice the cupcakes, make sure they are cooled completely first. Then make some
Dark Chocolate Ganache to spread on top!)

Thursday, June 11, 2009

Patriotic Vanilla Cake with Butter Cream Frosting

So, it was my husband’s birthday. And instead of making the usual chocolate cake, I decided to go for something a little daring… vanilla. Vanilla cake with buttercream icing. Risky right? Well, it was. Risky because it wasn’t the go to chocolate cake that you saw in one of my previous blogs. And risky because I wasn’t 100% certain that he would love it. Well, okay, that’s a lie. He loves sweets. But chocolate is hard to compete with.

I surprised him with a small early birthday party last month when we were in France with a small gathering of his close friends. For this occasion, we ordered a turtle shaped cake (raspberry sponge inside) to play on his French nickname “Tortue” (literally- turtle). The cake was stunning! Thus, the stakes for his actual birthday cake were even higher. Not only was I competing with my own staple rich chocolate cake which he loves, but I was also competing artistically with the turtle cake.
So, what was I going to do? Flavor wise, I decided it would be vanilla. Something different and equally tasty (I hoped). Esthetically, I knew I could not pull off a cool shape like the turtle. I was stumped. I had no idea what I was going to do. Then, the night before, I had an idea. The patriotic French husband’s birthday cake. Layers of red, white, and blue vanilla sponge complemented with a vanilla butter cream frosting.

The impression this cake makes immediately depends on how you decorate the outside. I went for a plain looking cake (white with blue writing), because I wanted the impact to come when the cake was sliced.


Now you are probably asking… did he like it? Well, I think you can see that for yourself.
Patriotic Vanilla Cake with Butter Cream Frosting
Makes a 3 layer cake - 9" Round

1 ½ cups Butter, Room Temp
2 cups White Sugar
9 Eggs
3 tsp Vanilla
4 ½ cups Flour
4 ½ tsp Baking Powder
¾ tsp Salt
¾ cup Milk

In a large bowl, cream together butter and sugar. Add the eggs, one at a time, mixing thoroughly after each egg is added. Add vanilla and stir.
In a separate bowl, mix together flour, baking powder, and salt.
Add dry ingredients about 1 cup at a time, alternating with milk and mixing well.

Optional Step: To color the cake: Divide the batter into 3 equal portions in 3 separate bowls. To each bowl, add a few drops of food coloring as necessary and mix until color is even. ( I colored one red, one blue, and left the third without coloring).

Lightly grease three 9” (23 cm) round cake pans and line bottoms with parchment paper. Fill each cake pan with batter. Bake at 350 degrees for about 30 minutes, or until a toothpick inserted into the centre of the cake comes out clean. Cool for about 15 minutes before removing from the pans. Cool completely on wire racks before frosting.


Vanilla Butter Cream Frosting
3 cups Icing Sugar
¾ cup Butter, Room Temp
3 tsp Whipping Cream
1 ½ tsp Vanilla Extract
Optional: Food Coloring

Cream butter with vanilla. Add icing sugar and cream. Beat well until light and fluffy. Add more icing sugar to thicken or whipping cream to thin as necessary.

When the cakes are cool, shave the tops of the bottom 2 layers to that they are even. Add an even layer of frosting onto the bottom layer of cake. Place the second layer on top and add a second even layer of frosting. Place the final layer of cake on top. Frost the entire cake with the remaining icing. Decorate as desired.