Search My Blog

Showing posts with label salad. Show all posts

Sunday, July 28, 2013

Wild Rice Salad


I love summer. Sunshine, music, farmers markets, bbqs....What could be better than that?

In Vancouver, this weather lasts just a few months, but it's these few months that propel us through the rainy and grey days during the rest of the year. Then, when the warmth and sunshine returns, we somehow quickly forget about those cold, wet days and become happy and social again!

So, to take advantage of the sunshine, I am spending as much time outside as I possibly can, trolling farmers markets, working in the garden, and of course, enjoying summertime meals. For this summer evening meal, I combined some farm fresh ingredients with some hearty wild rice, feta and dried cranberries to create this amazing salad that I really think I could eat all year long!

Friday, July 12, 2013

Kale Caesar Salad
(and other great uses for Caesar Salad Dressing)


Who doesn't like caesar salad? Even if you aren't an anchovy fan, the rich and creamy taste of caesar dressing is just addictive!

I used the Rebar Caesar Salad Dressing Recipe, which is absolutely fantastic and flavorful, made even better with roasted garlic, capers, and dijon. Then I made it a little healthier by using non-fat yogurt in place of some of the oil.

Besides having a great dressing, having fresh salad ingredients is also important. I personally love to make caesar salads with chopped kale. I find that it makes the salad heartier and the salad stays crisp and crunchy. In the picture above, you can see I used a mix of kale and romaine. Or of course, you could use the classic romaine if you wish (or really any other salad green you like).

Monday, July 1, 2013

Fresh & Filling Asian Lettuce Wraps


As the warmer weather hits, I am always looking for delicious recipes that are filling and fresh. I have lots, but most of them are some form of salad. Here are some of my favorites in case you missed them...


Anyway, as much as I love summer salads, this time, I wanted to do something different. And I have found the perfect recipe--- Asian Lettuce Wraps.

Saturday, March 2, 2013

Panzanella Salad (Italian Bread Salad)


When people think of salads, they often think about them as accompaniments rather than main courses. However, there are a lot of ways to make a salad a hearty and filling meal. For example, you can add protein like meat, fish, nuts, beans or eggs or you could add a starch like rice, potatoes or pasta.

Today, I am making a Panzanella Salad which is essentially an Italian bread salad. The bread adds a heartiness to this salad making it a great side dish or main course. The bread is also toasted, giving nice texture to the salad while soaking up some of the tasty dressing.

I love this salad because it is full of some many amazing flavours. The salty anchovy adds great depth to the dressing, the olives or capers add tanginess and salt, and all the veggies and basil add a freshness that elevate this from just a simple salad with croutons to something spectacular.

Wednesday, February 15, 2012

Blue Cheese, Walnut & Quinoa Chopped Salad


You know when you go through eating phases? Where you seem to eat a derivative of the same ingredients over and over for a while til you somehow switch to something new?

For example, I recently had a chicken phase. I had to eat chicken everyday. My favorite was a whole roasted chicken. I would eat the wings, my husband would eat the legs, and then we would use the breast meat in sandwiches, salads, and pastas. And when we were almost out of chicken (usually within a couple of days), I would get chicken anxiety, and I would run to the store and buy more chicken. Perhaps chicken legs or chicken breasts, but it had to be chicken. Nothing else was acceptable.

Now, I am in a salad phase. But not just any salad. Nope, that would be far to easy. It's got to be a salad with blue cheese and walnuts. Somehow, the richness of the cheese and the crunch of walnuts has made salads irresistible. And even though my pantry and fridge are stocked with tons of great ingredients, I have to run to the store to buy more stuff to make some kind of blue cheese and walnut salad. Go figure.

Sunday, February 5, 2012

Endive Salad with Walnuts


Endives. I am really not use to using these slightly bitter greens at all. But every time I go back to France, I find them in abundance in the fall, winter, and spring markets. It is especially noticeable in the winter, when there are few other "leafy" greens available... just cases upon cases of endives.

So, these become a winter staple. Cooked with bechamel and ham, sauteed with a little oil, salt and pepper, or as the basis of a fresh, wintery salad.

One of my favorites is this Endive Salad with Walnuts. It is light and flavorful, but the crunch of the walnuts and the slight bitterness of the greens remind you that it is still winter. Best of all, it is incredibly easy to make and apart from the endives, everything else is a pantry ingredient.

Monday, October 31, 2011

Kale Salad with Dried Cranberry, Walnut and Boursin


This is a super easy and incredibly flavorful salad. I made this as a Thanksgiving side dish, to complement my mom's massive turkey, stuffing, mashed sweet potato, and apple pie. It was a nice and fresh addition to the traditional but heavy, dishes included in Thanksgiving dinner. And as a bonus, it is chalk full of lots of healthy ingredients.

This would also make a great lunch, summer picnic dish, or dinner side.

Kale Salad with Dried Cranberry, Walnut and Boursin
Serves 2 (4 as a side dish)

1/3 cup Dried Cranberries
1/2 Sweet White Onion or Red Onion, sliced
1/2 pkg Cranberry and Black Pepper Boursin Cheese
1/2 cup Walnuts, toasted
Bunch of Kale, chopped (or Spinach)

For Dressing:
2 tbsp Dijon Mustard
1 tbsp Balsamic Vinegar
1 tbsp Extra Virgin Olive Oil
Salt and Pepper

In a large bowl, toss all the salad ingredients together.
For the dressing, place all ingredients into a jar and shake. Drizzle over salad.

Saturday, September 17, 2011

Roasted Vegetable Salad


As the summer ends and fall arrives, we are greeted with a plethora of "wintery" vegetables and a feeling that we just aren't ready for the summer to leave.

So, we find ourselves wanting to ease the passage of another summer by making dishes that reconcile both summer and winter seasons. Gone are the fruity, leafy salads, and fast arriving are Sunday night stews.

I think this dish perfectly expresses this changing of the seasons. Hearty vegetables are roasted and served room temperature or slightly chilled. An easy complement to the final summer grill out or a wintery roasted meat.

Roasted Vegetable Salad
Serves 4

1 Large Red Onion, cubed
1 Large Parsnip, cubed
1 Red Pepper, cut into chunks
1 Zucchini, cut into chunks
1 Sweet Potato, cubed
1 Eggplant, cut into chunks
4 cloves Garlic, whole peeled and crushed
2 tbsp Olive Oil
Salt and Pepper

1/2 cup Crumbled Feta Cheese

Dressing Ingredients
2 tbsp Dijon Mustard
2 tbsp Balsamic Vinegar
1 tbsp Maple Syrup
3 tbsp Extra Virgin Olive Oil
Salt and Pepper

Preheat the oven to 375 degrees.
Toss all the vegetables and garlic cloves in the olive oil. Season with salt and pepper.
Place the vegetables on a baking tray and roast for about 50 minutes.
Remove from the oven and let cool.

For the dressing, place all ingredients into a jar and shake together. Once the vegetables have cooled, toss with the dressing. Crumble the feta cheese on top.

Tuesday, July 12, 2011

Summer Quinoa Salad with Chicken & Apple


Nothing says summer like barbeques, picnics on the beach, and tasty, light summer food.

This salad is great because it is both a fresh and light accompaniment to any meal, or a healthy summer lunch or dinner! I love quinoa, but you could use couscous, bulgar, rice or even pasta in this recipe, and it would be fantastic.

I like to make this salad one evening for dinner, and keep the leftovers for lunch the next day! The perfect tasty timesaver!

Summer Quinoa Salad with Chicken & Apple
Serves 4

1 1/2 cups Quinoa
3 cups Water
4 Chicken Thighs, boneless and skinless
Juice and Zest of 1 Lemon
1 Large Apple, peel on, diced small (I used a Fuji apple but you can use whatever you have)
2/3 cup Yogurt
1/2 Red Onion, diced small
1 Zuchinni, peel on, diced small
1 can Black Beans, rinsed and drained
1/2 cup Raisins
1/2 cup Cilantro, chopped
Salt and Pepper

Place the quinoa and the water in a saucepan over medium-high heat. Bring to a boil, reduce to a simmer, cover and cook for about 12 minutes until the water is soaked up. Remove from heat and let sit for another 10 minutes or so. Fluff with a fork.

Season the chicken thighs with salt and pepper. Place in a pan over medium heat with a drizzle of oil and cook for about 4 minutes on both sides until cooked through. Let cool then shred with your hands.

In a large bowl, mix together lemon juice and zest and chopped apple. Stir in the yogurt. Add the onions, zuchinni, black beans, raisins and cilantro. Season to taste with salt and pepper.

Saturday, June 18, 2011

Four Bean Salad with Tangy Dressing


My mom used to make bean salad everytime we had company over. It was my least favorite dish. It was weird to eat a bowl of sweet and tart beans. Just didn't work for me.

Then my sister made it one night not too long ago. And it was fantastic. Hearty and filling with the tartness complementing the heaviness of the beans. I just couldn't stop eating it.

It's funny how dishes we remember as a child resurface in our adult lives. And it's amazing how our tastebuds change!

Four Bean Salad with Tangy Dressing
Serves 4-6

1 can Kidney Beans, rinsed and drained
1 can Chick Peas, rinsed and drained
1 can Cut Wax Beans, rinsed and drained
1 can Cut Green Beans, rinsed and drained
1 Green Bell Pepper, chopped
1 Red Onion, chopped
1/2 cup Cilantro, chopped

For the Dressing:
1/2 cup Red Wine Vinegar
1 tbsp Sugar
2 tbsp Extra Virgin Olive Oil
1 tsp Celery Seed
1 tbsp Mustard Dijon
Salt and Pepper

In a large bowl mix together all the salad ingredients.

In a seperate bowl, disolve the sugar in the vinegar. Add the other dressing ingredients and mix well. Pour the dressing onto the bean salad. Stir, cover, and refrigerate until service (the longer you refrigerate, the better this salad tastes, so I suggest you make it the night before).

Wednesday, April 13, 2011

More Tea Party Ideas: Greek Skewers & Mexican Taco Cups


On the topic of tea parties, here are a few other great tea party ideas. Of course, like the BBQ Chicken Pitas with Zesty Slaw earlier, they could also be used as creative starters for a dinner party, a light and fun lunch or appetizers before a party! They are so versatile and look great! Plus, a lot of the components can be made ahead.

These are fun, colorful dishes that can be made for 4 people or 40 people. So try them at your next social get together and let me know what you think!

Greek Skewers
Makes as many as you want

Feta Cheese
Extra Virgin Olive Oil
Oregano
Kalamata Olives
Cucumber, cut into about 2 cm cubes
Cherry Tomatoes
Red Onion, cut into about 2 cm pieces

Wooden Skewers, soaked for about 10 minutes (I think it helps everything slide on better, but not mandatory)

In a bowl, mix the olive oil and oregano. Cut the feta cheese into about 2 cm cubes. Toss in the olive oil and oregano.

Then just assemble the skewers... Cherry tomato, red onion, olive, feta, cucumber, tomato. Simple, tasty, and good looking!


Mexican Taco Cups
Make a few or a lot!

Ground Beef
Chili Powder
Ground Cumin
Salt and Pepper

Romaine Lettuce, Shredded
Salsa
Sour Cream
Guacamole (homemade or pre-made)
Cherry tomatoes, sliced
Cheddar Cheese, grated
Tostidos "Scoops" Tortilla Chips

Heat a pan over medium-high heat. Add the ground beef and season with chili powder and cumin (about 1 tsp of each for each 250grams of meat). Cook until there is no pink left and season to taste with salt and pepper. Let cool.

In a bowl, mix together equal parts of sour cream, salsa and guacamole (1/3 cup of each should be more than enough to start).

Assemble the cups: put about 1/2 teaspoon of ground beef mixture on the bottom of the tostido cup. Top with about 1/2 teaspoon of the sour cream mixture. Then add a little grated cheese, shredded lettuce, and top with a slice of cherry tomato.

These are best eaten immediately. The longer then sit, the tortilla chip becomes a little soggy.

Tuesday, April 12, 2011

Tea Party Ideas: BBQ Chicken Pitas with Zesty Cabbage Slaw


Tea Parties. Elegant parties with elegant little food. Cucumber sandwiches, smoked salmon rolls, petit fours and the like, right? Well, not in my book.


After all, who says that tea parties have to follow the "rules" when it comes to food? In my eyes, a tea party is a chance for people to get together, drink tea, perhaps champagne, and enjoy "little" food..... and by that, I simply refer to food that can be eaten while drinking tea.

So, this weekend was my sister's bridal shower. And it was a tea party.  So of course, food was an extremely important component. The question is, are all the traditions of a tea party really necessary?

Tea parties staples are in fact, just a suggestion, but they are not a requirement. It is not mandatory to adorn the table with perfect little cheddar sandwiches, deviled eggs, and fruit tartlets. This is a an opportunity to create an interesting spread of finger foods. Of course, details are everything. They need to look good and taste fantastic.

The first item on the menu were these BBQ Chicken Pitas with Zesty Cabbage Slaw. Definitely not the traditional tea party food, but colorful, comforting and just really delicious. They were a hit!


BBQ Chicken Pita with Zesty Cabbage Slaw
Makes a lot of little pitas (or you could just pile it onto a rolls and eat it yourself for lunch!)

For the Chicken
2 kg Whole Chicken Legs, bone in, skin on
Paprika
Salt and Pepper

For the BBQ Sauce
2 tbsp Canola Oil
1/2 Onion, chopped
4 Cloves Garlic, minced
1 tsp Dried Thyme
1 tsp Dried Rosemary
1 1/2 tsp Ground Cumin
1/2 tsp Ground Cloves
2 tsp Paprika
1 Bay Leaf
1/2 tsp Salt
1/2 tsp Black Pepper
2/3 cup Water
1/2 Orange, zest and juice
2 cups Plain BBQ Sauce (bottled)

For the Slaw
1 Head Cabbage, shredded (green, purple, or mixed)
1/2 Red Onion, thinly sliced
1/2 cup Raisins

For the Slaw Dressing
Juice of 1/2 Orange
Juice 1/2 Lime
2 tbsp Red Wine Vinegar
1/2 tsp Sugar
1 tbsp Dijon Mustard
1 tbsp Ginger, minced
1 small Red Chili, seeded and chopped
1/4 cup Extra Virgin Olive Oil
1/4 cup Plain Yogurt

Pita Bread (you could also use bread rolls or whatever bread you like)

For the Chicken
Generously season all sides of the chicken legs with salt, pepper and paprika. Place on a foil lined baking sheet and bake in a 350 degree oven for about 1 hour or until cooked through and the juices run clear. Remove from the oven and let cool.

Once cooled remove the skin and discard. Then shred or pull the chicken into small pieces and set aside.

For the BBQ Sauce
This is a really great way to make your own custom BBQ sauce. It really brings some additional great flavors to the table without needing to do everything from scratch.

Heat the oil in a large pot over medium heat. Add the onions and garlic and cook until translucent, about 5-8 minutes. Stir in all the spices. Then add the water, orange juice and zest, and BBQ sauce. Reduce the heat to medium low and let the BBQ sauce cook for about 45 minutes. This allows the flavors to meld together and the mixture to reduce a little.  After 45 minutes, remove the bay leaf.

Pour the BBQ sauce over the shredded chicken. Mix well and set aside.

For the Zesty Slaw
In a large bowl, add the orange and lime juices, red wine vinegar and sugar. Whisk until the sugar dissolves. Whisk in the dijon, ginger and chili. Then add the olive oil and yogurt and mix until smooth and creamy looking.  Add the cabbage, onions and raisins and toss with the dressing. Set aside.

To Prepare the Pitas
Cut each pita into triangles (I cut each pita into about 8 triangles). Top with a little slaw (make sure each portion has a few raisins), then the BBQ chicken. Enjoy!

Wednesday, March 16, 2011

Chicken Waldorf Salad


Waldorf Salad is a classic combination of apples, grapes, celery and walnuts in a creamy dressing.

Over the years, everyone has made their own version, and this is mine. It is pretty simple and stays very close to the classic Waldorf. However, since I made this the meal for two, I added some chicken.

Now, let's talk about the chicken for a moment. Most of the time, salads using chicken use chicken breasts which are cut into slices or cubes. I, however, used chicken thighs, which I cooked on the stove top, let cool, then hand shredded. Of course, if you prefer chicken breast, by all means use them. And if you prefer your salad to look less rustic, then of course you can cut the chicken into cubes. However, I love chicken thighs because they have far more flavor and stay super moist. In fact, I cook them with bone in and skin on, then remove both once the thighs are cooked. Then I hand shred them. Yes, a little rustic, but the salad dressing seems to stick better to the shredded chicken.

I also used only sour cream in the salad dressing. You could use yogurt, mayonnaise or a mix of the three, but I happened to have sour cream on hand and it turned out great!

This is a really great salad to make as a meal for 2 or as a starter or side dish for 4. And because there are no "greens" this salad doesn't wilt in the fridge. In fact, it tastes better with age, so make it in advance and keep the leftovers for a quick lunch. It really couldn't be easier.

Chicken Waldorf Salad
Serves 2 as a meal or 4 as a starter or side

1 Apple, cored and cut into cubes (I prefer the tartness of granny smith)
3 ribs Celery, cut into 1 cm pieces
1/2 cup Walnut Pieces, lightly toasted
1 cup Seedless Grapes, cut in half
4 Chicken Thighs, with skin and bone
Salt and Pepper

For the Dressing:
1/3 cup Sour Cream
2 tbsp Lemon Juice
1 tbsp Lemon Zest
1 tsp Celery Seeds
Salt and pepper

Heat a pan over medium heat. Season the chicken thighs with salt and pepper and place skin side down in the heated pan. Let cook for about 4 minutes until the skin is brown and turn over. Cover and oook for 6-8 minutes until cooked through. Remove from pan and let cool to room temperature.

In a large bowl, mix all the salad dressing ingredients. Season to taste with salt and pepper. Add the cut apple, celery and grapes. Remove the skin from the chicken and remove the meat from the bone. Tear into pieces about the same size as the rest of the ingredients. Toss everything together.

At this point, I would refrigerate the salad until I am ready to serve it. Just before service, toss in half of the toasted walnuts. Then sprinkle the rest on top for garnish.

Saturday, March 5, 2011

Ode to the Middle East: Part 2- Fattoush Salad


Fattoush. This is the salad that my brother fell in love with when he came to visit us in Syria (although he did mistakenly call it Phantoof....).

The reason why I love this salad (and probably why my brother loves it also) is because it has great texture and flavor. It is so fresh tasting and the tartness of fresh lemon juice, tanginess and saltiness of the olives, bite of the onions,  and the crunch of the fried or toasted pita bread all complement each other. It is a great starter salad, as it is traditionally eaten, or could be great as a meal, topped with some roasted chicken.

And the best part is that it can easily be made anywhere in the world!

Traditional fatoush uses a slightly bitter green called Purslane. If you cannot find purslane, you can use watercress, or baby arugula. It also uses a spice called sumac, which is ground from red berries and imparts a sour, lemony taste.

Here is my fatoush recipe:

Fatoush Salad
Serves 2

2 Tomatoes, cut into large dice
1 English Cucumber, cut into large dice (cut into 4 lengthwise, then chop)
1 bunch Purslane (Watercress, Baby Arugula, or Lettuce)
1/4 cup Black Olives (pitted, sliced, or whole.... your choice)
1 Shallot, thinly sliced

For the dressing:
1/4 cup Extra Virgin Olive Oil
1 tbsp White Wine Vinegar
2 tbsp Fresh Lemon Juice
1 tsp Sumac
1 tsp Dried Mint
1 tsp Dried Thyme
1 clove Garlic, crushed
1/2 tsp Salt

1 Round of Pita Bread

In a large bowl, mix together all the salad ingredients. For the purslane or watercress, use the leaves and small stems only. For the lettuce, chop into bite sized pieces.

In a smaller bowl, whisk together all dressing ingredients.

Place the pita bread in the oven (350 degrees) until crisp- about 5 minutes. Break into bite sized pieces. (You could also fry this bread as done traditionally. Cut into 1 inch pieces and fry in oil until crisp).

To put it all together, toss the dressing into the salad and top with the crisp pita bread.

Monday, November 29, 2010

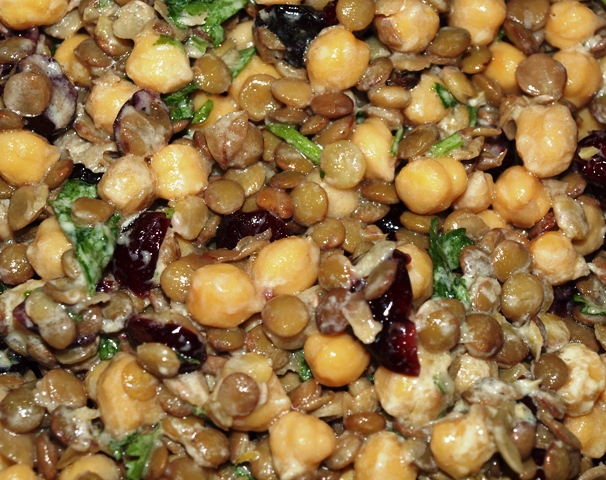
Lentil & Chick Pea Salad with Dried Cherries and Creamy Lemon Yogurt Dressing


I pride myself in a well stocked pantry. I could say it's because I like to be prepared for a natural disaster, but in fact, it's because I like to be prepared for whatever culinary adventure strikes me at any given moment.

Of course, there's the dried stuff.... the pasta, rice noodles, egg noodles, rice, couscous, cornmeal, oatmeal, bulgar, lentils, chickpeas, and other beans and pulses. Oh, and don't forget the flours and sugars. Then there is the canned stuff... the chopped tomatoes, coconut milk, evaporated milk, sweetened condensed milk.  Then, the essential sauces and oils. I mean, I like to make most things myself, so I am not referring to add and toss pasta sauce or meat sauces, I am talking about seasoning sauces like worchesterchire, tobasco, soy sauce, hoisin, oyster sauce, sesame oil, truffle oil, vinegars, etc.

Oh, and don't even get me started on the spices!  That would take hours.

But then there are times when it is necessary to do a "pantry clearout." Those are the times when I feel up for a challenge, or when my husband and I finalize a move to a different country and we realize we have far too much stuff in our pantry. So, for some number of weeks, or months (yes, it can take me THAT long to clear all the stuff in my pantry), we survive on what we have, plus the essential fresh stuff that we allow ourselves to buy.

And let me tell you... dishes can get mighty creative! So, here is one of them. A salad made from beans, dried fruit, and other stuff.

Oh, and as a note, I used dried lentils and chick peas rather than canned. I find that the texture of dried is far nuttier than canned and that each individual pulse stands up to being tossed in dressing and never gets that mushy texture. That is why I prefer to take the time and cook my own.

Lentil & Chick Pea Salad with Dried Cherries and Creamy Lemon Yogurt Dressing
Makes loads

2 cups Chick Peas, cooked
3 cups Lentils, cooked
3/4 cup Dried Cherries
1/2 cup Cilantro, chopped

For the Dressing
Zest and Juice of 2 Lemons
1/2 cup Yogurt
1/2 cup Olive Oil
2 tbsp Dijon Mustard
Salt and Pepper

In a jar or container with tight fitting lid, add add dressing ingredients. Place on lid and shake, shake, shake!!

Then, in a large bowl, toss together chick peas, lentils and dried cherries. (Everything can be done ahead up to this point).

When you are ready to serve, pour the dressing over the chick peas mixture and toss. Then stir in the cilantro. Season to taste with salt and pepper.

Sunday, November 21, 2010

Potato & Calamari Salad


There are so many versions of potato salad. And most are the mayonnaise drenched, rich kind that accompany fried chicken at a picnic or German sausages.

Well, not this one. This potato salad is colorful, healthy, light (well, by light I guess I mean in comparison to other potato salads), fresh, and full of veggies.  There is the crunch of the vegetables, the tender chewiness of the squid, the freshness of the lemon juice.... it is just so delicious.

So, try this salad. Not as an accompaniment to other picnic favorites, but on its own as a lunch or light dinner or a starter before other great dishes!

Potato & Calamari Salad
Serves 2 generously as main dish

3 Large Potatoes
1 Shallot, chopped
2 Small English Cucumbers
1 Large Tomato
2 cloves Garlic, minced
2 sprigs Fresh Rosemary, destemmed and chopped
500 grams Squid, cut into rings
Juice of 1/2 Lemon

2 tbsp + 2 tbsp Extra Virgin Olive Oil


Salt and pepper

Peel the potatoes and boil or steam until fork tender. Cut into large chunks and place in a bowl, along with the chopped shallot, cucumber and tomato. Season with salt and pepper and set aside.

In a large sautee pan over medium heat, add 2 tbsp olive oil. Add the garlic, chopped rosemary and squid and cook for about 1-2 minutes, until squid just turns opaque. Squeeze in the lemon juice. Pour the entire mixture into the bowl with the potatoes and vegetables. Toss. Drizzle with about 2 tbsp of olive oil and season to taste. Enjoy warm or cold.

Tuesday, September 14, 2010

Green Pea Pesto with Orechiette


Ahh…. Fresh green peas AGAIN! Yes, there is an abundance of fresh green peas around here, and I am really loving the taste of them. I used to be a frozen pea kinda girl. So convenient, sweet, and perfectly frozen at their absolute best, frozen peas really are the mid week solution to vegetable needs.

But now fresh peas have taken their place. That fresh but slightly bitter crunch just cannot be replicated with frozen peas. On top of that, it just so happens that right here in Damascus, you can buy fresh peas in the market already shucked! Yes, that’s right… you don’t have to spend the time to do it yourself, making these a great fresh veggie for the middle of the week!


You just need to make sure you aren’t uber sensitive about the fact that they come from a market called Shalaan, which is actually the “lazy women’s market.” This is the market where you can buy parsley already all chopped up to make tabouleh, zucchinis and aubergines already hollowed out and ready to be stuffed, garlic already peeled, and peas already shucked. So, if you can get over your complex of shopping in the “lazy women’s way,” just thank the gods for finding fresh “convenience” foods, then enjoy!


Green Pea Pesto with Orechiette
Serves 4

2 cloves Garlic
1 large pinch Sea Salt
2 cups Fresh Green Peas
Juice of 1 Lemon
1/2 cup Parmesan Cheese
Extra Virgin Olive Oil (about 1/4 cup)
Salt and Pepper
500 grams uncooked Orechiette
Lemon zest for garnish

Cook the orechiette in boiling salted water until el dente, drain and place in a large bowl. Toss in a little olive oil and set aside.

In a mortar (or a blender), pound together the garlic, sea salt, and the peas (reserve a few for garnish). Once this mixture resembles a chunky puree, add the lemon juice and cheese. Then mix in enough olive oil to form a thick paste. Add salt and pepper to taste.

Mix the pea mixture with the pasta. Drizzle with some olive oil and garnish with some fresh peas and lemon zest.

** Note: I have considered trying this recipe with some fresh mint, since peas and mint really are a perfect pair. To do this, pound about 1/2 cup fresh mint leaves with the garlic and sea salt. Then add the peas and continue the recipe.**

Monday, September 13, 2010

Warm Lentil “Salad” with Lardons, Peas, and Egg


Salad? Is this really a salad? I have no idea. But the original idea was. The idea was to cool the lentils then toss in the lardon mixture and top with the egg to make a warm dish, but, in the end, I was so hungry that I tossed everything together and ate it hot. And it was really really good.

The saltiness of the lardons, the crunch of the lightly cooked fresh peas, the runny egg yolk… the combination was amazing.

Fresh Peas?? Well, I used fresh peas because they gave a kind of bitter sweet crunch when they were just barely cooked. It added a nice contrast to this dish. Of course, if all you have is frozen peas, by all means, use them, but toss them in at the very end.

Warm Lentil “Salad” with Lardons, Peas, and Egg
Serves 4

1 cup Uncooked Lentils (about 4 cups cooked)
1 1/2 liters Water
1 Large Onion
3 cloves Garlic
1 cup Lardons (or sliced thick cut bacon, or pancetta)
1 cup Fresh Green Peas
Salt and Pepper to taste
Olive Oil
4 Eggs

Put lentils in a large pot, and cover with about 1 1/2 liters of water. Bring to a boil, and cook for about 30-45 minutes, until tender but not mushy. Drain and set aside.

In a large pan, add about 1 tbsp of olive oil and the lardons. Cook until the fat of the lardons starts of melt and they start to brown. Add the onions and the garlic and cook until the onions soften. Add the green peas and cook for about 1 minute. Then toss in the lentils. Season to taste with salt and pepper.

Cook the eggs sunny side up (in a hot pan, add a little olive oil, crack the egg into the pan, salt and pepper the egg, and cook until the white is cooked but the yolk is still soft).

Spoon the lentil mixture onto a plate, top with the sunny side up egg, and drizzle with a little extra virgin olive oil.

Sunday, July 4, 2010

Healthier Caesar Salad


Caesar Salad. That thicky, creamy, garlicky dressing! Who can resist? And of course, eating salad must be healthy right? WRONG!

Caesar salad is usually anything but healthy. Except for my version of course, which is packed with flavor and can be eaten without a guilty conscience!

In this recipe, I use yogurt for the creaminess and lots of lemon, anchovies and dijon to give maximum impact. I do use parmesan in the dressing, but only 1/4 cup of the grated good stuff. Try to stay away from the pre-grated, processed kind.


I served mine as a main course with some grilled, shredded chicken leg, but you could serve yours plain, or top it with whatever you like (try a piece of grilled fish, canned tuna, or even olives and walnuts for some protein!).

Give it a try and I am sure you will add this to your list of everyday meals!

Healthier Caesar Salad
Serves 2 as a main course

1/2 Head Romaine Lettuce, washed and cut
5 Anchovy Fillets, mashed to a paste
2 cloves Garlic, crushed
1 tsp Dijon Mustard
3 tbsp Yogurt
Juice of 1/2 Lemon
1 tbsp Extra Virgin Olive Oil
1/4 cup Grated Parmesan Cheese
Salt and Pepper to taste

In a bowl, mash the anchovy fillets. Add the garlic and mustard and mix together well. Then stir in the yogurt, lemon juice and olive oil. Stir in the parmesan. Season to taste with salt and pepper.

Toss the chopped romaine in the caesar dressing. Garnish with some parmesan shavings and extra toppings (chicken, fish, etc) as desired.

Saturday, November 28, 2009

Couscous Salad


Coucous. What a wonderful thing. It’s as versatile as rice, except that it takes less than 5 minutes to make. And the best part…. You can make it in the microwave directly in your serving dish. No mess and no cleanup!

My husband loves couscous tossed with a little salt and butter or olive oil. He could eat a whole bowl sitting on the couch. However, the wife part of me thinks it’s important to take his yummy couscous and turn it into a dish that is a little more balanced, if you know what I mean. So, I made him a couscous salad. It is more filling than a regular salad because of the couscous, while still containing loads of veggies. And there is a great mix of flavors and textures… the freshness of the lemon juice and mint, the creamy, salty feta cheese, and the pop of each olive. And, it takes the same amount of time as to make any other salad! What a bargain!


Couscous Salad
Serves 2 as a Main Course or 4 as a Side Dish

1 cup Couscous
1 ½ cups Water
2 tbsp Extra Virgin Olive Oil
1 cup Tomato, diced
¾ cup Cucumber, sliced
½ cup Green Onion, sliced
¼ cup Fresh Mint, chopped
Juice of 1 Whole Lemon
1/4 cup Feta Cheese
1/3 cup Black Olives

Place the couscous, water, and large pinch of salt in a microwave proof bowl and cook on high for 3 minutes. Remove from microwave and gently fluff with a fork. Drizzle with extra virgin olive oil. Let cool for a few minutes while preparing the other ingredients.

In a large bowl, mix tomatoes, cucumber, green onion and mint. Add the couscous. Drizzle with lemon juice. Crumble in the feta cheese and add the olives. Mix gently. Serve as a side dish for grilled chicken or meats (or eat it as is!).