Search My Blog

Sunday, September 26, 2010

Peach Jam


I am really into jam right now. Actually, more into making it than eating it to be honest.

I did make some strawberry jam a few months ago without pectin. This works very well, but I still prefer the consistency with the pectin. I just didn't have any at the time.


Then, I got my hands on some and made Fig Jam. I decreased the sugar, doubled the pectin, and found it to be a nice consistency and overall, very tasty. I would prefer the jam, however, with even less sugar. That's just my preference. My husband would probably disagree.

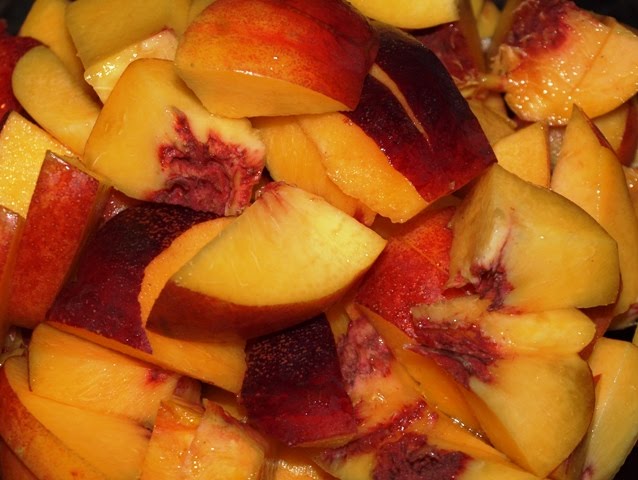
So, I made some peach jam today. Decreased the sugar, threw in a cinnamon stick, and it turned out beautifully. Like I said before, I had to use 2 packages of pectin to get the consistency I like. This could be because of the amount of sugar I use. You will need to try for yourself.  Most jams use equal amounts of sugar and fruit. I use less than half. You can start with however much sugar you like and 1 package of pectin. Once you boil it, taste it, then test the consistency. Add more sugar or pectin as necessary.

Once you have the method, I think you will find yourself making more jam that you can eat! I hope you have a husband like mine that eats his way through jars at a time!


Peach Jam
Makes about 4 jars of jam

1 1/4 kg Peaches (to make about 1 kg of pitted and cubed fruit, pitted and cut into pieces--not necessary to peel the peaches)
1/2 cup Water
2 packages Pectin
3/4 cup Sugar (about 165 grams)
1 stick Cinnamon
4 Sterilized Jam Jars

Place peaches and water into a large pot. Cover and cook on medium heat for about 10 minutes. Mash gently.

Add about 1/4 cup of sugar to the pectin. Stir the pectin/sugar mixture into the peaches. Cook for 5 minutes.

Stir the remaining sugar into the peach mixture. Add the cinnamon stick. Cook for another 5 minutes.

Take a small amount of jam out with a spoon and let it cool. If the jam is too runny, add in another 1/2 package of pectin, boil for 2 minutes, then check the thickness again.

Once you are satisfied with the thickness of the jam, skim the foam from the jam, stir the jam, and proceed to fill the sterilized jam jars. Fill the jars until they are about 1/2 cm from the top. Wipe the top of the jar clean and close with the lid.

Place the filled and closed jars into about 5 cm of boiling water and boil for 7-10 minutes. Pull the jars out of the water and let cool in a draft free place. Do not touch or move. Once they are cool (usually takes 1 day), check that the jars are properly sealed (the lid should be sucked in).

Store for 12-18 months in a cool place. Once opened, place in the refrigerator.

Friday, September 24, 2010

Homemade Bread with Cracked Wheat


I am not exactly sure how this happened, but today, I opened my pantry and found bags of cracked wheat. Yes, I use it for salad. Yes, I eat it as hot cereal. Yes, it is healthy and high in fibre. But really, 2 kilos of it? What in the world am I going to do with all of this?

Then I found this recipe for Cracked Wheat Bread. I love to bake fresh bread. In fact, I do it every week. (Although my journey with bread has been a long a grueling one....). So, perhaps adding cracked wheat to my weekly routine could just be the answer to my problems.

The bread rose really well and despite the few extra steps compared to my regular loaf, was very very easy to make. And, to top it all off, it turned out to be so delicious, that I might have to buy some more cracked wheat....


Homemade Bread with Cracked Wheat

Makes 2 large loaves of bread

1/2 cup Cracked Wheat
1 1/2 cups Water
2 1/4 tsp Active Dry Yeast
1/3 cup Warm Water
1/4 cup Butter
1 tbsp Salt
4 tbsp Honey
1 cup Milk
2 cups Whole Wheat Flour
3 cups Flour

Add the cracked wheat and 1 1/2 cups water to a pan. Bring to a boil, reduce to a simmer and cook for 8-10 minutes, stirring constantly. When the cracked wheat is soft, remove from heat and stir in butter, honey, salt, and milk. Let cool to room temperature.

Meanwhile, add the warm water to a large mixing bowl. Sprinkle in the yeast and let sit for about 10 minutes in a warm, draft free place.

Add the cooled cracked wheat mixture to the yeast. Slowly stir in the flour to form a soft dough. Turn the dough onto a generously floured board and knead for 10-15 minutes until smooth and elastic. Form into a ball, return to the bowl, cover, and let rest until doubled in size (about 1 hour). Punch down the dough, divide into two, and shape into two loaves.

Place the two loaves onto a baking sheet and slash with a knife. Let rise for another 20 minutes.

Meanwhile, preheat the oven to 400 degrees Farenheit). Bake the loaves for 35-40 minutes, until the loaves sound hollow when tapped on the bottom. Cool completely on a wire rack.

Wednesday, September 22, 2010

Herb Breaded Chicken Tenders with Honey Mustard Dipping Sauce


These are my husband's favorite. He constantly hints at them... as if I have forgotten to make them for him for a long time!

There are infinite ways of making chicken tenders, and I usually do it differently each time I make them. Sometimes I bread them with cornflakes, cornmeal, crackers, or bread crumbs, and sometimes I dip them in egg, egg and milk, yogurt, or olive oil. I usually end up baking them, but sometimes I pan fry them first. It really just depends.

But no matter how I make them, one thing remains the same, and that is the Honey Mustard Dipping Sauce. No matter how I make the chicken, it really is the sauce that counts.


Herb Breaded Chicken Tenders with Honey Mustard Dipping Sauce
Serves 4 to 6 people

1 1/2 kg Chicken Breast, cut into strips
2 cups Bread Crumbs
1 cup Flour
1 tbsp Salt
2 tsp Ground Black Pepper
2 tbsp Dried Oregano
2 tbsp Dried Parsley
About 1/4 cup Olive Oil

Preheat oven to 180 degrees Celsius (350 degrees Farenheit).

In a large bowl, mix together bread crumbs, flour, salt, pepper, oregano and parsley.

In another large bowl, place the chicken tenders. Drizzle with olive oil until all the chicken tenders are coated.

Dip each olive coated chicken tender into the breadcrumb mixture and place on a sheet pan lined with parchment paper.

Bake in preheated oven for 25 minutes, turning once during cooking. Serve with Honey Mustard Dipping Sauce.

Honey Mustard Dipping Sauce

1/2 cup Dijon Mustard
2 tbsp Honey
1 tbsp Balsamic Vinegar

Stir together the mustard, honey, and balsamic vinegar. Enjoy with chicken tenders.

Tuesday, September 21, 2010

Fig Jam


Tis the season for fresh figs. So, what better way to preserve the freshess of the season than to make jam.

This jam tastes great on its own, with Homemade Peanut Butter, or as a compliment to cheese.


To be honest, I don’t like my jam to be too sweet, so I cheat and use less sugar and more pectin and somehow, it works.


Fig Jam
Makes 5-6 jars of jam

About 2 kg Fresh Figs
1/4 cup Fresh Lemon Juice
3/4 cup Water
2 packagea Pectin
1 kg Sugar (about 5 cups)
6-8 sterilized Jam Jars (see below)

Wash the figs, and remove the stems and the bottoms. Peeling the figs is optional (I don’t peel them unless they are damaged). Just note, that you should end up with about 1.7kg of cleaned fruit.

Place the figs in a large pot, add the lemon juice and water, cover, and boil for about 3 minutes. Mash the figs with a potato masher.

Mix package of pectin with about 1/4 cup of the sugar.

Add the pectin/sugar mixture to the figs and boil for another 3 minutes.
Add the rest of the sugar, and boil for 5 minutes. Take a small amount of jam out with a spoon and let it cool. If the jam is too runny, add in another 1/2 package of pectin, boil for 2 minutes, then check the thickness again.

Once you are satisfied with the thickness of the jam, skim the foam from the jam, stir the jam, and proceed to fill the sterilized jam jars. Fill the jars until they are about 1/2 cm from the top. Wipe the top of the jar clean and close with the lid.

Place the filled and closed jars into about 5 cm of boiling water and boil for 7-10 minutes. Pull the jars out of the water and let cool in a draft free place. Do not touch or move. Once they are cool (usually takes 1 day), check that the jars are properly sealed (the lid should be sucked in).

Store for 12-18 months in a cool place. Once opened, place in the refrigerator.

Sterilizing the Jars

I have always reused jars for jam rather than buying proper jam jars. As long as you sterilize them properly, this should not present a problem.

I choose jars that have popping lids.

Wash them with soap and water as usual. Then boil the jars in water for 10-15 minutes. Turn off the heat and remove the jars and place upside down on a rack to dry slightly (but do not let them cool all the way). Place the lids in the still hot water for about 10 minutes. Remove onto the rack.

Friday, September 17, 2010

My Grandma’s Crisp Oatmeal Cookies


I really love cookies.

I think this is because of my grandma. When we were kids, she used to fill leftover tins with her homemade cookies. I remember looking at the Quality Street candy tins and the blue English tea cookie tins sitting under her side table and wondering which cookies were inside. I always knew that these tins were never filled with the original goods. They were always, always full of her (and our) favorites… particularly peanut butter, oatmeal raisin, lemon bars, schneken, and these yummy, crunchy oatmeal cookies.


As a little twist, I added some dried cranberries to the final dough. You could also add raisins, chocolate chips, or just keep them plain and simple. Because they are thin and flat, you can also sandwich them around a generous layer of nutella…


My Grandma’s Crisp Oatmeal Cookies
Makes about 5 dozen cookies

1 cup Butter, soft
1 cup Brown Sugar
3 cups Rolled oats
1 cup Whole Wheat Flour
1/2 tsp Salt
1 tsp Baking Soda
1/4 cup Boiling Water
1/2 cup Dried cranberries (optional)

Cream butter and sugar.

Mix together oats, flour, salt, and baking soda. Stir into butter and sugar mixture. Add 1/4 cup boiling water. Mix until dough comes together.
Shape into 2 rolls that are about 5 cm in diameter and freeze.

Heat oven to 180 degrees Celsius (350 degrees Farenheit).. Using a very sharp knife, slice into about 1/2 cm slices. Place on lined baking tray and bake for about 10 minutes until browned. Let cool so that they become crisp.

Tuesday, September 14, 2010

Green Pea Pesto with Orechiette


Ahh…. Fresh green peas AGAIN! Yes, there is an abundance of fresh green peas around here, and I am really loving the taste of them. I used to be a frozen pea kinda girl. So convenient, sweet, and perfectly frozen at their absolute best, frozen peas really are the mid week solution to vegetable needs.

But now fresh peas have taken their place. That fresh but slightly bitter crunch just cannot be replicated with frozen peas. On top of that, it just so happens that right here in Damascus, you can buy fresh peas in the market already shucked! Yes, that’s right… you don’t have to spend the time to do it yourself, making these a great fresh veggie for the middle of the week!


You just need to make sure you aren’t uber sensitive about the fact that they come from a market called Shalaan, which is actually the “lazy women’s market.” This is the market where you can buy parsley already all chopped up to make tabouleh, zucchinis and aubergines already hollowed out and ready to be stuffed, garlic already peeled, and peas already shucked. So, if you can get over your complex of shopping in the “lazy women’s way,” just thank the gods for finding fresh “convenience” foods, then enjoy!


Green Pea Pesto with Orechiette
Serves 4

2 cloves Garlic
1 large pinch Sea Salt
2 cups Fresh Green Peas
Juice of 1 Lemon
1/2 cup Parmesan Cheese
Extra Virgin Olive Oil (about 1/4 cup)
Salt and Pepper
500 grams uncooked Orechiette
Lemon zest for garnish

Cook the orechiette in boiling salted water until el dente, drain and place in a large bowl. Toss in a little olive oil and set aside.

In a mortar (or a blender), pound together the garlic, sea salt, and the peas (reserve a few for garnish). Once this mixture resembles a chunky puree, add the lemon juice and cheese. Then mix in enough olive oil to form a thick paste. Add salt and pepper to taste.

Mix the pea mixture with the pasta. Drizzle with some olive oil and garnish with some fresh peas and lemon zest.

** Note: I have considered trying this recipe with some fresh mint, since peas and mint really are a perfect pair. To do this, pound about 1/2 cup fresh mint leaves with the garlic and sea salt. Then add the peas and continue the recipe.**

Monday, September 13, 2010

Warm Lentil “Salad” with Lardons, Peas, and Egg


Salad? Is this really a salad? I have no idea. But the original idea was. The idea was to cool the lentils then toss in the lardon mixture and top with the egg to make a warm dish, but, in the end, I was so hungry that I tossed everything together and ate it hot. And it was really really good.

The saltiness of the lardons, the crunch of the lightly cooked fresh peas, the runny egg yolk… the combination was amazing.

Fresh Peas?? Well, I used fresh peas because they gave a kind of bitter sweet crunch when they were just barely cooked. It added a nice contrast to this dish. Of course, if all you have is frozen peas, by all means, use them, but toss them in at the very end.

Warm Lentil “Salad” with Lardons, Peas, and Egg
Serves 4

1 cup Uncooked Lentils (about 4 cups cooked)
1 1/2 liters Water
1 Large Onion
3 cloves Garlic
1 cup Lardons (or sliced thick cut bacon, or pancetta)
1 cup Fresh Green Peas
Salt and Pepper to taste
Olive Oil
4 Eggs

Put lentils in a large pot, and cover with about 1 1/2 liters of water. Bring to a boil, and cook for about 30-45 minutes, until tender but not mushy. Drain and set aside.

In a large pan, add about 1 tbsp of olive oil and the lardons. Cook until the fat of the lardons starts of melt and they start to brown. Add the onions and the garlic and cook until the onions soften. Add the green peas and cook for about 1 minute. Then toss in the lentils. Season to taste with salt and pepper.

Cook the eggs sunny side up (in a hot pan, add a little olive oil, crack the egg into the pan, salt and pepper the egg, and cook until the white is cooked but the yolk is still soft).

Spoon the lentil mixture onto a plate, top with the sunny side up egg, and drizzle with a little extra virgin olive oil.

Thursday, September 9, 2010

Lemon Cranberry Biscotti


Some people like soft and chewy cookies. Others prefer crisp and crunchy cookies. I like them both.

Today, I was craving something crunchy and satisfying. So I decided to make biscotti, the ultimate in crunchy cookies. I especially love these biscotti, because they have cornmeal, which give them a distinctive, satisfying crunch.


After going through a chocolate phase, when everything had to have dark chocolate, I wanted to make something different. So instead of my usual Dark Chocolate and Walnut Biscotti, I decided to go for Lemon and Cranberry. Summery yet comforting.


Lemon Cranberry Biscotti
Makes about 36 biscotti

3 Eggs
2/3 cup Sugar
Zest of 2 Lemons
2 cups Flour
3/4 cup Cornmeal
1 ½ tsp Baking Powder
1 tsp Salt
¾ cup Dried Cranberries

Preheat the oven to 180 degrees Celsius (350 degrees Farenheit).

In a large bowl, beat the eggs. Add the sugar and lemon zest and beat well until pale yellow.

In a separate bowl, mix together the flour, cornmeal, baking powder and salt. Add the dry ingredients to the wet ingredients, mixing until just combined. Stir in the cranberries.

Divide the dough into two and form each half into logs. Place the logs on a lined baking sheet and flatten each log so that they are about 4 inches wide and 1 inch thick. (It is easier if you wet your hands a little so the dough doesn’t stick).

Bake the logs for about 25 minutes until golden. Place on a wire rack to cool for about 15 minutes. Then, slice each log diagonally into ¾ inch slices. Place the slices back onto the baking sheet (cut side down), and bake for another 10-12 minutes until the cookies are dry.

Cool on a wire rack before serving.

Saturday, September 4, 2010

Zucchini Sticks with Tzatziki Sauce


In general, I try to eat healthy. And this means staying away from fried foods. The alternative is usually to bake, which turns out a similar crunch in a far more healthful manner.

But sometimes, occasionally, once in a while... my cravings overtake me and I want, actually, I NEED something fried.  In these very rare (ahem) cases, I fry at home. Yes, it is fried, but at least I control the type of oil, the amount of salt, and I make sure it tastes good. After all, if you are going to give into a craving, you better be eating something that tastes darn good!!!


This frying batter is unique because it uses soda water, which I believe gives the batter a lighter texture. Combined with some cornmeal, you get a crisp, light outer coating with a distinctive crunch.

I used this batter for zucchini sticks, but you could also use it for calamari, fish, and other vegetables like eggplant, onions, asparagus, or peppers.


Zucchini Sticks
Makes a whole bunch!

2 cups Flour
1 cup Cornmeal
Zest of 1 Lemon
2 1/2 cups Soda Water
1 kg Zucchini, cut into sticks
Vegetable Oil for frying
Salt

Heat oil in a large pot. The oil should be about 6 inches deep.

In a large bowl, combine the flour, cornmeal, and lemon zest. Add the soda water and stir to make a lumpy batter. Place a handful of zucchini sticks into the batter. When the oil is ready (test by dropping a little batter into the oil. If it immediately fries and floats, the oil is hot enough), drop a few zucchini sticks, one at a time, into the oil. It is very important not to put too many in at once, otherwise the temperature of the oil will drop and the sticks won't fry nicely.

Fry until golden, about 4-5 minutes. Remove from the oil with a strainer, and place on paper towel. Salt immediately and serve hot with tzatziki.


For the Tzatiki Sauce

3/4 cup Cucumber, grated
1 Clove Garlic, minced
1 1/2 cups Plain Yogurt
Juice of 1/2 Lemon
Salt and Pepper

Place the grated cucumber onto some paper towel, salt generously, and leave for about 10 minutes. After 10 minutes, pat dry to remove as much moisture as possible.

In a medium bowl, mix together all ingredients. Season to taste.