Search My Blog

Monday, November 29, 2010

Lentil & Chick Pea Salad with Dried Cherries and Creamy Lemon Yogurt Dressing


I pride myself in a well stocked pantry. I could say it's because I like to be prepared for a natural disaster, but in fact, it's because I like to be prepared for whatever culinary adventure strikes me at any given moment.

Of course, there's the dried stuff.... the pasta, rice noodles, egg noodles, rice, couscous, cornmeal, oatmeal, bulgar, lentils, chickpeas, and other beans and pulses. Oh, and don't forget the flours and sugars. Then there is the canned stuff... the chopped tomatoes, coconut milk, evaporated milk, sweetened condensed milk.  Then, the essential sauces and oils. I mean, I like to make most things myself, so I am not referring to add and toss pasta sauce or meat sauces, I am talking about seasoning sauces like worchesterchire, tobasco, soy sauce, hoisin, oyster sauce, sesame oil, truffle oil, vinegars, etc.

Oh, and don't even get me started on the spices!  That would take hours.

But then there are times when it is necessary to do a "pantry clearout." Those are the times when I feel up for a challenge, or when my husband and I finalize a move to a different country and we realize we have far too much stuff in our pantry. So, for some number of weeks, or months (yes, it can take me THAT long to clear all the stuff in my pantry), we survive on what we have, plus the essential fresh stuff that we allow ourselves to buy.

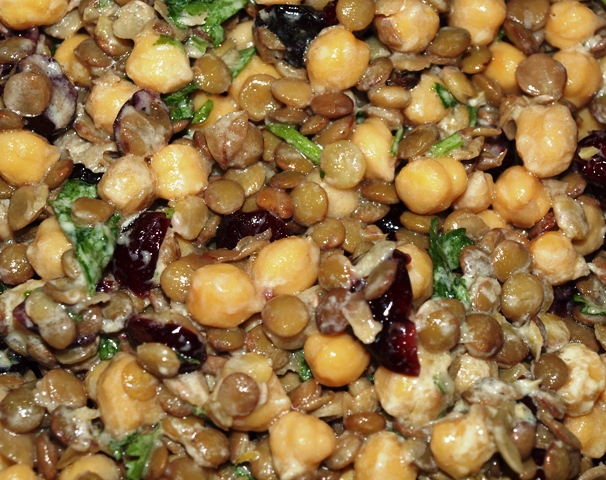
And let me tell you... dishes can get mighty creative! So, here is one of them. A salad made from beans, dried fruit, and other stuff.

Oh, and as a note, I used dried lentils and chick peas rather than canned. I find that the texture of dried is far nuttier than canned and that each individual pulse stands up to being tossed in dressing and never gets that mushy texture. That is why I prefer to take the time and cook my own.

Lentil & Chick Pea Salad with Dried Cherries and Creamy Lemon Yogurt Dressing
Makes loads

2 cups Chick Peas, cooked
3 cups Lentils, cooked
3/4 cup Dried Cherries
1/2 cup Cilantro, chopped

For the Dressing
Zest and Juice of 2 Lemons
1/2 cup Yogurt
1/2 cup Olive Oil
2 tbsp Dijon Mustard
Salt and Pepper

In a jar or container with tight fitting lid, add add dressing ingredients. Place on lid and shake, shake, shake!!

Then, in a large bowl, toss together chick peas, lentils and dried cherries. (Everything can be done ahead up to this point).

When you are ready to serve, pour the dressing over the chick peas mixture and toss. Then stir in the cilantro. Season to taste with salt and pepper.

Sunday, November 28, 2010

Twice Baked Honey-Soy Chicken Wings


This is an awesome recipe for chicken. I used it to make some kick a** chicken wings, but it can also be used as a marinade for a roasting chicken, chicken legs or even chicken breasts.

Sorry to use such strong words, but these chicken wings were really super amazing. I made them for my 30th (gulp, yes 30th) birthday party and they were a huge success. In fact, I would say that they were the hit of the party!

Sweet and sticky, my guests had to force themselves to STOP eating them! Now that's what I call a winner!


Twice Baked Honey-Soy Chicken Wings
Makes a whole lot of wings

4 kg Chicken Wings, wing tips removed
8 cloves Garlic, minced
3/4 cup Hoisin Sauce
1 cup + 1/2 cup Honey
1/2 cup Dark Soy Sauce
2 tbsp Sesame Oil
1 tbsp Chili Powder
Vegetable Oil for pan

Preheat oven to 400 degrees.

Rinse and pat dry the chicken wings. Separate the wing from the drumette and place the wing parts into a large bowl or ziplock bag.

In a bowl, mix together garlic, hoisin, 1 cup honey, soy, sesame oil, and chili. Pour half of the mixture into the chicken wings. Massage the marinade into the wings. Set the other half of the marinade aside.

Line a baking sheet with tin foil, then rub vegetable oil all over the foil. Place the wings, skin side up onto the baking sheet then pour the marinade that was with the wings over top. Bake for about 8 minutes, then flip over and bake for another 6 minutes.

After 14 minutes, remove the baking sheet from the oven. Place the wings into a bowl. Drain the fat and excess marinade off the baking sheet, change the foil, and rub again with oil.

Add 1/2 cup of honey to the remaining half portion of marinade. Toss the wings in the marinade and place on the baking sheet skin side up, and drizzle with leftover marinade as before.
Bake in the oven for another 12 minutes until the wings are sticky.

Sunday, November 21, 2010

Potato & Calamari Salad


There are so many versions of potato salad. And most are the mayonnaise drenched, rich kind that accompany fried chicken at a picnic or German sausages.

Well, not this one. This potato salad is colorful, healthy, light (well, by light I guess I mean in comparison to other potato salads), fresh, and full of veggies.  There is the crunch of the vegetables, the tender chewiness of the squid, the freshness of the lemon juice.... it is just so delicious.

So, try this salad. Not as an accompaniment to other picnic favorites, but on its own as a lunch or light dinner or a starter before other great dishes!

Potato & Calamari Salad
Serves 2 generously as main dish

3 Large Potatoes
1 Shallot, chopped
2 Small English Cucumbers
1 Large Tomato
2 cloves Garlic, minced
2 sprigs Fresh Rosemary, destemmed and chopped
500 grams Squid, cut into rings
Juice of 1/2 Lemon

2 tbsp + 2 tbsp Extra Virgin Olive Oil


Salt and pepper

Peel the potatoes and boil or steam until fork tender. Cut into large chunks and place in a bowl, along with the chopped shallot, cucumber and tomato. Season with salt and pepper and set aside.

In a large sautee pan over medium heat, add 2 tbsp olive oil. Add the garlic, chopped rosemary and squid and cook for about 1-2 minutes, until squid just turns opaque. Squeeze in the lemon juice. Pour the entire mixture into the bowl with the potatoes and vegetables. Toss. Drizzle with about 2 tbsp of olive oil and season to taste. Enjoy warm or cold.

Saturday, November 20, 2010

"Home Brewed" Vanilla Extract


Real vanilla extract is so darn expensive that it makes me want to scream! Why does it cost so much when it is so easy to make?

This frustration has led me to start making my own. With just 2 ingredients, you can make as much as you want!  Then, you just use it in recipes as you would store bought vanilla extract. Combine that with the satisfaction of making your own, and you have a winner!


"Home Brewed" Vanilla Extract
Makes about 1 cup

1 cup Vodka
3 Whole Vanilla Beans, split or about 12 used whole pods

Place the vanilla beans and vodka into a sterilized jar. Let sit for about 2 weeks in a cool, dark place until the vanilla infuses into the vodka. Use in recipes that ask for vanilla extract.

Thursday, November 18, 2010

Chinese Beef & Green Bean Stir Fry


One of my favorite Chinese dishes is Beef & Brocolli Stirfry. And somehow, my mom's is always the best. Everytime I go home, I ask her to tutor me again on this dish. And everytime I go back to my house, I try it and it never tastes the same. I don't know why. Must be that thing about your Mom's cooking.

Anyway, for my birthday, I decided to try it again. However, since brocolli isn't very common over here, and my husband isn't really a fan, I made it with green beans. Served with steamed rice, it was delicious, but the reality is, it will never be as good as Mom's.

Chinese Beef & Green Bean Stir Fry
Serves 4-6 people

1 kg Beef, cut into thin slices across the grain
1 kg Green Beans, trimmed and cut into 2 1/2 inch pieces

Marinade Ingredients
2 tbsp Rice Vinegar
1 tbsp Sugar
1 tbsp Soy Sauce
1 tbsp Water
2 tbsp Corn Starch

Other Ingredients
1/4 cup Oyster Sauce
1/4 cup Dark Soy Sauce
2 tbsp Cornstarch
1/3 cup Water
5 cloves Garlic
1 inch piece Ginger , cut into slices, then sticks
Vegetable Oil
Salt to taste

Place the beef in a bowl or ziplock bag. Add all the marinade ingredients except the cornstarch. Massage into the beef. The sprinkle in the cornstarch, ensuring the beef is coated with it. Place in the fridge for 30 minutes to 1 hour.

In the meantime, blanch the beans in boiling water until they turn bright green. Drain and rinse under cold water so they stop cooking.

In a small bowl, mix together the cornstarch and water to make a slurry (Chinese method of thickening).

Heat a wok or large sautee pan on high heat. Add about 1/4 cup vegetable oil. Add the beef and cook for about 3-4 minutes until browned on all sides. Remove the beef from the pan and set aside.

Add another tablespoon of oil to the pan. Add the garlic and ginger and cook for 2-3 minutes, stirring constantly so it doesn’t burn. Add the blanched beans and fry for about 1 minute. Add the beef back into the pan. Stir in the oyster sauce and soy sauce. Then add the slurry. As soon as the mixture thickens up, it is ready to serve. Add salt to taste. Serve with steamed rice.

Friday, November 12, 2010

Black Bean & Corn Dip


I love to throw parties and make a huge spread! And to make these get togethers as stress free as possible, I always make a menu that has a mix of things that can be made in advance and those that need to be put together at the last minute. 

This black bean and corn dip is definitely one that can be made ahead. In fact, I think it gets better with age as the flavors meld together.  Also, it is a crowd pleaser! Easy to munch on, healthy, and packed with flavor, it is a winner everytime!

Black Bean & Corn Dip
Makes about 3 cups

1 tbsp vegetable oil
1 large Onion, chopped
3 cloves Garlic, minced
1 Small Red Chili, seeded and chopped
2 tsp Ground Cumin
1 tsp Dried Crushed Red Chili
1 can Corn Kernels, drained and rinsed
1 can Chopped Tomatoes
1 can Black Beans, drained, rinsed, and slightly mashed
Juice of 1 Lime
1/2 cup chopped fresh cilantro

Heat the oil in a medium pan. Sautee the onion, garlic, and chili for about 5 minutes, until softened. Add the cumin and dried chili and cook for another minute. Stir in the corn, tomatoes, and beans and cook for another 5 minutes. Remove from heat. Stir in lime juice and cilantro. Serve warm with tortilla chips

Wednesday, November 10, 2010

Guilt Free Dark Chocolate Pudding


Chocolate pudding is a creamy, decadent indulgence that has the ability to satisfy a person's every need and craving.
 
I remember the little chocolate pudding pots that myself and many other kids would eat at school, packed in our back packs by our mothers as part of a balanced lunch box.

Then of course, there are the uncountable chocolate puddings and mousses that have found their ways onto various restaurant menus. 

Both are essentially the same. Pots of "feel good" chocolate served in a creamy, mouth coating, comforting sort of way. 

However, not all puddings are alike. And my version is one that you do not need to feel guilty about eating.  This recipe is for a delicious, creamy chocolate pudding without the guilt.  And, even better? It is so easy to make, that you could whip this up at any time of the week. Double or triple the recipe, and keep it in the fridge for those times when you need a little comforting.

Guilt Free Dark Chocolate Pudding
Makes 4 portions (about 1/2 cup each)

1/4 cup White Sugar
1/2 cup Cocoa Powder
3 tbsp Cornstarch
1/4 tsp Salt
2 1/2 cups Skim Milk
1 Egg Yolk
1 tsp vanilla extract

In a medium sauce pan, combine sugar, cocoa, cornstarch and salt. Whisk in the milk and the egg yolk. Heat gently over medium-low heat, whisking continuously until the mixture thickens. This should take 2-3 minutes. Remove from heat and whisk in the vanilla. Spoon the pudding into serving containers then place in the fridge until cool, about 1-2 hours. To serve, you can top with a piece of chocolate, grated chocolate or a dollop of whipped cream

Tuesday, November 2, 2010

Asian Fish Fillets


Nothing goes better with fresh fish than simple and clean flavors. This fish is seasoned with just a little garlic, spring onion, and soy, letting the fish really shine. This recipe would work well with any fish, but which fishes or salmon are best.

Just make sure that the fish is nice and fresh and that you don't overcook it. The fish should be nice and moist and glossy in the middle.... If it is completely opaque in the middle, it is overcooked.  Really, about 3 minutes on each side should be enough for any fillet.

Serve with some plain steamed white or jasmine rice.

Asian Fish Fillets
Serves 2

2 Fillets of Fish, skin on
2 cloves Garlic, whole but crushed
1/4 cup Spring Onion, chopped
3 tbsp Soy Sauce
Vegetable Oil
Serve over rice

Heat the vegetable oil over medium heat. Add garlic and let cook slowly for about 1 minute. Place the fish in the pan, skin side down. Cook for about 3 minutes, until skin is crisp. Turn the fillets. Add the spring onion and soy and cook for another 2 minutes. Serve over rice.

Monday, November 1, 2010

Homemade Chili Oil


I love a little bit of spice. And so often I find myself sprinkling chili flakes onto my pizzas or dipping bread in olive oil flecked with chili.

But besides dried chili flakes, I have a new favorite pantry staple… Homemade Chili Oil. It is so easy to make, and you get a much more intense and dispersed chili flavor. Drizzle it over your pasta before serving or spice up your garlic toast. I think you will find this oil indispensible in your kitchen!

Homemade Chili Oil
Makes 1/2 cup

2 tbsp chili flakes
1/2 cup Vegetable Oil

Sterilized jar (boil in water for about 10 minutes to sterilize).

Heat oil to about 225 degrees. Add chili flakes. Let cool to room temperature and pour into sterilized jar, straining if desired.

Store in fridge for up to a month. When the oil starts to become cloudy, discard.