Search My Blog

Friday, December 30, 2011

Carrot & Pumpkin Soup


Turkey, ham, stuffing, hashbrown casserole, gravy, prime rib, mashed potatoes, repeat. Yes, that sounds like my week. 

Actually, I am lying... I forgot to mention the curried puffs, chorizo fig cups, samosas, cheese sticks, cookies, lemon tarts, cranberry pudding.... the list goes on and on.

It has definitely been a week (or more) of fantastic eating. And eating. And eating some more.  A way to get together with family, hang out, and bond.

But after all this time of overindulging, it's time for something, well, a little lighter. And nothing does this trick like soup. This particular soup is perfect because it is quite filling, but with lots of good stuff. It really is the guilt-free end to a fantastic holiday season.

Tuesday, December 27, 2011

Quiche Lorraine


The Quebecois make tourtière around the holidays. It is a meat pie made usually with minced pork and sometimes also with veal or beef, onions, and spices.

Pies are not really a tradition in our household around the holidays, although I have toyed with the idea of trying to make one. But instead, in a similar theme, I decided to make Quiche Lorraine for my husband. Again, not something I usually make during the holidays, but I know he has been missing France lately, and in anticipation of our trip there next month, I thought it would be nice to get in the spirit. Plus, it is great for entertaining. It could be a cocktail hour treat (and could be made into little bite sized quiches), or could be served just like this in small slivers, or of course, for a holiday brunch.

This recipe is so versatile, because you could really add whatever you want to make this quiche your own. My in-laws don't like cheese (go figure... they are French and have unlimited access to some of the best cheeses in the world, but won't touch them with a ten foot pole), so we often omit the cheese, or you could add mushrooms, spinach, sausage, bell peppers.... the list is endless as long as you keep the eggs, milk, and cream the same.

So make your own holiday quiche or ring in the new year with a quick, make ahead brunch.

Quiche Lorraine
Makes 1 Tart

1 Tart Shell (See my recipe for a Homemade Whole Wheat Pastry Crust or a Regular Pastry Crust)

Filling:
6 slices bacon, cut into pieces
1 Large White onion, finely chopped
4 Eggs
1/2 cup Milk
1/4 cup Heavy Cream
3 tbsp Dijon mustard
 1/8 tsp Ground Nutmeg
1/2 tsp White pepper
1/4 tsp Salt
3/4 cup Extra Old Cheddar (traditionally, Gruyere cheese is used)

Preheat the oven to 400 degrees Fahrenheit.

Take the pastry out of the fridge and roll on a floured surgace until about 1/2 cm thick. 
Place into a tart tin (preferably one with a removable base). Prick all over with fork. Cover with foil and fill with pie weights or beans. Blind bake at 400 degrees Fahrenheit for 20 minutes. Remove from oven, remove weights and foil, and let cool in the tart pan. 

Reduce the oven to 375 degrees.

To make the filling: In large skillet, fry bacon pieces over medium-high heat until the fat renders. Transfer the bacon onto a paper towel lined plate.

Dispose of the fat from the pan, then sautee the onions until they soften.

In large bowl, whisk together eggs, milk, cream and dijon mustard. Stir in the nutmeg, salt and pepper. Add in the bacon, onion, and grated cheese (at this point, you could add whatever fillings you want to the egg mixture). Pour the egg mixture into the tart shell.

Bake in the 375 degree oven for about 30-40 minutes until a toothpick inserted into the centre of the quiche comes out clean. Let cool on a rack until ready to serve. You can serve warm or room temperature.

If you want to make it ahead, do everything as above, but let the quiche cool completely, then refrigerate.  You can reheat in the oven at 350 degrees until warm, about 15-20 minutes.

Sunday, December 25, 2011

Maple Walnut Fudge


Nothing says Christmas like fudge! And thanks to the Cookin' Canuck, her Nutella Fudge with Sea Salt has become a holiday staple and favorite.

But this year being our first year in Vancouver for Christmas, it was time to combine the old Christmas favorites with some new recipes. So, I decided to make a new fudge. After all, fudge is easy to make in batches and then enjoy all holiday season long, it's easy to transport, and great as a gift.
This fudge combines Canadian Maple Syrup with walnuts and white chocolate to make a delicious Christmas treat!

Maple Walnut Fudge
Makes 1 pan 9" by 13"

2 tablespoons butter
2/3 cup 2% Evaporated Milk
1 1/3 cups Sugar
1/4 tsp Salt
2 cups Mini Marshmallows
300 grams White Chocolate Buttons or Chips
1/2 cup Walnuts, chopped
1/4 cup Maple Syrup
50 Walnut Halves

Butter the bottom and sides of the pan and line with parchment paper. Set aside.

In a large saucepan over medium heat, combine the butter, evaporated milk, sugar and salt. Bring to a boil and cook, stirring constantly for about 5 minutes. Add the marshmallows and stir rapidly to melt the marshmallows. Remove from heat and stir in the white chocolate, chopped nuts and maple syrup.

Pour into prepared baking pan. Press the walnut halves into the top of the fudge in rows. Cover and refrigerate until the fudge is firm. Cut into squares.

Saturday, November 26, 2011

Chicken Stew with Acorn Squash & Quinoa


So, I went a little quinoa crazy last month and bought a couple of huge bags of organic quinoa because they were such a great deal. What I failed to consider is what I was going to do with all of this quinoa.  I already felt that I had exhausted all quinoa salad possibilities (okay, don't get me wrong... I love quinoa salad like this one with chicken and apple, but, well, you can't eat it everyday) and was just getting sick of the same old quinoa preparations.

So then I made these Sundried Tomato and Olive Quinoa Cakes which I have to admit, renewed my interest in the whole quinoa thing. However, it still didn't help in reducing my massive pantry stash of quinoa.  I had to keep looking.

Then, I came across a recipe by the Cookin Canuck. Hmm.... a stew with quinoa? Had to be worth a shot. So, I modified the recipe a little according to what I had around, and made an acorn squash, chicken, quinoa stew. And it was surprisingly fantastic! I kinda thought that the quinoa would turn to mush, but it really manages to hold it form and texture. And the olives gave a great saltiness to each bite. Really, it was phenomenal. And another quinoa recipe to add to my repertoire.

Chicken Stew with Acorn Squash & Quinoa
Adapted from recipe from www.cookincanuck.com
Serves 6

1 Acorn Squash, peeled, seeded & chopped into 1/2-inch pieces
3 1/2 cups chicken broth
1 1/2 lb. boneless, skinless chicken thighs
1 tbsp olive oil
1 medium yellow onion, finely chopped
1/2 tsp kosher salt
4 cloves garlic, minced
1 1/2 tsp dried oregano
1 can (14 oz) petite diced tomatoes
2/3 uncooked quinoa
3/4 cup pitted kalamata olives
Freshly ground black pepper, to taste

Heat olive oil in large saucepan over medium heat. Add onions, garlic, oregano and squash and sautee for a few minutes. Add about 1/4 cup of water, cover, and let steam for about 5-8 minutes, until squash just starts to soften.

Add chicken and broth. Cover and let simmer for another 8-10 minutes.

Stir in the tomatos and quinoa. Cover and cook for another 15 minutes.

Pull out the chicken, remove the bones, and shred.
Stir the chicken, olives and pepper into the stew and simmer, uncovered, to heat, about 5 minutes.

Saturday, November 19, 2011

Individual Ricotta Cheesecakes with Wild Blueberry Compote

My sister was coming over for dinner with some fresh Fanny Bay Oysters. She asked me to make a salad. I did, but I felt that it just wasn't enough of a contribution to this dinner. After all, she was bring fresh oysters. From Fanny Bay. On the island. And was sharing them with me. That is sisterly love.

So, I needed to bring something equally fun and loving to the dinner table. 

As I have said time and time again, I am more of a savory girl. My sister, however, loves her sweets. So, I thought I would make her some ricotta cheesecake. But, it couldn't just be any ricotta cheesecake. Because, as I mentioned before, she had the oysters. Fresh, beautiful, huge Fanny Bay oysters. And my dessert had to be worthy of those.

So I made the cheesecake with wild blueberry compote. In individual mason jars. To show my love and appreciation for my sister. Oh, and did I mention the oysters?


Individual Ricotta Cheesecakes with Wild Blueberry Compote
Makes 4 individual cheesecakes

250 grams Ricotta
2 Large Eggs, seperated
1/4 cup + 1 tbsp Sugar
1 1/2 tbsp Flour
Zest of 1 Lemon
Pinch of Salt
4 Small Wide Mouth Mason Jars (250ml) or ramekins or individual springforms
Butter and Sugar for Mason Jars

For the Wild Blueberry Compote
Makes about 2 cups of Compote

3 cups Wild Blueberries, frozen
1/3 cup Sugar
Zest and Juice of 1 Lemon
1 tbsp Cornstarch

To make the cheesecakes:
Preheat the oven to 375 degrees.
Butter 4 small wide mouth mason jars (250ml size). Sprinkle sugar inside the jars. Set aside.

In a large bowl, beat the ricotta until smooth. beat in the egg yolks and sugar. Stir in the flour, lemon zest and salt.

In a seperate bowl, beat egg whites with 1 tbsp sugar until they form stiff peaks. Fold the egg whites gently into the ricotta mixture.

Pour the mixture into the prepared mason jars, place on a baking sheet, and bake for 30-35 minutes until firm and golden brown on top. Let cool completely.

To make the compote:
Combine all ingredients into a saucepan and simmer on medium-high heat for about 10 minutes until thickened. Let cool completely. Spoon onto the cooled cheesecakes before serving.

Monday, November 7, 2011

Lemon Meringue Pie


Today is my birthday.

And there is no way that I would rather spend it than with my family and in the kitchen.

So, I am having some dinner tonight with my family. On the menu? Maple Chicken and Ribs, Boiled Baby Potatoes, and my fave.... Lemon Meringue Pie!

So, let's start with the pie.

I am really not the biggest sweet fan. I am more of a savory girl. However, I do love anything lemon. I think it's because of the delicate balance of sweet and sour. So for my birthday, a lemon meringue pie would be the perfect treat.

Lemon Meringue Pie
Adapted slightly from http://www.canadianliving.com/food/baking_and_desserts/lemon_meringue_pie.php

Makes 1 Pie

For the Crust:
1 1/2 cups Flour
1/4 tsp Salt
1/2 cup Unsalted Butter, cold and cubed
1 Large Egg Yolk
1 tsp Lemon Juice
3 tbsp Ice Cold Water

For the Filling:
1 cup White Sugar
6 tbsp Cornstarch
1/2 tsp Salt
2 cups Water
4 Large Egg Yolks, beaten
1 tbsp Lemon Zest
1/2 cup Fresh Lemon Juice
2 tbsp Butter

For the Meringue
5 Large Egg Whites
1/4 tsp Cream of Tartar
1/3 cup Sugar

Preheat oven to 400ºF (200ºC)

For Pie Crust:
In a food processor, mix flour with salt. Add cubes of butter and pulse until mixture resembles course meal. Add beaten egg, lemon juice, and 1 tbsp ice water. Pulse to combine. Continue adding ice water by the tablespoon and pulsing until dough just starts to come together. Take the dough from the processor bowl and press into disc. Wrap in plastic wrap. Chill for at least 30 minutes or for up to 3 days.

On lightly floured surface, roll out pastry so it is large enough to cover a 9 inch pie dish without stretching. Trim edges of pie crust. Line with foil. Fill with pie weights or dried beans. Bake in bottom third of 400ºF (200ºC) oven for 15 minutes. Remove foil and pie weights. Prick shell all over. Bake 10 minutes or until evenly golden. Let cool on rack.

For Filling:
In heavy saucepan, mix sugar, cornstarch and salt. Stir in water. Bring to boil over medium-high heat, stirring constantly. Reduce heat to medium-low.

Simmer for 3 minutes, stirring constantly. Remove from heat. Whisk one-quarter into egg yolks, whisk back into pan. Cook over medium heat, stirring for 2 minutes. Remove from heat. Stir in lemon rind, lemon juice and butter. Set aside.

For Meringue:
In bowl, beat egg whites with cream or tartar until soft peaks form. Beat in 1/3 of the sugar at a time until stiff peaks form.

Pour filling into cooled crust, smoothing top. Starting at edge and using spatula, spread meringue around outside of hot filling. Sealing to crust, which prevents meringue from shrinking.

Spread over remaining filling making attractive peaks with back of spoon. Bake in center of 400ºF (200ºC) oven for 5 to 6 minutes until golden. Let cool on rack for about 5 hours or until set.

Sunday, November 6, 2011

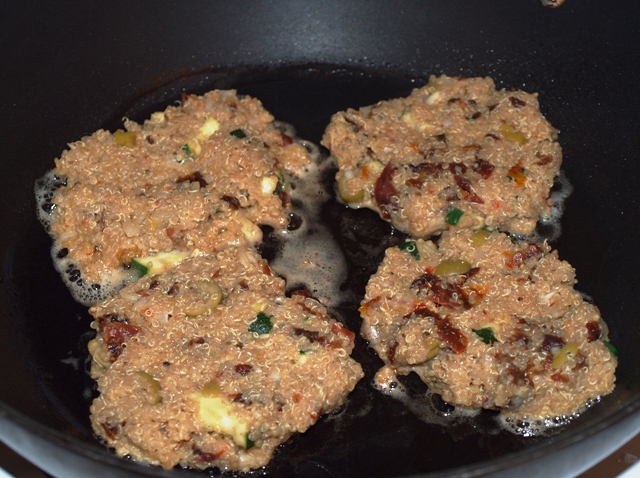
Sundried Tomato and Olive Quinoa Cakes


I have definitely been on a quinoa kick lately. I absolutely love the stuff. It's easy to make, has a great nutty texture, and is really good for you.

However, this quinoa kick has put me in a little bit of a rut. I find myself making the same things with quinoa. I cook it, then mix it with veggies and turn it into a salad of sorts like my Summer Quinoa Salad with Chicken & Apple.

I mean, don't get me wrong. These one meal wonders with quinoa are delicious. But I felt the need to break out of this quinoa rut and try something different.

For starters, I figured I should make something warm. Like a warm quinoa side dish. But of course, I got caught up in adding stuff to the quinoa, and before I knew it, it was another room tempurature salad of sorts. Again.


So, this time, to break out of the mold, I decided to use the quinoa as a basis for pan fried cakes. I added sundried tomatoes, olives, onions and zucchini for flavor; I added eggs to bind everything, and pan fried them. Then, for a final burst of flavour, I mixed up a little garlic mayo.

I served these cakes with some pan seared wild coho salmon and a little salad and it was a fantastic dinner! The perfect dish to make quinoa interesting again!


Sundried Tomato and Olive Quinoa Cakes
Makes 8 cakes

2 Large Eggs
1/3 cup Onions, finely chopped
1/3 cup Sundried Tomatoes, finely chopped
1/3 cup Olives, finely chopped (whatever kind you like)
1/2 cup Zucchini, finely diced
2 cups Cooked Quinoa, room temperature
2 tbsp Whole Wheat Flour
Salt and Pepper
Olive Oil canola oil for pan

Garlic Mayo
1 clove Garlic, minced
1/2 cup Mayonnaise
2 tbsp Grainy Mustard
Salt and Pepper

In a large bowl, beat the eggs. Stir in the onions, sundried tomatoes, olives and zucchini. Then add the quinoa and flour. Mix until incorporated. Let rest at room temperature for 10-15 minutes.

In the meantime, combine all ingredients for the garlic mayo in a bowl. Mix and set aside.

Heat some oil in a large pan over medium heat. Form the quinoa mixture into balls and place in the preheated pan, pressing down to form patties. Cook until browned on both sides (about 5 minutes per side).

Serve warm with the garlic mayo.

Monday, October 31, 2011

Kale Salad with Dried Cranberry, Walnut and Boursin


This is a super easy and incredibly flavorful salad. I made this as a Thanksgiving side dish, to complement my mom's massive turkey, stuffing, mashed sweet potato, and apple pie. It was a nice and fresh addition to the traditional but heavy, dishes included in Thanksgiving dinner. And as a bonus, it is chalk full of lots of healthy ingredients.

This would also make a great lunch, summer picnic dish, or dinner side.

Kale Salad with Dried Cranberry, Walnut and Boursin
Serves 2 (4 as a side dish)

1/3 cup Dried Cranberries
1/2 Sweet White Onion or Red Onion, sliced
1/2 pkg Cranberry and Black Pepper Boursin Cheese
1/2 cup Walnuts, toasted
Bunch of Kale, chopped (or Spinach)

For Dressing:
2 tbsp Dijon Mustard
1 tbsp Balsamic Vinegar
1 tbsp Extra Virgin Olive Oil
Salt and Pepper

In a large bowl, toss all the salad ingredients together.
For the dressing, place all ingredients into a jar and shake. Drizzle over salad.

Saturday, October 29, 2011

Pumpkin Oatmeal Bars


Nothing says fall like pumpkin. I picked up a bunch of canned pure pumpkin the other day, and was trying to figure out what to do with it. Here is the result....


Pumpkin Oatmeal Bars
Makes 1 pan of bars (9" by 13" pan), about 20 bars

2 tbsp Unsalted Butter, room temperature
1/4 cup Sugar
1 Large Egg
1 cup Pumpkin Puree
1 cup Unsweetened Applesauce
1 1/2 cups Quick Cooking Rolled Oats
1 cup Whole Wheat Flour
1/4 cup Ground Flax Seeds
1/2 tsp Salt
1/2 tsp Baking Powder
1/2 tsp Baking Soda
1/4 cup Raisins
1/4 cup Raw Sunflower Seeds

Preheat oven to 350 degrees. Grease a 9" by 13" pan.

In large bowl, cream together butter and sugar. Beat in egg, pumpkin and apple sauce.

In a separate bowl, mix together oats, flour, flax, salt, baking powder and soda.

Add the oat mixture into the egg mixture and stir until just combined. Fold in the raisins and sunflower seeds.

Press the mixture firmly and evenly into the pan (tip: use a sheet of wax paper to press the mixture in)

Press into pan. Use wax paper to press evenly. Bake for about 20 minutes. Cool and cut into bars.

Saturday, October 22, 2011

Pumpkin Mac & Cheese


When I was a kid, I loved Mac & Cheese. That beautiful orange, creamy sauce over soft white pasta... mmm....

And of course, there was the jazzed up version of this classic with cut up hot dog and perhaps a little bit of ketchup. Yes, those were the days before I really understood what was in that package. Before I dared to ask why the sauce was made out of an orange powder instead of real cheese.

I haven't had a package of mac & cheese in years. Perhaps over a decade. However, the idea of mac & cheese conjures up feelings of childhood, home and comfort.

So, I decided to make some. I found a great recipe online for Rachel Ray's pumpkin mac & cheese. I tweeked it a little, and here it is. Oooey, gooey, delicious (and healthy)!

Pumpkin Mac & Cheese

Serves 4

500 grams Whole Wheat Pasta
2 cups Frozen Peas
4 tbsp Butter
3 tbsp Flour
3 cups Skim Milk
2 tbsp Maple Syrup
2 tbsp Dijon Mustard
1/4 tsp Cinnamon
1/4 tsp Nutmeg
2 cups Pumpkin Puree
1 cup Sharp Aged Cheddar Cheese, grated
1 cup Gruyere Cheese, grated
Salt and Pepper


Cook the pasta as per the package instructions. When pasta is almost done, add the frozen peas. Drain the pasta and the peas and set aside.

In a large saucepan, melt the butter. Add the flour and stir, cooking until the flour soaks up all the butter and starts to lightly brown (1-2 minutes). Slowly whisk in the milk. Add the maple syrup, mustard, cinnamon and nutmeg. Stir in the pumpkin puree and the cheeses. Season the sauce to taste with salt and fresh cracked black pepper.

Add the pasta and peas to the sauce and stir until coated. Serve immediately.

Sunday, October 16, 2011

Sunday Breakfast: Eggs en Cocotte with Bacon and Spinach


After a long week, there is nothing better than breakfast at home with the hubby. Of course, it's got to be easy. No point stressing out trying to make a weekend breakfast.

Eggs en Cocotte is a great way to make a tasty, special breakfast that is headache-free. And it's a great way to use whatever ingredients you have around.

The basics are the eggs and the cream. After that, you can put whatever you want in them. Then, just put them in the oven for about 10 minutes and voila! Breakfast!


Eggs en Cocotte with Bacon and Spinach
Serves 2

3 cups Spinach
1 clove Garlic, minced
Olive Oil
1/4 cup Chopped Pork Belly or Bacon
4 Eggs
2 tbsp 18% Cream
Salt and Pepper

Preheat oven to 400 degrees.

In a pan over medium heat, heat the olive oil and the garlic. Add the spinach and cook until wilted. Remove from pan.

In the same pan, add the chopped pork belly or bacon and cook until browned. Place on a paper towel to drain.

Prepare the 2 ramekins by placing half of the spinach and bacon in each one. Crack 2 eggs into each cocotte. Add 1 tbsp of cream to each. Season with salt and pepper.

Bake the cocottes for about 10 minutes until the egg white is just cooked. Serve hot with toast.

Monday, October 3, 2011

Mom Miranda’s Crispy Pork Chops


My sister and brother in law went to my parents' place last weekend. And they came back raving about my mom's pork chops. So much so that I had to get the recipe!

And they were just as good as they sounded. Crispy and juicy, but also healthy since they are baked in the oven.  I served mine with dijon mustard, wild rice, and petit pois.

My mom never seizes to amaze me with her cooking. She always wants to try new flavors and techniques, and shares them with us, her three kids, in the hopes that we will fill our houses with the smells and tastes of home cooking.

Thanks Mom!

Mom Miranda’s Crispy Pork Chops
Serves 4

Marinade for pork chop:
2 cloves Garlic, minced or paste
Salt and black pepper

Other Ingredients
4 Pork Chops (with or without bone)
1/2 cup Dry Coarse Breadcrumbs, preferably whole-wheat (see Tip)
3/4 tsp Sugar
1/2 tsp Paprika
1/2 tsp Onion Powder
1/2 tsp Salt
4 tsp Canola Oil
1 Large Egg White, lightly beaten
4 tbsp Cornstarch

Marinate pork chops for an hour if possible. Then preheat oven to 400°F. Line a baking pan with foil for easy cleaning, greased rack and put inside pan.

Mix breadcrumbs, sugar, paprika, onion powder and salt in a shallow dish. Drizzle with oil and mash with a fork until the oil is thoroughly incorporated. Lightly beat egg white with a fork in another shallow dish. Sprinkle cornstarch over the pork chops and pat to coat evenly on both sides. Dip the pork chops into the egg, then press into the breading mixture until evenly coated on both sides. (Discard leftover mixture.)

Place the pork chops on the rack. Bake until cooked (3/4" thick boneless loin chops only takes 30-40 min). Don’t overcook or it will be dry. 

Tip: To make fresh breadcrumbs, tear bread into pieces and process in a food processor until coarse crumbs form. One slice of bread makes about 1/2 cup fresh crumbs. For dry breadcrumbs, spread the fresh crumbs on a baking sheet and bake at 250°F until crispy, about 15 minutes. One slice of fresh bread makes about 1/3 cup dry crumbs. Or use prepared coarse dry breadcrumbs, or “Panko breadcrumbs.”

Sunday, October 2, 2011

Rocky Road Cookies


I saw this recipe on cooking.com the other day, and I just had to try it! Rocky Road cookies?? I mean, COME ON! All of the best stuff (chocolate, marshmallows and nuts) mixed together in a cookie? It just had to be good!

I did face a few challenges with the recipe and made a few changes. The biggest thing was that the "dough" was extremely sticky and liquidy. I actually doubled the amount of flour to combat this.


The other thing... don't overbake them! Even if you feel the cookies aren't quite done yet, pull them out anyway after a maximum of 14 minutes. They are supposed to be a little bit oozy.

I made this recipe a little healthier by using whole wheat flour, and cutting both the sugar and chocolate chips. Even with those changes, these cookies were still super sweet and rich, yet surprisingly light! I know it sounds strange that a cookie could be both rich and light, but it really was! It was the most amazing cookie.

They make a fantastic dessert... I would suggest turning them into a rocky road ice cream sandwich with a scoop of vanilla ice cream between 2 cookies! Yum!

Rocky Road Cookies
Adapted from Recipe for Rocky Road Whoppers at Cooking.com

Makes 12 large cookies

2/3 cup Whole Wheat Flour
1/2 tsp Baking Powder
1/8 tsp Salt

1 1/2 cups Semi Sweet Chocolate Chips
2 tbsp Unsalted Butter

1/3 cup Sugar
1 Large Egg
1 1/2 tbsp Brewed Espresso, cooled
1/2 tsp Vanilla Extract
1/2 cup Walnuts, chopped

60 (about 2/3 cup) Mini Marshmallows

Preheat oven to 350 degrees F. Line 2 baking sheets with parchment paper.

Stir flour, baking powder and salt in small bowl to blend. Set aside.

Stir 1 cup chocolate chips and butter in medium bowl set over saucepan of barely simmering water until melted and smooth. Set aside.

Whisk sugar, egg, coffee mixture and vanilla in medium bowl until blended. Stir egg mixture into melted chocolate mixture. Mix in flour mixture just until blended. Add nuts and remaining 1/2 cup chocolate chips.

For each cookie, drop 1 rounded tablespoon dough onto prepared baking sheet, spacing 3 inch apart. Gently press 5 marshmallows into center of each. Gently press 1 rounded tablespoon of dough atop each to cover marshmallows and form 2-inch-high mounds. Bake cookies until top is dull and feels crusty when touched gently, rotating baking sheets front to back and top to bottom halfway through baking to ensure even browning, about 12-14 minutes.

Cool cookies on baking sheet 15 minutes. Transfer to rack and cool completely.

Thursday, September 29, 2011

Farmer's Market Lasagne


There is nothing like heading to the market, picking up whatever's around, and turning it into a fantastic meal.

Today at the market.... local BC zucchinis and eggplants. Both were looking fantastic. So, I decided to turn them into a healthy lasagne that we could enjoy tonight and whenever we needed a quick lunch or dinner.


Farmer's Market Lasagne
Makes 1 Lasagne

12 Whole Wheat Lasagne Noodles
1 Large BC Eggplant, sliced (#bceggplant)
2 BC Zucchini, sliced (#bczucchini)
1 jar (650 ml) Tomato Basil Pasta Sauce
Corn Kernels from 2 cobs (or 1 can corn kernels, drained)
300 grams Ricotta Cheese
1 1/2 cups Shredded Cheddar Cheese
Salt and Black Pepper

Cook the lasagne noodles as per the package instructions.

In a large casserole dish, start layering the eggplant and zucchini. Add 1 layer of lasagne noodles and top with 1/3 of the tomato sauce. Sprinkle with half of the corn.

Add another layer of eggplant and zucchini. Top with noodles then spread with 1/2 of the ricotta cheese and season with salt and pepper.

Add another layer of eggplant, zucchini, noodles, tomato sauce and the rest of the corn.

Add the final layer of eggplant, zuchini and noodles. Spread the noodles with the remaining ricotta and tomato sauce. Season with salt and pepper. Sprinkle with cheddar cheese.

Cover and bake in a 375 degree oven for about an hour until bubbly.

**Make ahead tip: You could make this ahead, cool it, cut it into portions, and freeze the portions for later!

Sunday, September 25, 2011

Peanut Butter Flax Nut Oat Bars


I love Starbucks. I know there are tons of other coffee companies out there, but I still favour this one. Why?

I like the consistency. I like to know what I am getting. And I love those damn Oat Bars!!!

Yes, the famous Oat Bar. I started this relationship with the Oat Bar and the Flax Oat Bar when I worked for Starbucks in Victoria, BC. At that time (and I think still now), the baked goods were supplied by Cakes Etc, a local bakery.

And they made that "to die for" huge, square Oat Bar and the less famous, but just as good if not better, Flax Oat Bar. I remember putting these yummy bars in little brown paper bags for endless numbers of customers. Then, during my break, I would line up with everyone else to enjoy one with my coffee.

That was more than 10 years ago. And today, I still fondly think about those Oat Bars. Unfortunately, the oat bars here in Vancouver have been reduced to a smaller, rectangle sort, although still delicious, but the flax oat bar is never to be found.

So, I decided to start making my own oat bars. I started with neither a traditional oat bar nor a flax oat bar. This one is a peanut butter, flax and nut oat bar.

It ended up being less oat-y than the traditional, with the peanut butter taking centre stage followed by the almonds. Absolutely delicious, but not really an Oat Bar. This one was also a little more of a crumbly texture than chewy like the real thing.  Perhaps next time I will try to replicate the real thing!

Peanut Butter Flax Nut Oat Bars
Makes 1 - 9" by 13" pan of bars (cut into 20 squares)

1/4 cup Butter, melted
1/2 cup Honey
1/2 cup Natural Peanut Butter
1/3 cup Whole Milk
1 Egg
1/2 tsp Vanilla Extract
3 cups Quick Cooking Oats
1/3 cup Slivered Almonds
1/3 cup Unsalted Sunflower Seeds
1/3 cup Flax Seeds
1/2 tsp Salt
1/2 tsp Ground Cinnamon

Preheat the oven to 350 degrees. Grease a 9" by 13" pan and set aside.

In a large bowl, mix together melted butter, honey, peanut butter, milk, egg and vanilla.

Stir in the rest of the ingredients and mix thoroughly.

Push the mixture into the pre-greased pan so that it is tightly packed.

Bake for 25-30 minutes until brown on the edges.

Monday, September 19, 2011

Raspberry Tart


A raspberry tart needs no reason. It speaks for itself. The perfect end to a weekend lunch or dinner.

And frozen raspberries make this tart possible all year round... So in the dead of winter, you can still enjoy a little bit of summer...

Raspberry Tart
Makes 1 Tart

For Tart Pastry:
1 1/4 cups whole wheat flour
1/8 tsp salt
½ cup butter
3 tbsp ice cold water

For the filling:
5 cups Raspberries, frozen
2 tbsp White Sugar
1/3 cup Brown Sugar
1/4 tsp Nutmeg
1/4 tsp Cinnamon
1 tsp Vanilla
4 tbsp Cornstarch
Zest of 1 Lemon
Juice of 1/2 Lemon

To Make Tart Pastry:
Preheat the oven to 400 degrees.

Mix the flour and the salt in a medium bowl or food processor.

Add the cold butter pieces and cut in using a pastry blender or by pulsing in the food processor.

Add ice water, 1/2 tbsp at a time until the dough forms into a ball. Gather up and pat into a disk. If possible, refrigerate dough for 30 minutes before rolling out.
When ready to use, roll dough out on a lightly floured board. Gently fold into quarters using a little flour as needed to prevent sticking. Place dough in pie plate and carefully unfold, fitting loosely and then pressing into place. Trim the edges and crimp for a decorative crust.

Prick the crust with the fork (be sure not to go all the way through) so that it doesn't puff up during blind baking or fill with foil and dried beans if you prefer.
Bake the crust at 400 degrees for 15 minutes.

For the Filling:
Reduce the oven to 375 degrees.

Mix all the filling ingredients together in a bowl. Pour into the pre-baked pastry crust. Bake in a 375 degree oven for 30-40 minutes until the filling is thick and bubbly.

Let cool completely before serving.

Saturday, September 17, 2011

Roasted Vegetable Salad


As the summer ends and fall arrives, we are greeted with a plethora of "wintery" vegetables and a feeling that we just aren't ready for the summer to leave.

So, we find ourselves wanting to ease the passage of another summer by making dishes that reconcile both summer and winter seasons. Gone are the fruity, leafy salads, and fast arriving are Sunday night stews.

I think this dish perfectly expresses this changing of the seasons. Hearty vegetables are roasted and served room temperature or slightly chilled. An easy complement to the final summer grill out or a wintery roasted meat.

Roasted Vegetable Salad
Serves 4

1 Large Red Onion, cubed
1 Large Parsnip, cubed
1 Red Pepper, cut into chunks
1 Zucchini, cut into chunks
1 Sweet Potato, cubed
1 Eggplant, cut into chunks
4 cloves Garlic, whole peeled and crushed
2 tbsp Olive Oil
Salt and Pepper

1/2 cup Crumbled Feta Cheese

Dressing Ingredients
2 tbsp Dijon Mustard
2 tbsp Balsamic Vinegar
1 tbsp Maple Syrup
3 tbsp Extra Virgin Olive Oil
Salt and Pepper

Preheat the oven to 375 degrees.
Toss all the vegetables and garlic cloves in the olive oil. Season with salt and pepper.
Place the vegetables on a baking tray and roast for about 50 minutes.
Remove from the oven and let cool.

For the dressing, place all ingredients into a jar and shake together. Once the vegetables have cooled, toss with the dressing. Crumble the feta cheese on top.

Wednesday, September 14, 2011

Chocolate Zucchini Walnut Bread


I am a savory person. Some people love sweets, but I love salt. So when it comes time for dessert, I usually prefer to have things that aren't too sugary sweet. I err on the side of fresh fruits and dark chocolate.

However, to appease those around me who thrive on more sweetness, I usually make some kind of "bread".... banana bread, carrot cake, or zucchini loaf. Somehow, these choices seem to satisfy both ends of the salty- sweet spectrum.  Plus as a bonus, they are full of fruit and veg.

And just in case there is any left over, no one will feel guilty snacking on the leftovers!


Chocolate Zucchini Walnut Bread
Makes 1 loaf

1/4 cup Butter
1/3 cup Sugar
2 Eggs
1/4 cup Unsweetened Apple Sauce
1/2 cup Buttermilk
1 cup Zucchini, shredded

1 1/4 cups Flour
1 cup Whole Wheat Flour
2 1/2 tsp Baking Powder
1 tsp Ground Cinnamon
1/4 tsp Ground Nutmeg
1/2 tsp Baking Soda
1/2 tsp Salt
Zest of 1/2 Lemon

1/3 cup Chopped Walnuts
1/3 cup Chocolate Chips

Preheat the oven to 350 degrees. Grease a loaf tin and set aside.

Cream together butter and sugar until light and fluffy. Then beat in the eggs.
Stir in the apple sauce, buttermilk and the zucchini.

Sift together the dry ingredients. Stir into wet ingredients until just combined. Stir in the walnuts and the chocolate chips.

Bake for about 45 minutes, or until done. Cool on a wire rack.

Monday, August 29, 2011

Fresh Fig Cake


Once again, it's that time of year when the fig tree in my parent's backyard bears its fruits!

I remember my mom planting that tiny tree like it was yesterday and me questioning her at the age of 10 what figs were and if I would even like them.


Before I moved away from home at around 20 years old, I don't remember eating fruit off that tree. I do remember my mom getting really excited one year when she was able to get 3 figs off the tree. But she must have eaten them....


On my journeys away from home, I became more and more familiar with figs. Especially in the dried form. In Dubai and Damascus, I remember strings of them hanging in the store fronts along with dried dates and apricots. I fell in love with them.

Fast forward to this summer.... my first summer after returning to Canada, just a short ferry ride from home. And boy was I surprised this week when my mom came over with 2 huge buckets of ripe figs from the tree.


I ripped some apart immediately with my hands and ate them, with the intention of turning a lot of the remainders into jam. 


My sister, not knowing what to do with all these figs, resorted to the internet, and came up with this fantastic recipe for a fresh fig cake.

The only modification that she made was to use 1 1/2 cups of figs in the cake batter instead of the original 1 cup. And the cake was TO DIE FOR! It was so good, that I had to share it with all of you!

Fresh Fig Cake
http://allrecipes.com/recipe/fresh-fig-cake/detail.aspx

For the Cake:
1/4 cup butter, softened
1 cup white sugar
1 egg
2 cups all-purpose flour
1/2 teaspoon salt
2 teaspoons baking powder
1 cup evaporated milk
1 teaspoon vanilla extract
1/4 teaspoon almond extract
1 1/2 cups chopped fresh figs

For the Filling:
1/4 cup packed brown sugar
1/4 cup water
2 cups chopped fresh figs
1 tablespoon lemon juice

Preheat oven to 350 degrees F (175 degrees C). Spray two 8-inch round cake pans with vegetable oil spray.

In a medium bowl, sift together flour, salt and baking powder. Set aside.

In a large mixing bowl, cream butter with the sugar until fluffy. Add egg and beat well. Add flour mixture alternately with the evaporated milk. Fold in vanilla and almond extracts and chopped figs.

Divide into two prepared 8 inch round cake pans. Bake at 350 degrees F (175 degrees C) for 30 minutes, or until a toothpick inserted into the center comes out dry.

To make the filling: In a saucepan, combine 2 cups figs, brown sugar, water and lemon juice. Bring to a boil. Reduce heat to a simmer and cook until thickened, about 20 minutes. Spread thinly between layers of cake and on top.

Monday, August 22, 2011

Whole Wheat Oatmeal, Chocolate, Raisin Cookies


When it's raining outside, one great way to warm up your house is to bake. Somehow, it makes every trouble go away!

The cookies that I made today fit the bill to a tee. They are hearty, healthy, just sweet enough oatmeal cookies.

I made 24 larger cookies (about 3 inches round when baked), but you could make them whatever size is right for you. Don't be alarmed if the dough feels kind dry. Just use your hands to form the balls of dough and then press them gently with your hand. They will turn out just fine!


Whole Wheat Oatmeal, Chocolate, Raisin Cookies
Makes 24 cookies

1/2 cup Butter, room temperature
1/3 cup Brown Sugar
1/3 cup White Sugar
1 Large Egg
1 tsp Vanilla
1 cup Whole Wheat Flour
1/2 tsp Cinnamon
1/2 tsp Salt
1/2 tsp Baking Powder
1/2 tsp Baking Soda
2 cups Old Fashioned Rolled Oats
1 cup Raisins
2/3 cup Semi Sweet Chocolate Chips

Preheat the oven to 350 degrees. Line baking sheets with silpat or parchment paper.
Cream together the butter and sugars. Beat in the egg and vanilla.
In a seperate bowl, mix together the flour, cinnamon, salt, baking powder and baking soda. Stir the flour mixture into the butter mixture until just combined. Then stir in the oats, raisins and chocolate chips.
Form the dough into 1.5 inch balls. Flatten onto a baking sheet. Bake for 13-15 minutes until golden.

Saturday, August 13, 2011

My Pasta Puttanesca


Lots of recipes are just variations of other recipes. Everyone adds their own special touch, adapts recipes to their specific tastes, or uses what they have on hand or in season.

In this case, I made Pasta Puttanesca. Basically, it's a tomato sauce with anchovies, garlic, onions, olives, capers, chili flakes and Italian Parsley. I made it my own by adding a whole bunch of kale to bulk it up and using whole wheat pasta.

You could top this with cheese, or eat it just drizzled with some extra virgin olive oil. However you deal with this flavorful sauce, it is sure to please!

My Pasta Puttanesca
Serves 4 people

375 grams Whole Wheat Spaghetti
1 tbsp Extra Virgin Olive Oil
4 cloves Garlic, minced
1/4 Large Red Onion, chopped
1/2 Red Bell Pepper, thinly sliced
2 tbsp Anchovy Paste
1/3 cup Sliced Green Spanish Olives
3 tbsp Capers
1 tsp Red Pepper Flakes
1 1/2 tsp Dried Oregano
1/2 tsp Cracked Black Pepper
1- 28 ounce can Diced Tomatoes
3 cups Chopped Kale
1 1/2 cups Italian Parsley, chopped

Cook the spaghetti as per the package instructions until al dente. Drain and set aside.

In a large pan, heat olive oil over medium high heat. Add garlic, onion, bell pepper and anchovy paste and sautee until the onions and peppers just start to soften. Stir in the olives, capers, red pepper flakes, oregano, and black pepper. Then stir in the tomatoes. Let simmer for a few minutes, then stir in the kale and parsley until just wilted. Toss in the pasta. Serve with a drizzle of extra virgin olive oil.

Saturday, August 6, 2011

Whole Wheat Flax Tortillas


Bread. Starch. All that stuff that people nowadays are avoiding. For me, it's a staple food. And it's available everywhere. Yet so often, the breads in the grocery stores are packed with stuff that we have never even heard of and then end up sitting on shelves for who knows how long. Then, the consumer takes that bread home, slathers it in stuff to make it taste good, and eats it.

Well, for starters, the bread should taste good. By itself. Alone. With no accompaniments. And then, topped with a really good jam, salted butter, or cured meat, that bread is taken to a whole new level. Yes, that is what bread should taste like!

That is why I try to make my own bread. I would say I make a loaf every week. And it has just 4 ingredients. Good flour (whole wheat, white, rye, multigrain or a mix), yeast, salt and water. That's it.

But lately I have found myself gravitating towards flat breads. I like them because they are easy to eat during the week. They serve as a vessel for a whole variety of things, such as left over chicken and alfalfa sprouts, ground pork with barbeque sauce, veggies and cream cheese. You name it, it can be wrapped and eaten in a flat bread.

So, I decided to try to make my own. After all, $3 for 6 tortillas doesn't go far. Plus, they are once again packed with so many unnecessary ingredients that I am sure they cannot be that healthy.

Yes, it did take a little more labor than making a loaf of bread, however, there was no rising time. And the result was fantastic. I let them cool, put them in a ziplock bag, and left them in the fridge for a week of tortilla pleasure!

Whole Wheat Flax Tortillas
Makes 12 tortillas

2 cups Whole Wheat Flour
1 1/2 cups White Flour
1/2 cup Ground Flax Seeds
1 tsp Baking Powder
1 tsp Salt
1/4 cup Canola Oil
1 1/2 cups Warm Water

In a large bowl, mix together all dry ingredients.
Add water and oil and mix until just incorporated.
Knead for a few minutes to form a soft, smooth dough.
Divide into 12 balls. Cover with a towel.
Take one ball and roll it into about a 10 inch round (roll it as thin as possible).
Heat a flat griddle pan or grill pan over medium high heat.
Place the rolled out tortilla onto the heated pan and cook for about 30 seconds on each side, or until air pockets start to form in the tortilla.
Use immediately or store in a ziplock bag in the fridge or freezer until ready to use.